Movement is an important part of video games. It helps bring your game to life. Smooth character movement gives players a good sense of control. On the other hand, poor character movement can make a game unnecessarily difficult. In addition, poor character movement may make your game completely unplayable for some players.
This tutorial features an GBDK-2020 gameboy example later. The source code for that tutorial can be found on Github. See my How to make Games for Gameboy tutorial series for more info.
The Modern Solution
In modern engines, like Godot, Unity, or Unreal Engine smooth movement is achieved using floating-point numbers. A floating-point number (Also called a “Float”) is a number with a decimal place.
| Integer | 1 |
| Floating-Point Number | 1.2 |
With floating-point numbers, variables can change in smaller increments compared to normal integers. For integers, you can increase/decrease by no less than 1.
| Integers | 1 | 2 | 3 | 4 | 5 | 6 | 7 | 8 | 9 | 10 |
For floating-point numbers, they can increase by much smaller amounts. For example:
| Floating-Point Numbers | 1.1 | 1.2 | 1.3 | 1.4 | 1.5 | 1.6 | 1.7 | 1.8 | 1.9 | 2.0 |
The Retro Solutions
However, when developing for some retro game consoles (like The Gameboy), floating-point numbers are not a efficient. We can only efficiently utilize Integers. Each integer will represent one pixel, and We cannot handle for the (sub-pixel) decimal values between two pixels. The resolution for this problem, called Sub-Pixel Resolution, uses “Scaled Integers”. Scaled Integers is commonly and generally called “Fixed-Point Arithmetic“.
Conceptually, each variable will have a “face” value and a “true” value. The “face” value is the variable’s as-is. The “true” value, simply put, is the “face” value divided by a consistent integer value.
Basic Example
Let’s imagine we have a variable called “playerX“. “playerX” is where we want to draw the player at. In this example, we are going to use 16 as our scale amount.
If the “true” value of “playerX” is 1.6, then the face value for “playerX will be 25 (remainder is discarded). When we want to move the player, we can increase/decrease “playerX” freely. However, when drawing our player, we need to divide by our scale amount: 16.
One thing to note is that this isn’t perfect. 25/16 (our face value divided by our scale amount) equals 1.5625. However because the decimal remainder is discarded, Drawing the player at 25/16 will result in the player essentially being drawn at 1. Here’s a table for visualization
| True Value | 1 | 1.0625 | 1.125 | 1.875 | 1.25 | 1.3125 | 1.375 | 1.475 | 1.5 |
| Integer Face Value | 16 | 17 | 18 | 19 | 20 | 21 | 22 | 23 | 24 |
| Integer Draw Location (Remainder Discarded) | 1 | 1 | 1 | 1 | 1 | 1 | 1 | 1 | 1 |
Bit Shifting & Powers of 2
Thanks to Toxa for help on this section. (Check out his gameboy game Color Lines DX, published by Ferrante Crafts)
On retro consoles, division by non “powers of 2” can be slow. So, with scaled integers, always use a power of 2 as our scale amount.
In addition, rather than dividing by that scale amount, we should perform bit shifting. Bit shifting is the same as multiplying/dividing by powers of 2, except its faster.
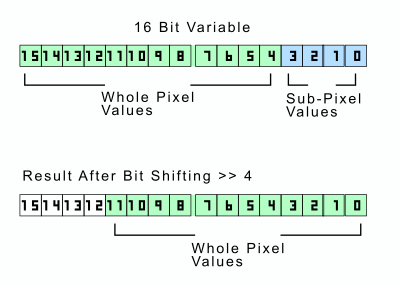
For bit-shifting, we’ll shift whichever “power of 2” our scale amount is. If our scale amount is 16, we’ll shift by 4. Since 16 is 24 ( 2 “to the fourth power”). Here’s table for visualization. (Although it’s literally just a table showing powers of 2)
| Scale Amount | Bit Shift Amount |
| 2 | 1 |
| 4 | 2 |
| 8 | 3 |
| 16 | 4 |
| 32 | 5 |
| 64 | 6 |
| 128 | 7 |
Here’s a visualization of Sub-Pixel Resolution, complimentary of @bbbbbr (who also makes Gameboy Games . Check out Petris and GB Wordyl, Published by Ferrante Crafts.)
Sub-Pixel Resolution Alternatives
Despite being 30 years old Gameboy’s processor can run at 60 frames-per-second. Incrementing an integer 60 times in one second can lead to insanely fast & uncontrollable movement. Without sub-pixel resolution, developers have 3 (lesser) choices for reasonable & smooth character motion.
- Accepting possibly uncontrollable motion
- Slowing down the frame rate of the entire game
- Using a counter to change character motion variables
Uncontrollable motion is out of the question, as it will ruin the player’s experience.
Slowing down the frame rate of the entire game will effect almost every other visual/physical aspect of the game, and also make changing other visual/physical aspects confusing.
Using a counter to change character motion variables solves our previous problem. I use it in my How to make Flappy Bird for the Nintendo Gameboy tutorial. However, it adds complexity when dealing with multiple variables.
Sub-Pixel Resolution Actual Example
Here’s a an actual Gameboy example of Sub-Pixel Resolution. In this example, move “Mario” left & right (using the d-pad) to collect the falling mushrooms. The mushrooms will fall from the top of the screen at a constant rate.
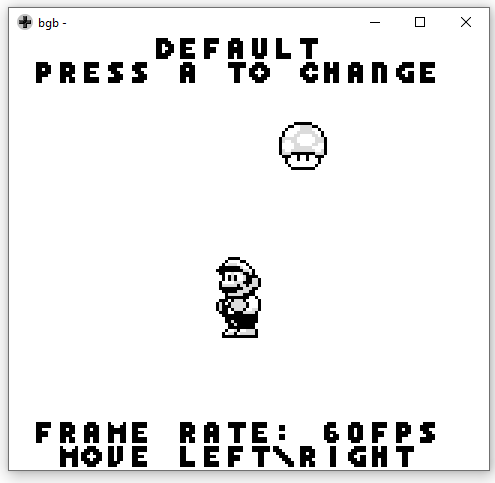
The sprites are from Super Mario Land 2: Six Golden Coins. I found them on The Spriters Resource.

The A button can be used to toggle between 4 different modes:
- Default Motion
- Slowing down the frame rate for the entire game
- Using a Counter
- Sub-Pixel Resolution
A switch-case statement is used to switch between logic. The following variables should be noted:
- movement – This is an signed integer value. If the player isn’t pressing left or right, it’s value is 0. Otherwise, it’s value is -1 when the user is pressing left, and +1 when the user is pressing right.
- marioFrame – This value is changed by the following logic method. It can range between 0 and 4 inclusive.
- marioX – This value will be changed by the following logic methods.
- marioDrawFrame – This is the actual frame that Mario will be drawn with. The reason it is separate from the marioFrame variable is for consistent logic flow. With Sub-Pixel Resolution, we’ll set the value of this variable to be the “true” value of the marioFrame variable.
- marioDrawX – This is the actual x position mario will be drawn at. The reason it is separate from the marioX variable is for consistent logic flow. With Sub-Pixel Resolution, we’ll set the value of this variable to be the “true” value of the marioX variable.
NOTE: Because of potentially large values, the variables need to be 16-bit
Default Motion
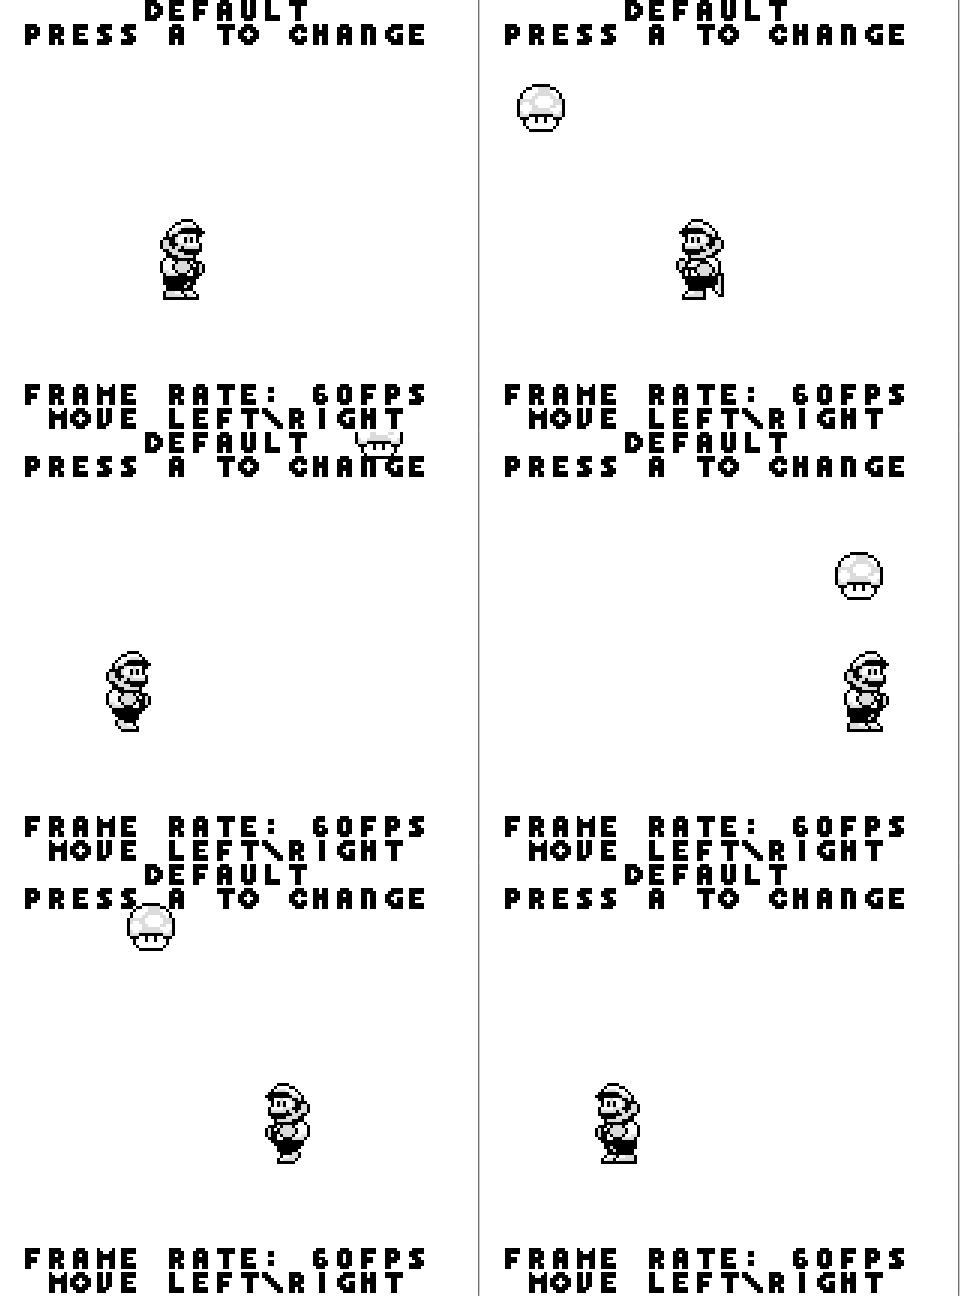
Using the first method, Mario moves at a good smooth speed. However, since it’s animation frame increments each frame, he’s animated way too fast.
// This is okay for certain move speeds( It can't do less than 1px/second though)
// However, animation is out of control
default:
    if(movement!=0){
        marioX+=movement*2;
        marioDrawX=marioX;

        // Increase mario's frame
        // Loop background after 3
        if(++marioFrame>=MARIO_RUN_FRAMECOUNT)marioFrame=0;

        // Frame 0 is or standing
        // Increase by one for running frames
        marioDrawFrame=1+marioFrame;
    }else{

        // Draw with our standing frame 0
        marioFrame=0;
        marioDrawFrame=0;
    }
    break;
Slowing down the frame rate
Using the second method, we fix the problem with Mario’s fast animation. However, the result isn’t very smooth. In addition we’ve slowed down the mushroom.
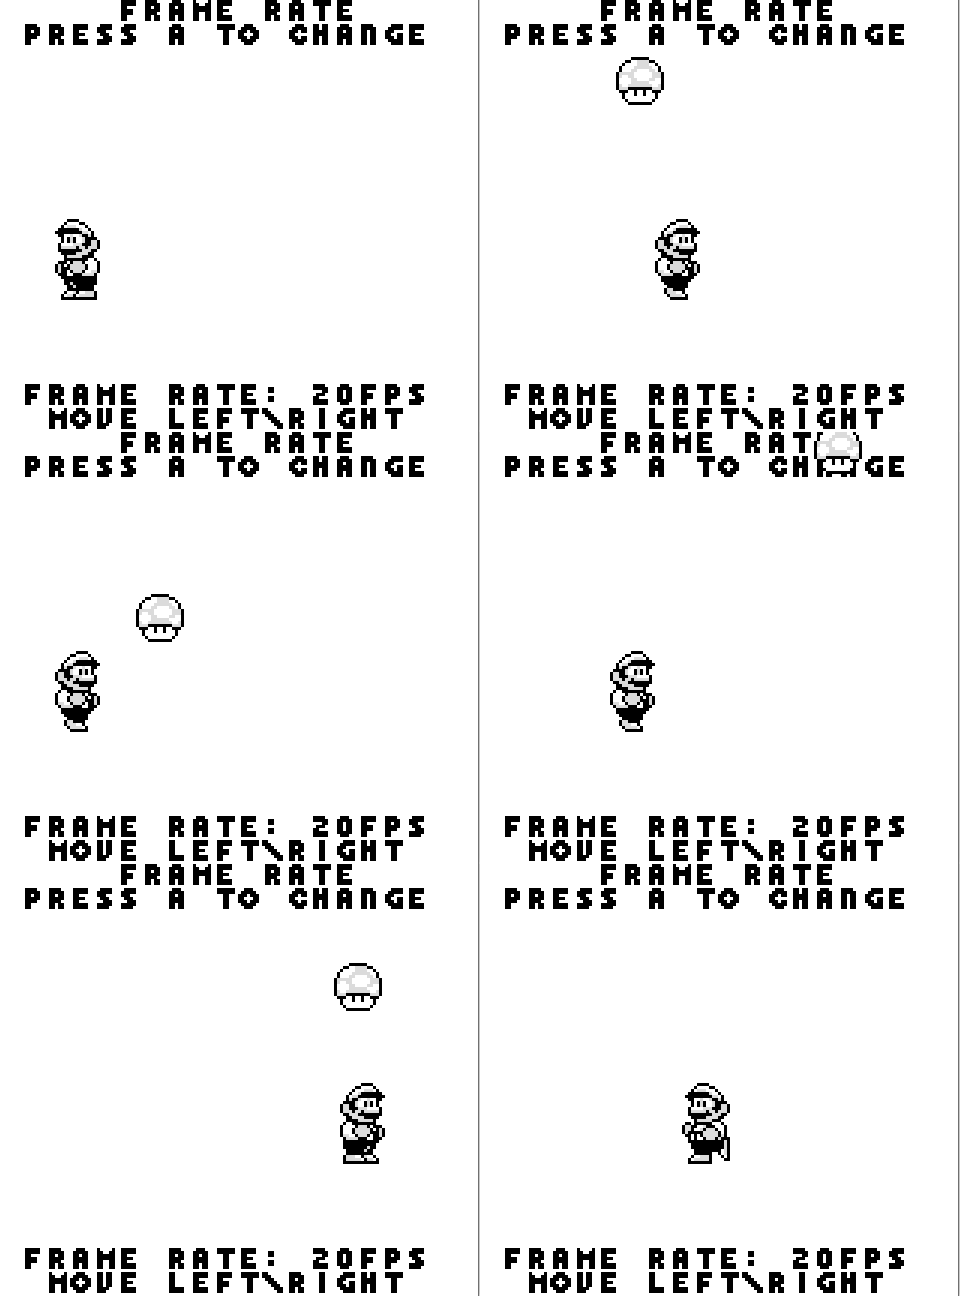
Since we’ve slowed down the frame rate, we have to increase how fast we move Mario.
// With the frame rate method , the logic is just like the default method
// Accept we need to increase some values more since code executes less often
case FRAME_RATE:
    if(movement!=0){
        marioX+=movement*5;
        marioDrawX=marioX;

        // Increase mario's frame
        // Loop background after 3
        if(++marioFrame>=MARIO_RUN_FRAMECOUNT)marioFrame=0;

        // Frame 0 is or standing
        // Increase by one for running frames
        marioDrawFrame=1+marioFrame;
    }else{

        // Draw with our standing frame 0
        marioFrame=0;
        marioDrawFrame=0;
    }
    break;
Using a Counter
In the third method, adjusting the frame rate, we’ve fixed the previous problems.
- Mario runs at an acceptable pace.
- The mushroom falls at our desired speed.
- Mario’s animation isn’t insanely fast.
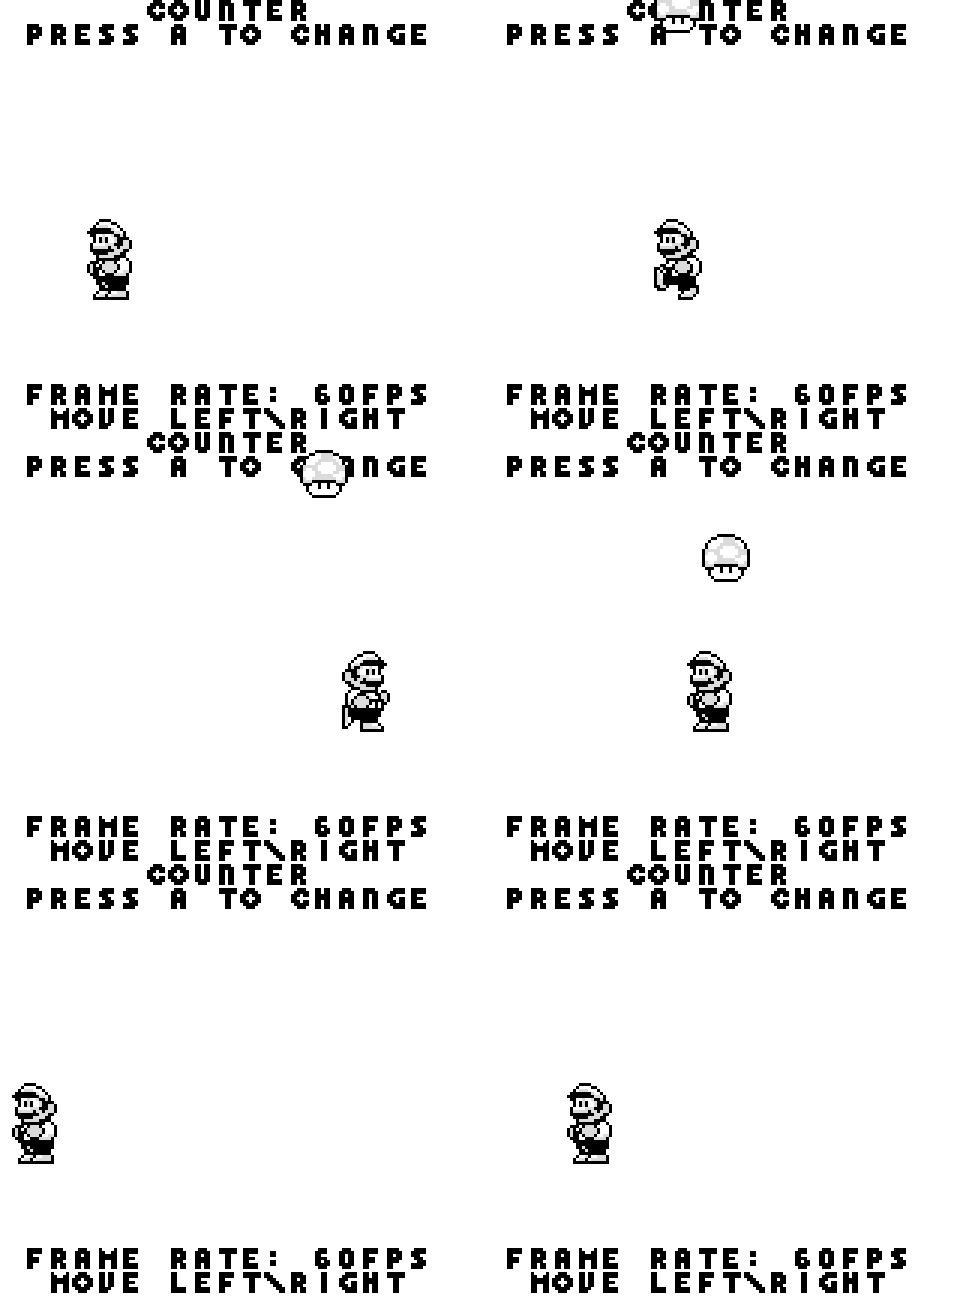
With this method, Mario is moved 5 pixels every 3 frames. In addition, Mario is animated 1 frame every 6 frames. However, this method is not very smooth. Also, the code, when only using 2 variables, is slightly more complicated. This is because we have to increment, check, and reset 2 different counter variables. One for motion (simply called “counter”), and one for animation (called “runCounter”).
// In the counter method, we use a extra counter to increment values at a slower rate
// This avoids the issue of having to adjust frame rate.
case COUNTER:
    if(movement!=0){

        // Change Mario's X position by 5 every 3 frames
        if(++counter>=3){
            counter=0;
            marioX+=movement*5;
            marioDrawX=marioX;
        }

        // Increase our animation counter until it reachces 6, then reset
        if(++runCounter>=6){
            runCounter=0;

            // Increase mario's frame
            // Loop background after 3
            if(++marioFrame>=MARIO_RUN_FRAMECOUNT)marioFrame=0;

            // Frame 0 is or standing
            // Increase by one for running frames
            marioDrawFrame=1+marioFrame;
        }
    }else{

        // Reset our counters
        counter=0;
        runCounter=0;

        // Draw with our standing frame 0
        marioFrame=0;
        marioDrawFrame=0;
    }
    break;
Sub-Pixel Resolution
The fourth method, sub-pixel resolution (via scaled integers), solves all the previous problems.
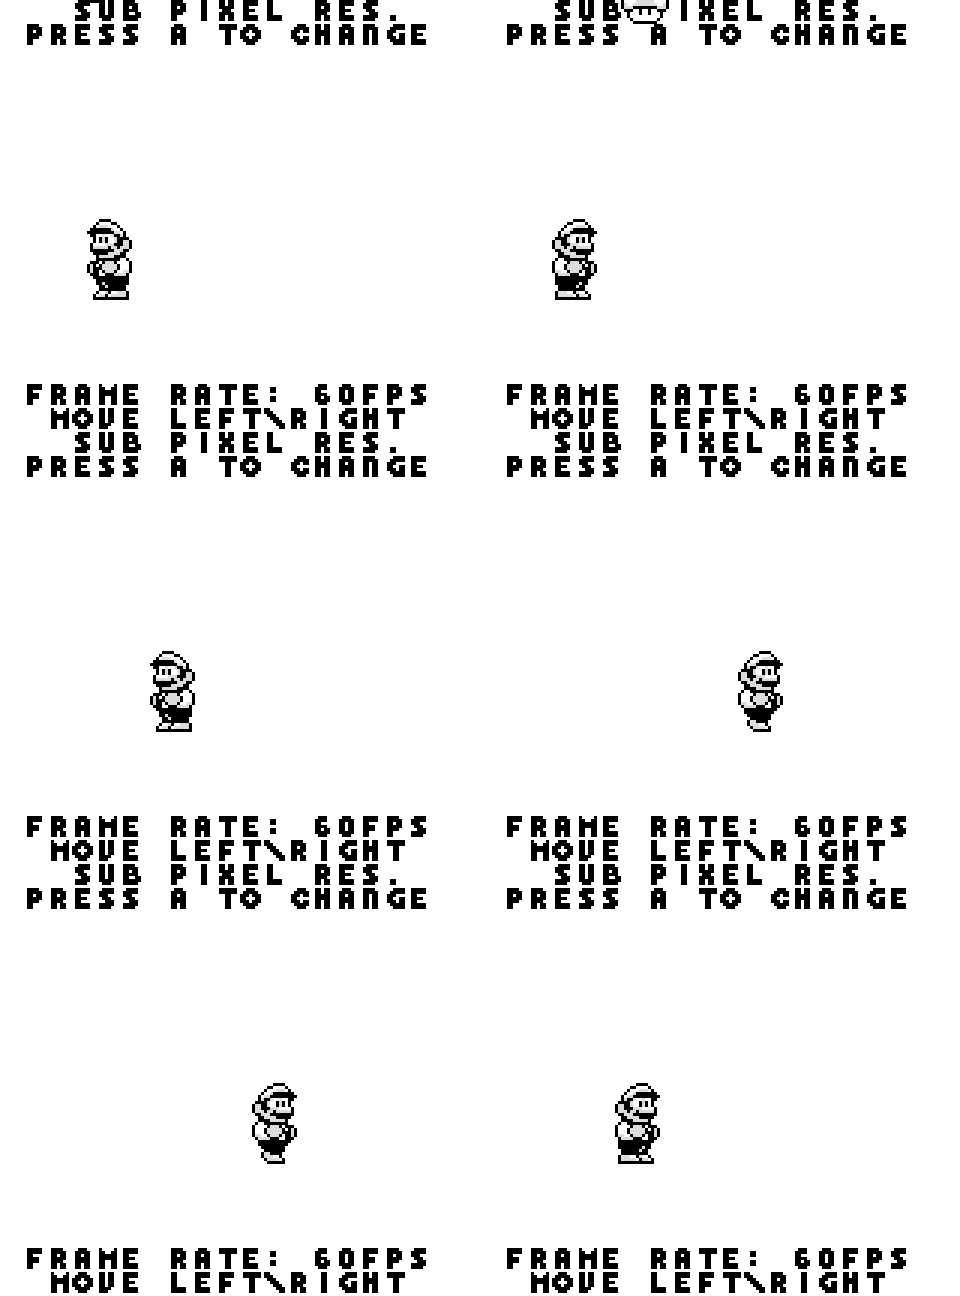
Both the “marioX” and “marioFrame” variables are scaled integers. Our scale amount is 16 (16 is the 4th power of 2, so we shift by 4 bits). We can add to them normally. Adding 16 is equivalent to adding 1px. Adding 4 is equivalent to adding 0.25px. We need shift the bits of the “face” values rightward in two situations.
- When checking/using what animation frame Mario is on.
- Mario’s X to be drawn at.
// This is the best method
// We don't need an extra variable, and we have more control over slower rates
case SUB_PIXEL_RESOLUTION:

    // Increase/Decrease the "face" value
    marioX+=movement*25;

    // Draw mario at the true value
    marioDrawX=marioX>>4;

    // If the player is moving
    if(movement!=0){

        // Increase mario's frame by 2
        // This is a sub-pixel resolution value
        marioFrame+=2;

        // Increase mario's frame
        // Loop background after 3
        // Shift right 4 bits to get it's true value
        if((marioFrame>>4)>=MARIO_RUN_FRAMECOUNT)marioFrame=0;

        // Frame 0 is or standing
        // Increase by one for running frames
        // Shift right 4 bits to get it's true value
        marioDrawFrame=1+marioFrame>>4;
    }else{

        // Draw with our standing frame 0
        marioFrame=0;
        marioDrawFrame=0;
    }
    break;
Analyzing the Demo
Minus the comments, you’ll notice that the third (counter) method’s logic is slightly more complex. This is because we have to manage 2 counter variables. Within the scope of this demo, that may seem alright. However, when you think about a full game and all the different variables in it; possibly a lot of different counters will be needed.
If we compare the third (counter) method, and fourth (sub-pixel resolution) method; we can see what makes the fourth method more smooth.
The third method moves Mario’s X position 5 pixels every 3 frames.
| Using a counter for MarioX | ||||||||||||
| Frame | 1 | 2 | 3 | 4 | 5 | 6 | 7 | 8 | 9 | 10 | 11 | 12 |
| Counter | 0 | 1 | 2 | 3 | 0 | 1 | 2 | 3 | 0 | 1 | 2 | 3 |
| Mario X | 0 | 0 | 0 | 5 | 5 | 5 | 5 | 10 | 10 | 10 | 10 | 15 |
| Difference | 0 | 0 | 0 | 5 | 0 | 0 | 0 | 5 | 0 | 0 | 0 | 5 |
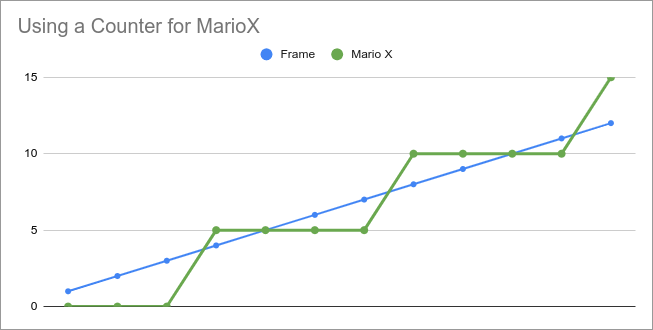
Graph courtesy of @bbbbbr
The fourth method move’s the “face” value for Mario’s X position by 25 each frame. The scale amount is 16
| Using Scaled Integers for MarioX | ||||||||||||
| Frame | 1 | 2 | 3 | 4 | 5 | 6 | 7 | 8 | 9 | 10 | 11 | 12 |
| Face Value | 0 | 25 | 50 | 75 | 100 | 125 | 150 | 175 | 200 | 225 | 250 | 275 |
| Mario X (True Value) | 0 | 1 | 3 | 4 | 6 | 7 | 9 | 10 | 12 | 14 | 15 | 17 |
| Difference | 0 | 1 | 2 | 1 | 2 | 1 | 2 | 1 | 2 | 2 | 1 | 1 |
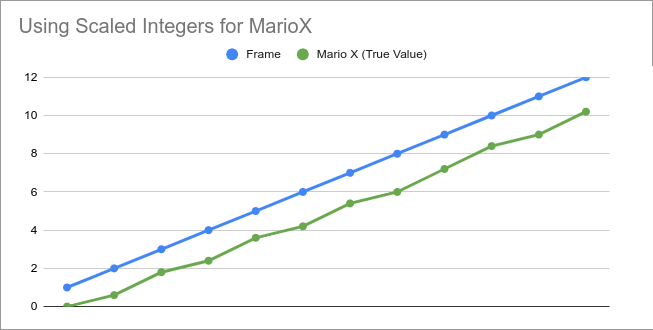
Note how in the fourth method, the difference between Mario’s X value’s never goes above 2. On the contrary, the same cannot be said for the third method. Where the difference jumps to 5 for one frame every 3 frames.
If we compare against using floating points. The ideal difference for the third method is 15/12 (The distance moved divided by the number of frames), which equals 1.25. The ideal difference for the fourth method is 17/12, which equals 1.4167. This is why the fourth method appears more smooth. The difference in the final value is more consistently closer to the ideal situation using Floats.
I hope you found this helpful. Check out my How to make Games for Gameboy tutorial series if you want to learn more about making Gameboy games. I also utilize this in my How to make Pacman for Gameboy tutorial.
The source code is available for free on GitHub. You can run this example using a Gameboy emulator like BGB or Emulicious.


