
In this tutorial you will learn How to make Pacman. It will be based around a “starter repository“, which will have all files, variables, and method declarations already created for you. If you want to see the completed version, the source code is also on github here: https://github.com/LaroldsJubilantJunkyard/pacman-gameboy This tutorial may look very large, but most of that size goes towards the images and the code snippets. The largest chunk of text is only 3-4 paragraphs.
Introduction
This tutorial is going to be using C Programming and the GBDK 2020 library. If you are not familiar with GBDK 2020, refer to the GBDK 2020 Documentation or my own “How to make a Gameboy Game” tutorial series. Additionally, you can find a link to the GBDK discord servers on the GBDK 2020 Github Page
This tutorial won’t contain a menu unlike my “How to make Flappy Bird” and “How to make Space Invaders” tutorials. I wanted to focus purely on gameplay with this tutorial. The graphics for Pacman are from The Spriters Resource, specifically for Pac-Man: special color edition.
Disclaimer: I’m not a genius programmer, or a Gameboy Game Development master. I just like to make games. With these tutorials (and this site) I hope that I can help others who want to make games. Some of my methods may not be the most efficient, but they work. I hope in creating this tutorials, I’ll learn more. As the song goes: “In learning, you will teach; and in teaching, you will learn.”
Quick Background
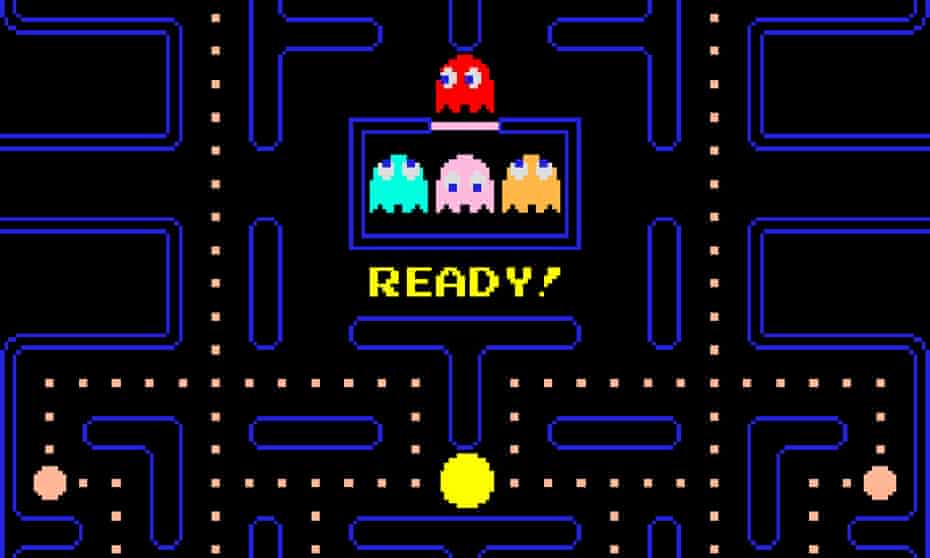
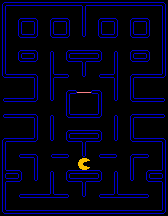
Pacman is a classic Arcade game. Originally released in 1980 by Namco, Pacman has been on virtually ever console. The gameplay has remained the same through decades, with slight variations appearing occasionally. The premise is simple: Eat all the dots, while avoiding the 4 menacing ghosts.
Ghosts AI Credit
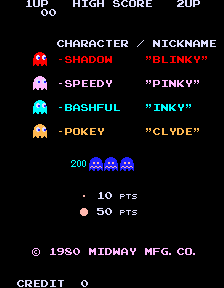
One of the important parts of Pacman are it’s ghosts. Named Blinky/Shadow (red), Inky/Bashful (blue), Pinky/Speedy (pink), and Clyde/Pokey (orange); these ghosts will chase Pacman around the maze using their own individual AI. Giving credit where due, the logic used for this tutorial comes from this YouTube video on “Pac-Man Ghost AI Explained” by Retro Game Mechanics Explained. Some of it will be explained in this tutorial, but I recommend watching that video. The creator does a good job at explaining things.
Getting Started
This tutorial will be split into multiple sections. Each section will focus around different parts of the game. Code will not be explained line-by-line. Instead, the entire function will be shown and each part of that function explained.
To follow along this tutorial on how to make Pacman, grab the starter repository and fill out each function as it is covered.
Downloading GBDK 2020
To get started, you need to have the latest GBDK 2020 version installed. As of February 14th, 2022, the latest version is 4.0.6. Here is a link to that release, where you can find the necessary files. The source code isn’t needed, only the binaries. Once you have those, extract the GBDK folder to your computer. I’m using windows. I put mine on my C Drive at C:/GBDK.
Cloning/Downloading the Starter Repository
Once you have the files for GBDK 2020, you’ll need to clone/download the starter repository. As previously explained, the starter repository will have many things already setup for you. Being completely honest, the purpose for this structure is to make the tutorial writing process quicker for me. Having things setup already prevents me from having to talk about declaring variables, creating files, and/or setting up .h header files.
Using Git
To clone the repo you’ll need git installed. Git is a free version control system. It is used all throughout the IT industry. When you know where you want to put the starter repository, you an clone it using the following command:
git clone https://github.com/LaroldsJubilantJunkyard/pacman-gameboy-starterThat command will create a folder called “pacman-gameboy-starter”. In that folder will be the contents of the starter repository.
Without using Git
If you do not have git, the starter repository can be downloaded in zip form here. Once downloaded, extract the “pacman-gameboy-starter” folder to wherever you like.
Creating and Running a Gameboy ROM file
Included in the starter repository is a make.bat script. When you run this script, a Pacman.gb ROM file will be created (If there are no compile errors).
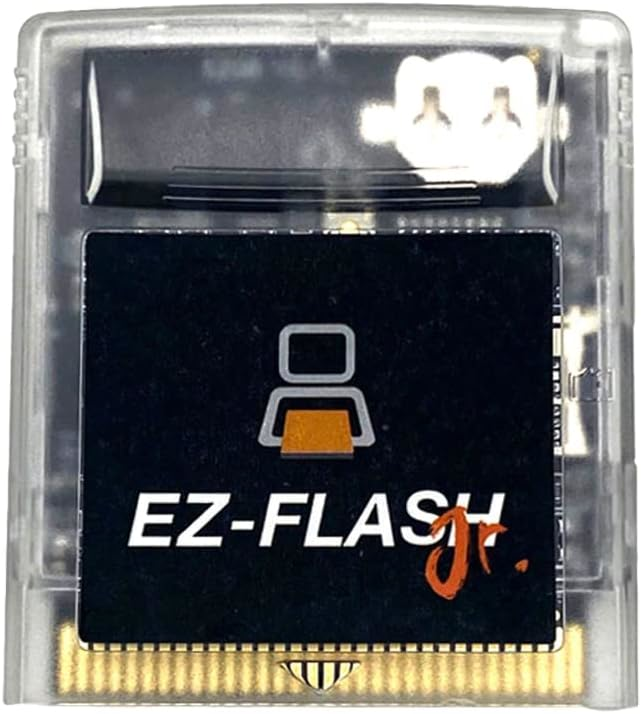
To run this ROM file, you can load it in a emulator such as BGB or Emulicious. If you want to test it out on actual hardware, a EZ Flash JR or Everdrive can be used. These will allow you to load and play multiple games on a single cartridge.
If you want to put the ROM file on it’s own dedicated cartridge, Insider Gadgets has affordable hardware for that. There are also people online, like Ferrante Crafts, that can assist you with that
Generating our Graphics
The Graphics in all Gameboy games are made from 8×8 tiles. The Gameboy and GBDK 2020 framework cannot handle modern image formats, so we need the data for the all of our tiles in a .c and .h file. Luckily we have a tool to assist us with this: png2asset. Png2asset is a part of the GBDK 2020 framework. This tool, will take a PNG image file, and convert it to .c and .h files that GBDK 2020 can use.
NOTE: Alternatively, we could use GBTD (Gameboy Tile Designer) & GBMB (Gameboy Map Builder). But i find using Png2asset and working in aseprite to be my preference.
A scripts that converts our PNG images to .c and .h files has already been included in the starter repository. It is Called from the make.bat batch file. This file, “generate-graphics.bat”, will utilize png2asset to do all of the hard work.
- Pacman, Ghosts, and the TargetTiles PNG files are going to be used as sprites/metasprites.
- The Map/maze, Dots, text, and numbers are going to be used on the background/window layers.
More info on png2asset here.
%PNG2ASSET% graphics\Pacman.png -c source\gen\default\graphics\Pacman.c -sw 16 -sh 16 -spr8x16 -keep_palette_order -noflip
%PNG2ASSET% graphics\PacmanEatenDown.png -c source\gen\default\graphics\PacmanEatenDown.c -sw 16 -sh 16 -spr8x16 -keep_palette_order -noflip
%PNG2ASSET% graphics\PacmanEatenLeft.png -c source\gen\default\graphics\PacmanEatenLeft.c -sw 16 -sh 16 -spr8x16 -keep_palette_order -noflip
%PNG2ASSET% graphics\PacmanEatenRight.png -c source\gen\default\graphics\PacmanEatenRight.c -sw 16 -sh 16 -spr8x16 -keep_palette_order -noflip
%PNG2ASSET% graphics\PacmanEatenUp.png -c source\gen\default\graphics\PacmanEatenUp.c -sw 16 -sh 16 -spr8x16 -keep_palette_order -noflip
%PNG2ASSET% graphics\Ghosts.png -c source\gen\default\graphics\Ghosts.c -sw 16 -sh 16 -spr8x16 -keep_palette_order -noflip
%PNG2ASSET% graphics\GhostsScared.png -c source\gen\default\graphics\GhostsScared.c -sw 16 -sh 16 -spr8x16 -keep_palette_order -noflip
%PNG2ASSET% graphics\GhostsEaten.png -c source\gen\default\graphics\GhostsEaten.c -sw 16 -sh 16 -spr8x16 -keep_palette_order -noflip
%PNG2ASSET% graphics\TargetTiles.png -c source\gen\default\graphics\TargetTiles.c -sw 8 -sh 16 -spr8x16 -keep_palette_order -noflip


%PNG2ASSET% graphics\BlackSquare.png -c source\gen\default\graphics\BlackSquare.c -map -use_map_attributes -noflip  -keep_palette_order
%PNG2ASSET% graphics\Map.png -c source\gen\default\graphics\Map.c -map -use_map_attributes -noflip  -keep_palette_order
%PNG2ASSET% graphics\Dots.png -c source\gen\default\graphics\Dots.c -map -use_map_attributes -noflip  -keep_palette_order
%PNG2ASSET% graphics\Numbers.png -c source\gen\default\graphics\Numbers.c -map -use_map_attributes -noflip -keep_palette_order
%PNG2ASSET% graphics\OneUpText.png -c source\gen\default\graphics\OneUpText.c -map -use_map_attributes -noflip -keep_palette_order
%PNG2ASSET% graphics\ReadyText.png -c source\gen\default\graphics\ReadyText.c -map -use_map_attributes -noflip -keep_palette_order
%PNG2ASSET% graphics\HighText.png -c source\gen\default\graphics\HighText.c -map -use_map_attributes -noflip -keep_palette_order
This file will already be setup for you, you’ll just need to update the following line to where your GBDK installation is located:
SET GBDK_HOME=C:/gbdkOur Game’s Entry Point
When our ROM is loaded, the gameboy/emulator is going to run the contents of the “main” function. This function is located in our main.c file. Inside this function we will setup & start gameplay, and then start an infinite loop. We use a infinite loop because if the main function were to end, the Gameboy would no longer process any of our logic. Which would result in a frozen game. Here is what our “main” function should look like:
void main(){

    SetupGameplay();
    StartGameplay();

    while(TRUE){

        joypadPrevious=joypadCurrent;
        joypadCurrent=joypad();

        // Allow enabling a debug mode
        if((joypadCurrent & J_SELECT) && !(joypadPrevious & J_SELECT)){
            enableDebug = !enableDebug;
        }

        UpdateGlobalFrameCounters();
        UpdateHUD();
        UpdateAllGhosts();
        UpdatePacman();
        HandleDotConsumption();
        UpdateCameraPosition(5);

        // If pacman is dead, pereform his death animation
        // NOTE: this function contains a while loop and some wait_vbl_done's
        // Thus why we added _halting on it's name for clarity
        if(pacman.state==0){

            // If we are not yet resetting
            // Show the pacman death animation
            if(!ghostsResetting)PacmanDeathAnimation_Halting();
            ghostsResetting=1;

            // Setup gamelay
            if(ghostsReady){
                SetupGameplay();
                StartGameplay();
            }
        }

        // If there are no more balls remaining
        // We want to blink the screen blue and white in celebration
        // NOTE: this function contains a while loop and some wait_vbl_done's
        // Thus why we added _halting on it's name for clarity
        else if(dotsRemaining==0){
            BlinkLevelBlueAndWhite_Halting();
            SetupGameplay();
            StartGameplay();
        }

        wait_vbl_done();

    }
}
Inside the infinite game loop, the first thing we do is handle joypad input. We save the previous state of the joypad, and get the current state of the joypad. I’ve included an extra piece of logic to enable/disable a simple “debug mode” (More on that later). I have a tutorial on How to handle joypad input if you want to read more about that.
After polling for input, we’ll update all the different parts of the game.
- Pacman – Positioning, Animating, and Moving Pacman
- The 4 Ghosts – Positioning, Animating, and Moving The Ghosts using a basic AI
- Dots – Letting Pacman consume the dots & Power pellets
- The HUD – Showing the score and high score.
- Our Camera Position – To make sure Pacman stays in view.
After all of our various elements are updated we’ll handle two different scenarios before calling our wait_vbl_done() function. The first scenario is Pacman being dead. Pacman is considered dead when his “state” variable is set to 0. In that case we just want to restart the game. The second scenario is that we have collected all of the dots/pellets. In that case we want to flash the screen and also restart.
Our “wait_vbl_done()” function wait’s for the gameboy’s vertical blank phase to be completed before continuing. This creates a consistent frame rate for gameboy games.
Setting up Gameplay & The Maze
The first thing we’ll do is setup gameplay and the maze. Once we have a them setup we can move onto Pacman, the dots/pellets, and then the ghosts.
The first part of setting up gameplay is turning things on. This includes the screen, the background, the window, the sprites, and sound. All of this will be done in our “SetupGameplay” function.
void SetupGameplay(){

    // This enables Sound
    // these registers must be in this specific order!
    NR52_REG = 0x80; // is 1000 0000 in binary and turns on sound
    NR50_REG = 0x77; // sets the volume for both left and right channel just set to max 0x77
    NR51_REG = 0xFF; // is 1111 1111 in binary, select which chanels we want to use in this case all of them. One bit for the L one bit for the R of all four channels

    DISPLAY_ON;
    SHOW_SPRITES;
    SPRITES_8x16;
    SHOW_BKG;
    SHOW_WIN;

    score=0;

    SetupVRAM();
    SetupHUD();
    SetupDots();
    SetupPacman();
    SetupGhosts();

    // We want all the ghosts, the camera, and pacman in position before the upcoming "ready" delay
    // Otherwise, they'll jump to the correct location after it's completed
    UpdateScore();
    UpdateCameraPosition(1);
    DrawGhost(0);
    DrawGhost(1);
    DrawGhost(2);
    DrawGhost(3);
    DrawPacman();

    for(uint8_t i=0;i<21;i++){
        for(uint8_t j=0;j<27;j++){

            TileSideWalkability[i][j][DOWN]=CheckBackgroundTileIsWalkable(i,j+1);
            TileSideWalkability[i][j][UP]=CheckBackgroundTileIsWalkable(i,j-1);
            TileSideWalkability[i][j][RIGHT]=CheckBackgroundTileIsWalkable(i+1,j);
            TileSideWalkability[i][j][LEFT]=CheckBackgroundTileIsWalkable(i-1,j);
        }
    }


}
We enable sound using the NR50, NR51, and NR52 registers. Once it is turned on, we utilize GBDK 2020 provided macros for turn the Gameboy’s display on and showing our sprites/window/background. To save on sprites, our sprites will be 8×16 in size. For more information check out the following tutorials:
- Drawing on the Background and Window Layers
- Drawing and Moving Sprites in Gameboy Games
- How to play a sounds on Gameboy Hardware
Setting up VRAM
Next we default our score to 0, and setup our various game elements. The setup logic for the ghosts, Pacman, the HUD, and the dots will be explained later. Here is what happens in our “SetupVRAM” function:
void SetupVRAM(){

    // Use the palettes from these two graphics
    // For simplicity, all sprite PNGs use the same palette set
    // For simplicity, all background/map PNGs use the same palette set
    set_sprite_palette(0,5,Pacman_palettes);
    set_bkg_palette(0,5,Map_palettes);

    // Pur our backround tiles in VRAM
    set_bkg_data(0,Map_TILE_COUNT,Map_tiles);
    set_bkg_data(DOTS_TILES_START,Dots_TILE_COUNT,Dots_tiles);
    set_bkg_data(NUMBERS_TILES_START,Numbers_TILE_COUNT,Numbers_tiles);
    set_bkg_data(READYTEXT_TILES_START,ReadyText_TILE_COUNT,ReadyText_tiles);
    set_bkg_data(ONEUPTEXT_TILES_START,OneUpText_TILE_COUNT,OneUpText_tiles);
    set_bkg_data(HIGHTEXT_TILES_START,HighText_TILE_COUNT,HighText_tiles);
    set_bkg_data(BLACKSQUARE_TILES_START,BlackSquare_TILE_COUNT,BlackSquare_tiles);

    // Pur our sprite tiles in VRAM
    set_sprite_data(GHOSTS_SPRITES_START,Pacman_TILE_COUNT,Ghosts_tiles);
    set_sprite_data(GHOSTS_SCARED_SPRITES_START,GhostsScared_TILE_COUNT,GhostsScared_tiles);
    set_sprite_data(GHOSTS_EATEN_SPRITES_START,GhostsEaten_TILE_COUNT,GhostsEaten_tiles);
    set_sprite_data(TARGET_TILES_SPRITES_START,TargetTiles_TILE_COUNT,TargetTiles_tiles);

    // Draw the map
    VBK_REG=1; set_bkg_tiles(0,0,21,27,Map_map_attributes);
    VBK_REG=0; set_bkg_tiles(0,0,21,27,Map_map);

    // Get the tile we'll use at the blank tile
    blank=get_bkg_tile_xy(10,13);
}
All of our game’s tiles will be in loaded into the Gameboy’s VRAM (Video Random Access Memory). Here’s everything that our SetupVRAM function loads into the Gameboy’s VRAM:


Once this has all been loaded into VRAM, we draw the map and save reference of our “blank” tile.
The Blank Tile
Our map is converted into .c and .h files using the previously mentioned GBDK 2020 tool: png2asset. This tool also prevents duplicate tiles from being created. With that said, Because this is process is semi-automated, we need a dynamic way to determine which tiles are not walls. For this, we’ll just select a tile in the middle area at 10,13. These non-wall, blank, tiles are the places where Pacman and the ghosts can walk. Also, on most of these blank tiles we will place the collectable dots.
Later, when checking if a tile is solid, we’ll check against this blank tile.
Positioning for Ready
After we setup VRAM, the ghosts, pacman, the dots, and the HUD; we need to position everything. This is because afterwards, in the StartGameplay function, we are going to draw the READY text and wait for small amount of time. If we do NOT pre-position everything beforehand , then things will randomly jump/snap into place once the time passes. It’s not crucial to gameplay, but it makes for a smoother experience.
The functions for the ghosts, pacman, the dots, and the HUD will be explained later. As for updating our camera’s position. If we mentally split the map into 3×3 grid. The camera only moves when pacman is in the middle row and/or the middle column.
We can directly change the background layer’s position using the SCX_REG & SCY_REG macros.
void UpdateCameraPosition(uint8_t dividor){

    // Get pacman's position
    uint8_t playerX=pacman.column*8+Directions[pacman.direction].x*(pacman.move>>4);;
    uint8_t playerY=pacman.row*8+Directions[pacman.direction].y*(pacman.move>>4);;

    uint8_t sidebarWidth=56;
    uint8_t heightRemainder=Map_HEIGHT-DEVICE_SCREEN_HEIGHT*8;

    uint16_t targetCameraX=SCX_REG;
    uint16_t targetCameraY=SCY_REG;

    // Make the map follow pacman when in the middle third
    if(playerX<Map_WIDTH/3)targetCameraX=0;
    else if(playerX<(Map_WIDTH/3)*2)targetCameraX=((playerX-Map_WIDTH/3)*sidebarWidth)/(Map_WIDTH/3);
    else targetCameraX=sidebarWidth;

    // Make the map follow pacman when in the middle third
    if(playerY<Map_HEIGHT/3)targetCameraY=0;
    else if(playerY<(Map_HEIGHT/3)*2)targetCameraY=((playerY-Map_HEIGHT/3)*heightRemainder)/(Map_HEIGHT/3);
    else targetCameraY=heightRemainder;

    // The amount of change to get to the target position
    int16_t cameraXDiff=targetCameraX-SCX_REG;
    int16_t cameraYDiff=targetCameraY-SCY_REG;

    // Divide it some, so it's not instant
    SCX_REG+=cameraXDiff/dividor;
    SCY_REG+=cameraYDiff/dividor;
}
Pre-Determining Walkable Tiles
After we position everything to show our READY text, we’ll use a double for-loop to calculate which tiles are walkable, and which are not. This will all be stored in a three dimensional array in RAM. That double-for-loop, stores: For a given tile, which direction can someone on that tile move in. Later these values will be used by Pacman and the ghosts when determining if they can move in a specific direction. The function we created to help us with this is below.
uint8_t CheckBackgroundTileIsWalkable(int8_t nextColumn, int8_t nextRow){
if(nextColumn==10&&nextRow==11)return TRUE;
// To allow looping around, consider horizontally out of bound tiles walkable
if(nextColumn>=Map_WIDTH/8||nextColumn<0){
return TRUE;
}
// If this tile is blank, or one of the dots, it is walkabble
return get_bkg_tile_xy(nextColumn,nextRow)==blank ||
get_bkg_tile_xy(nextColumn,nextRow)==DOTS_TILES_START||
get_bkg_tile_xy(nextColumn,nextRow)==DOTS_TILES_START+1;
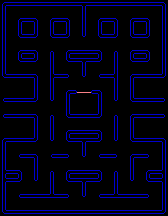
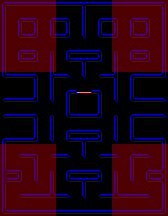
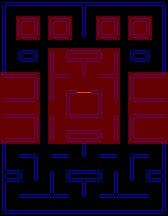
}This function’s main logic checks our background tiles against the blank tile, and against the tiles for the dots and the power pellets. Those tiles should be considered walkable. In the below image, red represents the areas we cannot walk on.
There are two special exceptions we need to consider:
- The middle ghost pit door tile
- Looping around from left to right or right to left
When this function is called, the ghost pit door will still be closed. Although we will later “open” it, since we are calculating tile walkability ahead of time, we nee to make sure it’s marked as walkable. Otherwise 3 of the 4 ghosts will get stuck inside of the ghost pit.
NOTE: Blinky (red) doesn’t start in the pit, so he would be free to go.
The second exception is when Pacman and the ghosts are looping around. We need to make sure that Pacman and the Ghosts can loop around smoothly without getting caught. To do this, we consider tiles outside of the map’s horizontal range to be walkable. This prevents ghosts from getting stuck when trying to loop around.
Starting Gameplay
When gameplay starts we are going to show the READY text, and delay for a moment.
After that delay we are going to “open the gate” to the ghost pit, hide the READY text, and default two variables to 0. We can “open the ghost pit” this simply by changing its tiles. The middle portion will be set to blank. The two edges, for aesthetics, will be changed too. We’ll simply borrow from nearby tiles that don’t have the pink “door”.
void StartGameplay(){

    // Show the ready text (above pacman, below the ghost pit)
    VBK_REG=1; set_bkg_tiles(8,15,6,1,ReadyText_map_attributes);
    VBK_REG=0; set_bkg_based_tiles(8,15,6,1,ReadyText_map,READYTEXT_TILES_START);

    delay(1000);

    // Open up the gap forthe ghosts
    // Inky, pinky, and clyde will not be able to escape
    VBK_REG=1; set_bkg_tile_xy(10,11,0);
    VBK_REG=0; set_bkg_tile_xy(10,11,blank);

    // Fully hide the blocker's edges
    // This won't affet their pathfinding, it's just for asthetics
    // Were going to borrow two of the tiles for the same type of edge
    set_bkg_tile_xy(9,11,get_bkg_tile_xy(8,9));
    set_bkg_tile_xy(11,11,get_bkg_tile_xy(12,9));

    // cover up our ready text
    VBK_REG=1; fill_bkg_rect(8,15,6,1,1);
    VBK_REG=0; fill_bkg_rect(8,15,6,1,blank);

    twoFrameAnimator=0;
    threeFrameAnimator=0;
}
Adding some counters to assist with animation
We’ve created two variables to assist with animation:
- twoFrameAnimator – This will be either 0 or 1. It will be used by the ghosts when in frightened, scatter, or chase mode.
- threeFrameAnimator – This will be either 0, 1, or two. This is used by pacman, and when hiding/showing the power pellets and 1-up text.
In the UpdateGlobalFrameCounters function these values increment/loop every 5 frames.
void UpdateGlobalFrameCounters(){
    counter++;
    if(counter>=5){
        counter=0;
        twoFrameAnimator++;
        threeFrameAnimator++;
        if(threeFrameAnimator>2){
            threeFrameAnimator=0;
        }
        if(twoFrameAnimator>1){
            twoFrameAnimator=0;
        }
    }
}
The Completion Animation
When Pacman eats all of the dots, the screen will flash in celebration. To flash the screen we will simply change a color palette and wait for a quarter second, before changing it back. We’ll do this 10 times. Making sure to set the original value when done.
As Pacman collects a dot the dotsRemaining variable will decrease by one. When pacman collects has collected all of the dots, our dotsRemaining variable will be 0.
void BlinkLevelBlueAndWhite_Halting(){

    // We'll flash on/off 10 times.
    for(uint8_t i=0;i<10;i++){

        // The palette item for blue (in the first, default, palette) is white in the third color palette
        // Swap between these two to create the level complete blinking effect
        if(i%2==0)set_bkg_palette(0,1,Map_palettes+8);
        else set_bkg_palette(0,1,Map_palettes);

        // Wait a little bit
        // Could be some wait_vbl_done's, but i like the control
        // Also, at this point, the level is done.
        delay(250);
    }

    // Make sure we restore the original color palettes
    set_bkg_palette(0,1,Map_palettes);
}
Our Characters: The Ghosts and Pacman
The ghosts and Pacman will have a lot of similar logic. However since we are coding in C, there is no class inheritance. Which would probably be the normal way of handling things. Therefore by using this common struct to represent both, we can easily setup different functions that they both can use. This is the struct that will represent Pacman and the Ghosts:
NOTE: This struct will already be present in the starter repository.
typedef struct Character{

    uint16_t move;
    uint8_t direction;
    int16_t column,row;

    // Pacman: Normal vs dead
    // Ghosts: Normal vs Eaten vs Scared
    uint8_t state;

    // Ghosts Only
    int16_t targetColumn,targetRow;
} Character;
The move, direction, column, and row variables of this struct will be used for grid-based movement. The x and y coordinate of a character will not be stored directly in RAM. We can instead calculate it using those 4 variables. A character should show at the specified column and row, plus a given amount (move) in their target direction.
The “move” variable needs to be a 16 bit integer since it’s value will be bit-shifted for precise values/movement.
The targetColumn and targetRow variables are for ghosts only. Each ghost will use its own strategy to select which grid item it wants to move towards.
For the state variable, it will be simple for Pacman. If the value is 1, pacman is alive. If the value is 0, Pacman is dead. For the ghosts, there will be a value for their 3 main states: Scatter/Chase, Frightened, and Eaten.
Next, we’ll define a set of common functions.
Moving Forward
To move our characters, we are going to increase their “move” variable. Before we do that, well check if the character can even move in that direction. When our character has moved forward 8 pixels, the current character has fully moved to the next tile. In such case, we should reset our move variable to 0, and update our column/row variables.
Smooth Movement & Sub-Pixel Resolution
There are only 8 pixels between each two tiles. It would be difficult to move our characters between tiles smoothly Normally for smooth movement, in modern game development, we could just move each character by a small decimal amount. However, for Gameboy games, only whole numbers are supported. The best solution for this is using sub-pixel resolution.
To implement sub-pixel resolution we’ll use bit shifting. In this case, we’ll be shifting our move variable by 4 bits. To find the true value of our move variable we simply shift it’s face value (what we have stored in RAM) to the right 4 bits.
If we increase the move variable by 10, initially, we actually haven’t moved the character any pixels. This is because 10 shifted to the right 4 pixels is still zero. However, here is a table on how that adds up over time.
| Value of move Variable | Actual Pixels Moved |
| 10 | 0 |
| 20 | 1 |
| 30 | 1 |
| 40 | 2 |
| 50 | 3 |
| 60 | 3 |
| 70 | 4 |
| 80 | 5 |
| 90 | 5 |
| 100 | 6 |
| 110 | 6 |
| 120 | 7 |
| 130 | 8 |
When our move variable reaches a face value of 130 were done. That value shifted to the right 4 bits equals 8. Something interesting to note: if we shift 8 4 bits to the left we get a value of 128. Here is another visualization from @bbbbr below, you can find some of his gameboy projects here.
Using sub-pixel resolution we can move our character 8 pixels smoothly over the course of 13 frames, as opposed to only 8 frames. Which might seem weird, but it’s important part of the game design that our characters move at a certain speed. Sub-pixel resolution helps us achieve that.
Getting back to our MoveForward function. In this function we also will handle looping around from one side to another.
uint8_t MoveForward(Character *character, uint8_t speed){

    if(CanCharacterMoveInThisDirection(character,character->direction)){

        // Move forward some
        character->move+=speed;

        // If this character has moved one tile away
        // The move variable's value is shifted to the left 4 bits for higher-precision
        // 128 = 8<<4
        // We're checking if the player has moved more than 8 pixels
        if(character->move>=128){

            // Reset our move
            character->move=0;

            // For looping around
            if(character->column==0&&character->direction==LEFT){
                character->column=Map_WIDTH/8+1;
            }else if(character->column==Map_WIDTH/8&&character->direction==RIGHT){
                character->column=-1;
            }else{

                // Move in the given direction
                character->column+=Directions[character->direction].x;
                character->row+=Directions[character->direction].y;
            }

            return 1;
        }

    }

    return 0;
}
Drawing Our Characters
Our characters will be 16×16. Gameboy sprites can be 8×16 at most. This means we’ll make use of “metasprites”. Metasprites are just groups of sprites positioned together to represent one object. GBDK and png2Asset provide us with some helpful functions and constants for dealing with metasprites.
Both Pacman and The Ghosts will require two sprites to be drawn. The below function will draw our character at the proper location on the screen. It needs to be passed which character is calling it, what metasprite should be used to draw that character, and two parameters for the metasprites tiles and starting sprites.
Recall our characters don’t have a traditional x & y variable. We calculate those dynamically using their column, row, move, and direction variables.
void DrawCharacter(Character *character, metasprite_t const *metasprites, uint8_t baseSprite, uint8_t baseTile){

    // Get our screenX and screenY
    // Take our world position and subtract the camera's position to get our screen position
    uint16_t screenX=(character->column*8+Directions[character->direction].x*(character->move>>4))-SCX_REG;
    uint16_t screenY=(character->row*8+Directions[character->direction].y*(character->move>>4))-SCY_REG;


    // Sprites are draw at the specified x,y position, MINUS 8 and 16
    // So a sprite draw at 0,0 will not be shown
    // To draw a sprite at 0,0, it's x,y should be 8,16
    // We use +4 and +12 so the 8x8 sprite is centered at the x,y position
    move_metasprite(metasprites,baseTile,baseSprite,screenX+12,screenY+20);
}
Checking Movement in A Given Direction
This next function is used to help us determine if a character and move in a given direction. We’ve already handle the main logic previously. Our 3-dimensional array “TileSideWalkability” defines which directions an actor on a given tile can move. The only extra thing we need to do is handle some extra scenarios regarding looping around. If we are out of the normal bounds of the map, allow horizontal movement, but not vertical movement.
uint8_t CanCharacterMoveInThisDirection(Character *character, uint8_t direction){

    int8_t nextColumn=character->column+Directions[direction].x;
    int8_t nextRow=character->row+Directions[direction].y;

    // To allow looping around, consider horizontally out of bound tiles walkable
    if(nextColumn>=Map_WIDTH/8||nextColumn<0){

        // Don't allow vertical movement
        if(direction==UP||direction==DOWN)return FALSE;
        return TRUE;
    }

    return TileSideWalkability[character->column][character->row][direction];
}
Once we know a character can move in a direction, the next function becomes useful.
Changing Directions
The previous function will be used also in our function for changing direction. When trying to change direction we need to check if the character can move in that direction. Also, if the character is changing which axis it is moving along, we need to check if the character is aligned with the grid. This will be so when our characters move variable has a value of 0 or 128 (8, the size of the grid tile, shifted to the left 4 bits).
When a character turns (changes axis of movement), we’ll reset how far it has moved to 0. When a character reverses, we need to get the inverse value of our move variable. High values become low, and low values become high. Example: If we have moved 2px from left to right, and we reverse directions. Then that 2px becomes 6px now that we are moving right to left.
void TryChangeDirection(Character *character, uint8_t nextDirection){

    // If this is the same direction, do nothing
    if(character->direction==nextDirection)return;

    // This could be adjusted to make things more user-friendly
    // but, some 'snapping' may occur
    // The move variable's value is shifted to the left 4 bits for higher-precision
    // 128 = 8<<4
    // We're checking if the player has moved more than 8 pixels
    uint8_t aligned = character->move==0||character->move>=128;

    uint8_t changingAxis=
        (character->direction==LEFT&&(nextDirection==UP||nextDirection==DOWN))||
        (character->direction==RIGHT&&(nextDirection==UP||nextDirection==DOWN))||
        (character->direction==UP&&(nextDirection==LEFT||nextDirection==RIGHT))||
        (character->direction==DOWN&&(nextDirection==LEFT||nextDirection==RIGHT));

    uint8_t canMoveThisWay=CanCharacterMoveInThisDirection(character,nextDirection);

    // If the tile in this direction is walkable
    if(canMoveThisWay){

        // If we are changing axis and aligned
        if(changingAxis && aligned){

            character->direction=nextDirection;

            // Reset how far we've moved
            character->move=0;

        // If we are NOT changing axis, ok
        }else if(!changingAxis){

            // Move in the given direction
            character->column+=Directions[character->direction].x;
            character->row+=Directions[character->direction].y;

            character->direction=nextDirection;

            // Use the inverse value for move
            character->move=(128-character->move);

        }
    }
}
Getting All possible directions.
The final common function of our Characters is to help us determine all the possible directions a character can move in. For this we just use a for loop and one of the previous functions we created. This function saves the info in two global variables: “numberOfDirectionsCharacterCanMoveIn” and “directionsCharacterCanMoveIn“.
void GetDirectionsCharacterCanMoveIn(Character *character,uint8_t allowReverse){

    numberOfDirectionsCharacterCanMoveIn=0;

    for (uint8_t i = 0; i < 4; i++)
    {
        // Are we NOT reversing? OR can we reverse?
        uint8_t notReversingOrIsAllowed=(character->direction!=reverseDirections[i]||allowReverse);

        // If this tile is walkable, increase how many and save what direction it is
        if(CanCharacterMoveInThisDirection(character,i) && ReversingOrIsAllowed) directionsCharacterCanMoveIn[numberOfDirectionsCharacterCanMoveIn++]=i;
    }
}
That’s our common character logic. Logic for Pacman and The Ghosts will use those in their own specific ways.
Pacman
We can’t have a How to make Pacman tutorial without pacman right?
Setting Up Pacman
First, we’ll go back and define how pacman is setup. Recall, previously when setting up gameplay, we called a “SetupPacman” function. What happens in this function is really simple.
void SetupPacman(){

    // Make sure pacman's normaltiles are set
    // At the end of gameplay, we change these to a death animation
    // Ensure they are in their normal state
    set_sprite_data(0,Pacman_TILE_COUNT,Pacman_tiles);

    // Default pacman's position and motion and state
    pacman.column=10;
    pacman.move=0;
    pacman.row=20;
    pacman.state=1;
    pacman.direction=RIGHT;
}
First we load pacman’s tiles into VRAM, starting at tile 0. Our pacman graphics have 4 directions, and 3 frames. We could use 2 directions and flip the graphics for the other missing directions. However, in having all 4 directions defined, our games is more DMG compatible. DMG gameboy’s (Original Gameboy & Gameboy Pocket models) don’t support flipping background tiles.

We’ll also default pacman’s location and direction to 10,20
Updating Pacman
Our logic for updating Pacman is really simple. This is because a lot of the logic has already been defined previously. In Short:
- Try to change directions if the d-pad is pressed
- If Pacman isn’t dead:
- Move forward
- Draw Pacman
void UpdatePacman(){

    // if the d-pad is down on the joypad
    if(joypadCurrent & (J_UP | J_DOWN | J_LEFT | J_RIGHT)){

        // Get our direction
        uint8_t dir = UP;
        if(joypadCurrent & J_DOWN)dir=DOWN;
        else if(joypadCurrent & J_LEFT)dir=LEFT;
        else if(joypadCurrent & J_RIGHT)dir=RIGHT;

        // Change direction
        // This will fail if they cannot
        TryChangeDirection(&pacman,dir);
    }

    if(pacman.state!=0){

        // Move pacman forward
        MoveForward(&pacman,10);
        DrawPacman();
    }
}
Drawing Pacman
Drawing Pacman is also very simple. We’ll simply use our previously created “DrawCharacter” method. We created this method so Pacman can be drawn anytime without having to worry about passing the proper parameters.
NOTE: We are technically not “drawing” Pacman. Really, we are re-positioning a set of sprites and updating their tiles for the proper frame/direction.
void DrawPacman(){

    // Draw our pacman metasprite
    // We have this in a function so we can make sure pacman is properly drawn from wherever
    DrawCharacter(&pacman,Pacman_metasprites[pacman.direction*3+threeFrameAnimator],0,0);
}
The Death of Pacman
When ghosts run into Pacman, we want to play a death animation. This function will do that for us.
void PacmanDeathAnimation_Halting(){

    NR10_REG=0x7C;
    NR11_REG=0xCB;
    NR12_REG=0x67;
    NR13_REG=0xA6;
    NR14_REG=0x86;

    // We have an eaten animation for each direction
    // Use the tile data from the proprer direction
    switch(pacman.direction){
        case DOWN: set_sprite_data(0,PacmanEatenDown_TILE_COUNT,PacmanEatenDown_tiles); break;
        case UP: set_sprite_data(0,PacmanEatenUp_TILE_COUNT,PacmanEatenUp_tiles); break;
        case LEFT: set_sprite_data(0,PacmanEatenLeft_TILE_COUNT,PacmanEatenLeft_tiles); break;
        case RIGHT: set_sprite_data(0,PacmanEatenRight_TILE_COUNT,PacmanEatenRight_tiles); break;
    }


    // Since some othe metasprites only use one sprites
    // Hide these by default, so they don't accidentally show when unused by the metasprite
    move_sprite(0,0,0);
    move_sprite(1,0,0);

    for(uint8_t i=0;i<8;i++){

        // Draw the proper metasprites depending on which direction we are facing
        switch(pacman.direction){
            case DOWN: DrawCharacter(&pacman,PacmanEatenDown_metasprites[i],0,0); break;
            case UP: DrawCharacter(&pacman,PacmanEatenUp_metasprites[i],0,0); break;
            case LEFT: DrawCharacter(&pacman,PacmanEatenLeft_metasprites[i],0,0); break;
            case RIGHT: DrawCharacter(&pacman,PacmanEatenRight_metasprites[i],0,0); break;
        }

        wait_vbl_done();
        wait_vbl_done();
        wait_vbl_done();
    }

    move_sprite(0,0,0);
    move_sprite(1,0,0);

    pacman.column=10;
    pacman.row=20;
    pacman.move=0;
    pacman.direction=RIGHT;
}
When called, the death animations will not yet be in VRAM. So, when the first thing we must do is put the tiles for our death animation in VRAM. We’re not gonna put all tiles for all directions in VRAM. This is because we are placing the tiles over Pacman’s existing tiles in VRAM. We don’t want to override the tiles that come after Pacman.


Once the tiles are in VRAM, we’ll Re-Draw Pacman’s character using the metasprites associated for the proper death animation. After this, well wait for a couple frames before continuing to the next frame.
When all the frames have been shown, we’ll hide pacman and default some of his variables
Collecting Dots / Power Pellets
Before we can get into pacman consuming the dots and/or power pellets, we must place them on the map.
Setting up our Dots & Power Pellets
Our “SetupDots” function is called from our SetupGameplay function. It’s just is to count how many dots are on the map, and actually place each dot on the map.

To place a dot, we can use the macro “DOTS_TILES_START“. For the power pellet, we can use that macro plus 1 (DOTS_TILES_START+1) the third tile is blank on purpose.
Unlike in modern game engines, each dot will not have it’s own object to represent it. Instead, each dot will be drawn on the background. To check for collision against a dot, we just need to check if the tile pacman over is for the dots. Here is how we setup dots:
void SetupDots(){

    // Default at 0
    // The following for-loops will increment
    dotsRemaining=0;

    // For each big pellet
    for(uint8_t i=0;i<4;i++){

        // Draw the pellet
        VBK_REG=1; set_bkg_tile_xy(BigPelletPositions[i].x,BigPelletPositions[i].y,0);
        VBK_REG=0; set_bkg_tile_xy(BigPelletPositions[i].x,BigPelletPositions[i].y,DOTS_TILES_START+1);
    }

    for(uint8_t i=0;i<Map_WIDTH/8;i++){
        for(uint8_t j=0;j<Map_HEIGHT/8;j++){

            // These are areas where we do not want to spawn dots
            uint8_t mid = i>=6&&j>=6&&i<15&&j<=17;
            uint8_t left = i<=4&&j>=9&&j<=17;
            uint8_t right = i>=17&&j>=9&&j<=17;

            // We do not want to generate dots/dots
            // In these locations
            if(j==3&&i==3)continue;
            if(j==3&&i==7)continue;
            if(j==3&&i==13)continue;
            if(j==3&&i==17)continue;

            // We do not want to generate dots/dots
            //in these sections
            if(mid)continue;
            if(left)continue;
            if(right)continue;

            uint8_t current =get_bkg_tile_xy(i,j);

            if(current==blank){
                VBK_REG=1; set_bkg_tile_xy(i,j,0);
                VBK_REG=0; set_bkg_tile_xy(i,j,DOTS_TILES_START);
                dotsRemaining++;
            }
        }
    }
}
The above function first defaults our dotsRemaining variable to 0. In the upcoming for-loop it will increment that variable by one each time it places a dot on the background.
We have an array of positions for the 4 power pellets. With that array, we’ll place the power pellets in their proper locations. We “place” those power pellets in their proper locations by simply setting the background tile at those locations.
For placing our actual dots. Its simple, but with a few exceptions. Recall previously when drawing the map, we saved a variable referencing which tile in VRAM represented “blank” tiles. We are going to reference that blank tile once again. We want to place a dot wherever we find a “blank” tile.
There are 7 exceptions. These exceptions, are simply parts of the map where we do not want any dots to be at the beginning of the game:
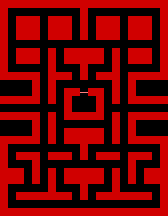
When all the dots are placed, the background layer will look like this:
Collecting Dots & Power Pellets
For consuming dots, it’s the opposite of placing them. When Pacman consumes a dot/pellet, we’ll set it’s corresponding background tile to blank.
Well get the background tile pacman is on using his column & row variables. If that tile is a dot, we’ll consume it and increase score. If it’s a power pellet we’ll consume it, but also set all ghosts to be frightened.
void HandleDotConsumption(){
// Get the tile pacman is on
uint8_t tile = get_bkg_tile_xy(pacman.column,pacman.row);
// Every cycle of the two frame animator
// We'll hide/show the big dots
if(threeFrameAnimator==0){
dotsShown=!dotsShown;
// Switch the tile in VRAM between the 2nd and third tile in the Dots graphic
// The third tile is blank, the second is the power pellet
if(dotsShown)set_bkg_data(DOTS_TILES_START+1,1,Dots_tiles+16);
else set_bkg_data(DOTS_TILES_START+1,1,Dots_tiles+32);
}
// If this is a big or small pellet
if(tile==DOTS_TILES_START||tile==DOTS_TILES_START+1){
NR21_REG=0x87;
NR22_REG=0x65;
NR23_REG=0xf8;
NR24_REG=0x86;
if(tile==DOTS_TILES_START+1){
frightenedTimer=500;
for(uint8_t i=0;i<4;i++){
// BOO!!!!!!
// But only if we are not already eaten
if(ghosts[i].state==SCATTERCHASE){
ghosts[i].state=FRIGHTENED;
// Try to change directions
TryChangeDirection(&ghosts[i],reverseDirections[ghosts[i].direction]);
}
}
}
score++;
// Possibly update our high score
if(score>highScore)highScore=score;
UpdateScore();
dotsRemaining--;
// Set the current tile as blank
set_bkg_tile_xy(pacman.column,pacman.row,blank);
}
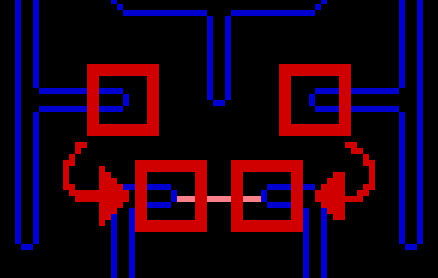
}This function also handles making the power pellets flash. Instead of manually updating each tile, we’ll update all of them at once. We do this by simply changing what tile data is in VRAM at “DOTS_TILES_START+1“. We’ll change that tile to be the third tile in the dots graphic, which if you recall, is intentionally blank.
To specifically reference the 3rd tile, we’ll just add 32 to our Dots_tiles array. Every 16 values in an array of tile data represents one tile. Here’s a visual representation of that:

When we increase score, we’ll conditionally update the high score. After updating the score, we’ll use the UpdateScore function to visually show the new score. That function will be covered later.
The 4 Ghosts
The ghosts are as important as pacman himself. However, since the ghosts use basic Artificial Intelligence to move, their logic is much more complicated than pacman’s logic.
Setting up the Ghosts
When we setup gameplay, we also setup the ghosts. In short, when we are setting up the ghosts, we place them at their default location in scatter/chase mode.
After ghosts are in their proper position, we calculate each ghosts initial target tile and direction. Next, we draw each ghost..
We need to default 4 variables. Those variables are used in the following manner:
- frightenedOffset– This value will alternate between 0 and 1. When it’s one value, the frightened ghosts will be blue, when its the other they will be white;
- frightenedTwoFrameAnimator – This value will be incremented. When it reaches 20, it will reset back to 0 and switch frightenedOffset back to 0 or 1.
- ghostsResetting – Our ghosts will move back to start after eating pacman. This value is 0 when the ghosts are NOT resetting, and 1 when the ghosts are resetting.
- frightendTimer – This value will decrease from 500 when ghosts are frightened. When it reaches 0, all frightened ghosts will return to normal state.
void SetupGhosts(){

    // For each of the 4 ghosts
    for(uint8_t i=0;i<4;i++){

        // Reset their positions and movement
        ghosts[i].state=SCATTERCHASE;
        ghosts[i].move=0;
        ghosts[i].direction=DOWN;
        ghosts[i].column=GhostsStartPositions[i].x;
        ghosts[i].row=GhostsStartPositions[i].y;

        // Decide our next target tile and direction
        GetGhostTargetTile(i);
        GetGhostNextDirection(i);

        // Draw the ghot initially
        DrawGhost(i);
    }
    frigtenedTwoFrameAnimator=0;
    frigtenedOffset=0;
    ghostsResetting=0;
    frightenedTimer=0;
}
Updating the Ghosts
For updating the ghosts, we’ll first update some variables that all of our ghosts will use. Then we’ll update each ghost individually.
Updating All Ghosts
Our “UpdateAllGhosts” function does just that, it updates all ghosts. But it also handles three of the variables mentioned previously.
- frightenedOffset– This value will alternate between 0 and 1. When it’s one value, the frightened ghosts will be blue, when its the other they will be white;
- frightenedTwoFrameAnimator – This value will be incremented. When it reaches 20, it will reset back to 0 and switch frightenedOffset back to 0 or 1.
- frightendTimer – This value will decrease from 500 when ghosts are frightened. When it reaches 0, all frightened ghosts will return to normal state.
After performing that logic, this function will update whether or not the ghosts are in scatter or chase mode. Which will be explained later.
Finally, before we update & draw each ghost individually, we’ll default the ghostsReady variable to 1. When updating each individual ghost, if it is not in its original position, that ghost will change the ghostsReady variable back to 0.
void UpdateAllGhosts(){

    // While our frighted timer is larger than 0
    // Are ghosts are still frightened
    if(frightenedTimer>0){
        frightenedTimer--;

        // When it reaches zero
        // We want to change all ghosts back to scatterchase mode
        if(frightenedTimer==0){
            for(uint8_t i=0;i<4;i++){

                // If this ghosts is frightened still (because they could have been eaten)
                // Change by to scatter-chase mode
                if(ghosts[i].state==FRIGHTENED)ghosts[i].state=SCATTERCHASE;
            }
        }
    }

    frigtenedTwoFrameAnimator++;
    if(frigtenedTwoFrameAnimator>=20){
        frigtenedTwoFrameAnimator=0;
        if(frigtenedOffset==0)frigtenedOffset=1;
        else frigtenedOffset=0;
    }

    UpdateScatterOrChaseMode();

    // By default, all ghosts are ready
    // Each ghost will unset this to 0 if they are not ready.
    ghostsReady=1;

    // For each of the 4 ghosts
    for(uint8_t i=0;i<4;i++){

        // Update and Draw
        UpdateSingleGhost(i);
        DrawGhost(i);
    }
}
Updating a single ghost
First, when updating a single ghost, if we are not at our starting position: we’ll set the ghostsReady variable to false. When the game is resetting after death, it will wait until this variable is true and all ghosts are in their starting positions.
If a ghost isn’t eaten we’ll try to check for collision against pacman. In the case of collision with pacman, we have two outcomes:
- The ghost is in the frightened state – The ghost is now “eaten” and will start moving towards the ghost pit.
- The ghost is in scatter/chase mode – Pacman dies in this scenario.
If a ghost is eaten, and it’s within the ghost pit, we’ll reset its state to scatter/chase mode.
As for movement, the ghost will always move torwards it’s target tile. Ghosts move faster when in the eaten state. If a ghost is at it’s starting position and the game is resetting the ghost should not move at all. After we move the ghost using our handy MoveForward function (previosly explained), if ghost has reached a new tile we’ll pick a new target tile and possibly change direction.
void UpdateSingleGhost(uint8_t i){

    // If we are not at our start position
    // The ghosts aren't ready
    if(ghosts[i].column!=GhostsStartPositions[i].x||ghosts[i].row!=GhostsStartPositions[i].y){
        ghostsReady=0;
    }

    if(ghosts[i].state!=EATEN){

        int16_t pacmanX, pacmanY, ghostX, ghostY;

        pacmanX = pacman.column*8+Directions[pacman.direction].x*(pacman.move>>4);
        pacmanY = pacman.row*8+Directions[pacman.direction].y*(pacman.move>>4);
        ghostX = ghosts[i].column*8+Directions[ghosts[i].direction].x*(ghosts[i].move>>4);
        ghostY = ghosts[i].row*8+Directions[ghosts[i].direction].y*(ghosts[i].move>>4);

        int16_t xd = pacmanX-ghostX;
        int16_t yd = pacmanY-ghostY;

        // Get the absolute value
        if(xd<0)xd=-xd;
        if(yd<0)yd=-yd;

        if(xd<=8&&yd<=8){

            // If we are frightened
            if(ghosts[i].state==FRIGHTENED){

                // WE are eaten
                ghosts[i].state=EATEN;
                delay(400);
            }else{

                // Pacman is dead
                pacman.state=0;

            }
        }

    }else if(ghosts[i].column>=GHOST_PIT_LEFT&&ghosts[i].column<=GHOST_PIT_RIGHT&&ghosts[i].row>=GHOST_PIT_TOP&&ghosts[i].row<=GHOST_PIT_BOTTOM){

        ghosts[i].state=SCATTERCHASE;

    }

    uint8_t speed = 10;

    // Move faster when eaten
    if(ghosts[i].state==EATEN)speed=40;

    // If the ghosts are resetting
    if(ghostsResetting){

        // If we are at our target location
        if(ghosts[i].column==GhostsStartPositions[i].x&&ghosts[i].row==GhostsStartPositions[i].y){
            speed=0;
            ghosts[i].move=0;

        // if we are not there, move faster
        }else{
            speed=40;
        }
    }


    // Move forward
    // This function returns true when we reach new tile
    if(MoveForward(&ghosts[i],speed)){

        // Pick a new target tile
        // Pick a new direction
        GetGhostTargetTile(i);
        GetGhostNextDirection(i);
    }
}
Drawing the Ghosts
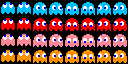
The ghosts have 4 different types of graphics:
- Their default colored look – Inky is blue, Blinky is red, Pinky is pink, and Clyde is orange.
- When they are frightened – They will all blink white and blue
- When they are eaten – They are just a pair of eyeballs.
Based on their state, we’ll use metasprites from the associated graphic.
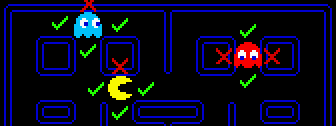
Additionally, i’ve added a the ability to show where each ghosts is targeting. Pressing SELECT on the Gameboy will toggle the debug mode. When enabled, a little colored icon will show on a ghosts target tile.
NOTE: Sometimes ghosts target offscreen tiles, so they may not be visible.
void DrawGhost(uint8_t i){

    switch(ghosts[i].state){
        case FRIGHTENED: DrawCharacter(&ghosts[i],GhostsScared_metasprites[frigtenedOffset*2+twoFrameAnimator],2+i*2,GHOSTS_SCARED_SPRITES_START); break;
        case EATEN: DrawCharacter(&ghosts[i],GhostsScared_metasprites[ghosts[i].direction],2+i*2,GHOSTS_EATEN_SPRITES_START); break;
        default: DrawCharacter(&ghosts[i],Ghosts_metasprites[ghosts[i].direction*2+twoFrameAnimator+i*8],2+i*2,GHOSTS_SPRITES_START); break;
    }

    if(enableDebug){

        int16_t screenX = ghosts[i].targetColumn*8-SCX_REG;
        int16_t screenY = ghosts[i].targetRow*8-SCY_REG;

        move_metasprite(TargetTiles_metasprites[i],TARGET_TILES_SPRITES_START,36+i,12+screenX,24+screenY);

    }
}
Ghost Artificial Intelligence
Artificial Intelligence is a big part of games. Most games, if not all, have computer enemies that players must fight against. These enemies must act in a manner that seems realistic and challenging, but not too challenging that players cannot win.
The AI used in this tutorial is my implementation of the AI explained in this video, by Retro Game Mechanics Explained.
Ghost Target Tiles
Each ghost will always be moving towards a target tile. Whenever a ghost reaches a new tile, it will re-evaluate what it’s target tile should be. Each ghost has it’s own method for determining it’s target tile
Besides “eaten” and “frightened” ghosts have 2 other states:
- Chase Mode – The ghosts will chase after pacman.
- Scatter – The ghosts will scatter towards their “scatter location”. Which is around the corner of the map for each ghost.
Ghosts will alternate between scatter and chase mode. In real pacman, there is a set amount of switches between scatter/chase mode before they stay in chase mode. That will not be in this tutorial, ghosts will indefinitely swap between scatter and chase mode.
We’ve combined scatter and chase mode into one constant SCATTERCHASE. When a ghost’s state variable has this value, when finding a target tile, it will use the value of the scatterOrChaseMode variable.
When ghost are frightened they will randomly pick adjacent tiles as their target tile. When ghosts are eaten, they will pick the tile in the middle of the ghost pit. Things get more complicated when ghosts are in the CHASE state:
- PINKY – Moves towards the location 4 tiles AHEAD of Pacman. If Pacman is facing up however, pinky will move towards the location 4 tiles above and to the left of Pacman.
- BLINKY – Moves towards Pacman directly.
- CYLDE – Moves towards Pacman if he is far from Pacman (less than 8 tiles). If CLYDE is more than 8 tiles from Pacman he will move towards his scatter point.
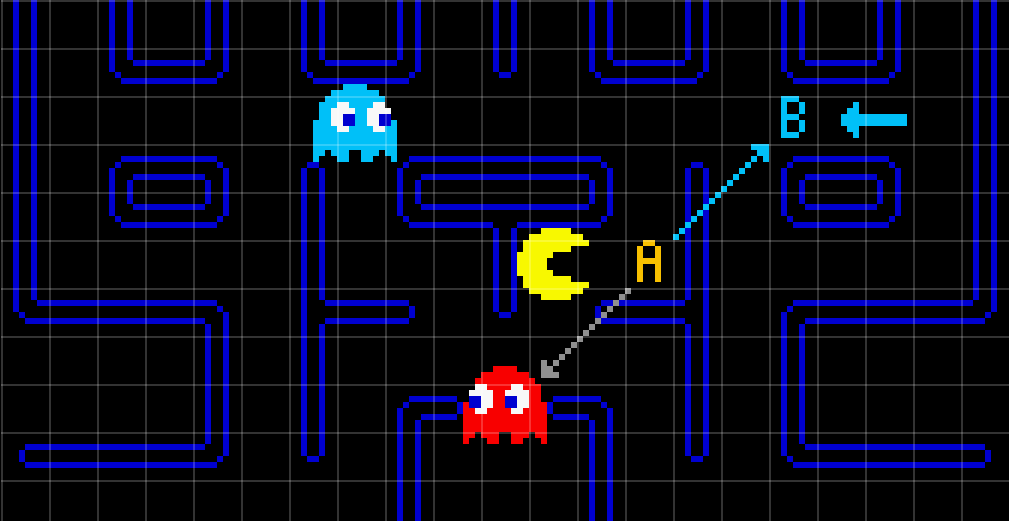
- INKY – Inky works to flank Pacman with BLINKY. Inky will first look 2 tiles ahead of Pacman (A). Next inky will move FROM that tile (A) AWAY from BLINKY ( towards B). B is IINKY’s target tile.
void GetGhostTargetTile(uint8_t ghostIndex){
    if(pacman.state==0){
        ghosts[ghostIndex].targetColumn=GhostsStartPositions[ghostIndex].x;
        ghosts[ghostIndex].targetRow=GhostsStartPositions[ghostIndex].y;
        return;
    }

    int16_t intermediateColumn, intermediateRow;
    int16_t blinkyXDiff, blinkyYDiff;
    uint16_t squareDistance;
    uint8_t random;

    uint8_t state = ghosts[ghostIndex].state;

    // The ghost's 'state' variable will never have a value of SCATTER or CHASE
    // They are combined so we can use our 'scatterOrChase' variabble which alternates
    if(state==SCATTERCHASE)state=scatterOrChaseMode;

    switch(state){
        case CHASE:

            switch(ghostIndex){

                // From: https://www.youtube.com/watch?v=ataGotQ7ir8
                // Inky works with blinky to flank pacman

                case INKY:
                    intermediateColumn = pacman.column+Directions[pacman.direction].x*2;
                    intermediateRow = pacman.row+Directions[pacman.direction].y*2;

                    // When facing up, some targets offset horizontally too
                    if(pacman.direction==UP)intermediateColumn-=2;

                    blinkyXDiff = ghosts[BLINKY].column-intermediateColumn;
                    blinkyYDiff = ghosts[BLINKY].row-intermediateRow;

                    ghosts[ghostIndex].targetColumn=intermediateColumn-blinkyXDiff;
                    ghosts[ghostIndex].targetRow=intermediateRow-blinkyYDiff;

                    break;

                // From: https://www.youtube.com/watch?v=ataGotQ7ir8
                // Pinky tries targets the tile 4 ahead of pacman

                case PINKY:
                    ghosts[ghostIndex].targetColumn=pacman.column+Directions[pacman.direction].x*4;
                    ghosts[ghostIndex].targetRow=pacman.row+Directions[pacman.direction].y*4;

                    // When facing up, some targets offset horizontally too
                    if(pacman.direction==UP)ghosts[ghostIndex].targetColumn-=4;
                    break;

                // From: https://www.youtube.com/watch?v=ataGotQ7ir8
                // Pinky tries targets pacman directly

                case BLINKY:
                    ghosts[ghostIndex].targetColumn=pacman.column;
                    ghosts[ghostIndex].targetRow=pacman.row;
                    break;

                // From: https://www.youtube.com/watch?v=ataGotQ7ir8
                // Clyde targets pacman if far, and his scatter point if far
                case CLYDE:


                    squareDistance = getSquareDistance(pacman.column,pacman.row,ghosts[ghostIndex].column,ghosts[ghostIndex].row);

                    // if we are 8 tiles away or less
                    // 8*8 is 64
                    if(squareDistance<64){

                        // go toward the scatter target
                        ghosts[ghostIndex].targetColumn=GhostsScatterTargets[ghostIndex].x;
                        ghosts[ghostIndex].targetRow=GhostsScatterTargets[ghostIndex].y;

                    }else{

                        // Go toward pacman
                        ghosts[ghostIndex].targetColumn=pacman.column;
                        ghosts[ghostIndex].targetRow=pacman.row;

                    }

                    break;
            }

        break;

        // Go to the scatter targets
        case SCATTER:

            ghosts[ghostIndex].targetColumn=GhostsScatterTargets[ghostIndex].x;
            ghosts[ghostIndex].targetRow=GhostsScatterTargets[ghostIndex].y;

        break;
        case FRIGHTENED:

            // Get which directions we can move in
            // Do not pick opposite directions
            GetDirectionsCharacterCanMoveIn(&ghosts[ghostIndex],FALSE);

            random = RandomNumber(0,numberOfDirectionsCharacterCanMoveIn);

            ghosts[ghostIndex].targetColumn=ghosts[ghostIndex].column+Directions[directionsCharacterCanMoveIn[random]].x;
            ghosts[ghostIndex].targetRow=ghosts[ghostIndex].row+Directions[directionsCharacterCanMoveIn[random]].y;


        break;

        // Go to the middle tile
        case EATEN:
            ghosts[ghostIndex].targetColumn=10;
            ghosts[ghostIndex].targetRow=10;
        break;
    }

}
Determining the Next Direction
Once our ghosts know where to go, they need a way to decide how to get there. If ghosts are in the pit, they will always move in a down=>right=>up=>left to get out of the pit. If ghosts are not in the pit, then they will move towards which ever tile is closest to their target tile. There is a little more to it though.
- Ghosts will not reverse directions during normal path finding. They only ever do this when changing their state.
- If two or more tiles are equidistant from their target tile, tile priority goes as follows: up, right ,down left
Whenever we decide a new direction to move in, we’ll use our TryChangeDirection function on the current ghost.
void GetGhostNextDirection(uint8_t ghostIndex){

    // If the ghosts aren't resetting we want specific logic to get out of the ghost pit
    // If they are resetting let them use the normal logic
    if(!ghostsResetting){

        // Override directional logic if ghosts are in the ghost pit
        // To Make sure they can get out
        if(ghosts[ghostIndex].column>=GHOST_PIT_LEFT&&ghosts[ghostIndex].column<=GHOST_PIT_RIGHT&&ghosts[ghostIndex].row>=GHOST_PIT_TOP&&ghosts[ghostIndex].row<=GHOST_PIT_BOTTOM){

            // If we are on the left side
            if(ghosts[ghostIndex].column==GHOST_PIT_LEFT){

                // Move down and then to the right
                if(ghosts[ghostIndex].row==GHOST_PIT_TOP)ghosts[ghostIndex].direction=DOWN;
                else ghosts[ghostIndex].direction=RIGHT;

            // IF we are in the middle
            }else if(ghosts[ghostIndex].column>GHOST_PIT_LEFT&&ghosts[ghostIndex].column<GHOST_PIT_RIGHT){

                // Move up or right
                if(ghosts[ghostIndex].row==GHOST_PIT_TOP)ghosts[ghostIndex].direction=UP;
                else ghosts[ghostIndex].direction=RIGHT;

            // If weare on the right
            }else if(ghosts[ghostIndex].column==GHOST_PIT_RIGHT){

                // Move left or up
                if(ghosts[ghostIndex].row==GHOST_PIT_TOP)ghosts[ghostIndex].direction=LEFT;
                else ghosts[ghostIndex].direction=UP;
            }

            return;
        }
    }

    // Get which directions we can move in
    // NOTE: WE cannot reverse directions
    GetDirectionsCharacterCanMoveIn(&ghosts[ghostIndex],FALSE);

    if(numberOfDirectionsCharacterCanMoveIn==0)return;

    // Get the distance to our target tile FROM the first (possibly best) direction
    uint16_t bestDistance=getSquareDistance(
        ghosts[ghostIndex].column+Directions[directionsCharacterCanMoveIn[0]].x,
        ghosts[ghostIndex].row+Directions[directionsCharacterCanMoveIn[0]].y,
        ghosts[ghostIndex].targetColumn,
        ghosts[ghostIndex].targetRow
    );

    uint16_t bestDirection=directionsCharacterCanMoveIn[0];

    // Check each other possibble side
    // NOTE: This loop starts at 1, because we default at 0
    for(uint8_t i=1;i<numberOfDirectionsCharacterCanMoveIn;i++){

        // Get the distance to our target tile FROM the tile in our next (possibly best) direction
        uint8_t nextPossibleNestDirection = directionsCharacterCanMoveIn[i];
        uint16_t nextPossibleBestDistance = getSquareDistance(
            ghosts[ghostIndex].column+Directions[nextPossibleNestDirection].x,
            ghosts[ghostIndex].row+Directions[nextPossibleNestDirection].y,
            ghosts[ghostIndex].targetColumn,
            ghosts[ghostIndex].targetRow
        );

        // If this distance is lesser OR equal w/ higher priority
        // Then we have a new best direction to move in
        if((nextPossibleBestDistance<bestDistance)||(nextPossibleBestDistance==bestDistance&&DirectionalPriorities[nextPossibleNestDirection]>DirectionalPriorities[bestDirection])){
            bestDistance=nextPossibleBestDistance;
            bestDirection=nextPossibleNestDirection;
        }
    }

    TryChangeDirection(&ghosts[ghostIndex],bestDirection);

}
Scatter or Chase mode?
When ghost’s aren’t eaten or frightend, they will alternate between scatter and chase mode. This UpdateScatterOrChaseMode function will handle switching between those two modes. Whether the ghosts are in scatter or chase mode depends on the scatterOrChaseMode variable. Scatter mode lasts very-roughly 7 seconds, chase mode lasts very-roughly 20 seconds.
When ghosts change between scatter and chase mode they will reverse directions.
void UpdateScatterOrChaseMode(){

    // Per: youtube.com/watch?v=ataGotQ7ir8
    // The ghosts alternate between scatter and chase mode

    scatterChaseCounter++;
    uint16_t scatterChaseTime;

    if(scatterOrChaseMode==SCATTER)scatterChaseTime=7;
    else scatterChaseTime=20;

    // Wait until enough time has passed
    // 60 frames (roughly with wait_vbl_done), multiply the time by 60 to the amount in seconds
    if(scatterChaseCounter>scatterChaseTime*60){

        // Reset our counter
        scatterChaseCounter=0;

        // Swap between the two
        scatterOrChaseMode=!CHASE;

        // For each of the 4 ghosts
        for(uint8_t i=0;i<4;i++){

            // if this ghost is in scatter or chase mode
            if(ghosts[i].state==SCATTERCHASE){

                // Per: youtube.com/watch?v=ataGotQ7ir8
                // The ghosts swap directions when changing between chase/scatter mode
                switch(ghosts[i].direction){
                    case LEFT:TryChangeDirection(&ghosts[i],RIGHT);break;
                    case RIGHT:TryChangeDirection(&ghosts[i],LEFT);break;
                    case UP:TryChangeDirection(&ghosts[i],DOWN);break;
                    case DOWN:TryChangeDirection(&ghosts[i],UP);break;
                }
            }
        }

    }
}
The Heads Up Display
We’re almost done. All that’s left is the HUD. The HUD will be drawn on the window layer, which will be on the right side of our screen. On our HUD we’ll show some text, the high score, and the current score.

Setting up the HUD
To setup our HUD we first need to move the window to an acceptable location. Once it’s in place we will fill the window with blank black square tiles. We have a single square tile loaded into VRAM for the HUD. The color palette for this black square does not have black as the first color. This is intentional. This is because, we want to render these black tiles with priority. When rendered with priority, they will appear over sprites. Without this, the ghosts will go over the HUD.
NOTE: Rendering our HUD tiles with priority is a Gameboy Color (CGB) only feature. For DMG games, a top/bottom HUD may be preferred over a side HUD.
To render a tile with priority, we need to adjust it’s attributes. Specifically making sure the leftmost bit of that tiles attribute value is 1. To do this we simply use the bitwise operator and 0x80 or 128. We’ll do this with all of the tiles on the window.
After filling the window with blank tiles, we’ll show the score and the one up text. The high score text will use color palette 4, and the one up text will use color palette 3.
void SetupHUD(){

    // Move the window to the right side
    move_win(120,0);

    // Fill the window with blank tiles
    VBK_REG=1; fill_win_rect(0,0,20,18,0x80|3);
    VBK_REG=0; fill_win_rect(0,0,20,18,BLACKSQUARE_TILES_START);

    // Show the high (score) text
    VBK_REG=1; fill_win_rect(1,0,4,1,0x80|4);
    VBK_REG=0; set_win_based_tiles(1,0,4,1,HighText_map,HIGHTEXT_TILES_START);

    // Show the one up text
    VBK_REG=1; fill_win_rect(2,3,3,1,0x80|3);
    VBK_REG=0; set_win_based_tiles(2,3,3,1,OneUpText_map,ONEUPTEXT_TILES_START);

    UpdateScore();
}
Updating the Score
Updating the Score is a simple function. We also call this one Pacman consumes a frightened ghost or dot. We are just gonna re-draw the high score and score onto the window layer.
void UpdateScore(){

    DrawNumber(1,1,highScore,4,2);
    DrawNumber(1,4,score,4,1);
}
Drawing Numbers
For drawing numbers, we will copy a tile from our numbers graphic to the window layer.
I have created a macro that points to where numbers start in VRAM. NUMBERS_TILES_START. At that value in VRAM the numbers tiles can be found from 0 to 9.
For drawing numbers, first we need to convert the numbers to a string. The uitoa function helps us do that. It converts a unsigned integer to a string. However, there’s one setback. That function doesn’t pad with zeros. Which is an aesthetic that I desired. We’ll have to manually do that.
The 4th parameter “digits” is how many digits should be shown for the number. We’ll use the strlen function and a for-loop to pad with zeros. Afterwards, well start placing tiles for the actual number on the window.
Because we want to draw numbers in two different colors (red and white), this function takes a 5th parameter for the color palette to use.
void DrawNumber(uint8_t x,uint8_t y, uint16_t number,uint8_t digits,uint8_t palette){

    unsigned char buffer[]="00000000";

    // Convert the number to a decimal string (stored in the buffer char array)
    uitoa(number, buffer, 10);

    // Get the length of the number so we can add leading zeroes
    uint8_t len =strlen(buffer);

    // Add some leading zeroes
    // uitoa will not do this for us
    for(uint8_t i=0;i<digits-len;i++){
        VBK_REG=1;
        set_win_tile_xy(x,y,palette|128);
        VBK_REG=0;
        set_win_tile_xy(x++,y,NUMBERS_TILES_START);
    }

    // Draw our number
    for(uint8_t i=0;i<len;i++){
        VBK_REG=1;
        set_win_tile_xy(x,y,palette|128);
        VBK_REG=0;
        set_win_tile_xy(x++,y,(buffer[i]-'0')+NUMBERS_TILES_START);
    }
}
Updating the HUD
For updating the HUD, not much is needed. This is called in our main game loop. We will hide or show the one up text every 3 frames.
void UpdateHUD(){

    if(threeFrameAnimator==0){

        // at 2,3 on the window we will draw the one up text
        // or blank, when flashed off
        // If this tile is blank we want to draw the text
        // otherwise we want to hide the text
        ShowOrHideOneUpText(get_win_tile_xy(2,3)==blank);

    }
}
We have a graphic for our one up text. When we want to show it, we copy that graphic’s tiles onto the window. When we want to hide the one up text, we fill that same space with our previously mentioned black square tiles.
void ShowOrHideOneUpText(uint8_t show){

    if(show){

        // Show the 1up text
        VBK_REG=1; set_win_based_tiles(2,3,3,1,OneUpText_map_attributes,128);
        VBK_REG=0; set_win_based_tiles(2,3,3,1,OneUpText_map,ONEUPTEXT_TILES_START);
    }else{

        // Hide the 1up text
        VBK_REG=1; fill_win_rect(2,3,3,1,1|128);
        VBK_REG=0; fill_win_rect(2,3,3,1,blank);
    }
}
Conclusion
That’s the end of our how to make Pacman Tutorial, with all of that, you should have a completed and working Pacman Gameboy game. You can view the final code here on Github. The game can be tested on a gameboy emulator like BGB or Emulicious. Additionally, if you want to test on real gameboy hardware you have two options:
- You can order something like a EZ Flash Jr, which lets you store multiple gameboy games on a single cartridge.
- InsideGadgets has a Reader/writer that can be used to write gameboy ROMs to physical reproduction cartridges.
I hope you found this space invaders tutorial informative and helpful. If so, please share on social media to help The Junkyard grow. If you have any questions, feel free to reach out via email or social media. Any and all criticism/questions help The Junkyard produce more helpful content.