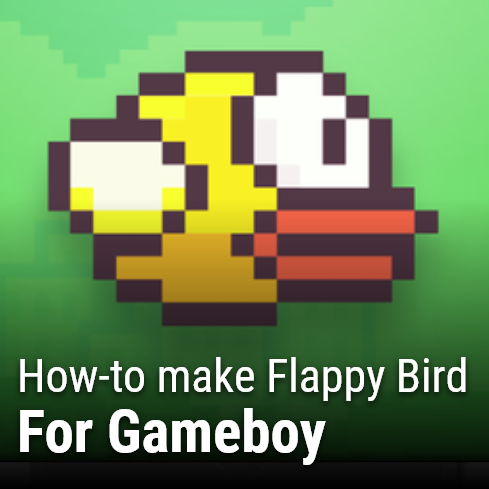
Flappy Bird was a popular hyper casual mobile game released in 2013 by Vietnamese video game artist and programmer Dong Nguyen. Flappy Bird is a simple side-scrolling game where the player controls a yellow bird. The objective is to fly as far as possible. During such, random set’s of green pipes will attempt to obstruct your path. In addition, Flappy Bird has a single button control screen. The player must tap the screen to make the bird flap it’s wings. Flappy Bird was eventually removed from app stores by request of it’s creator. However, many clones have been made in it’s absence.
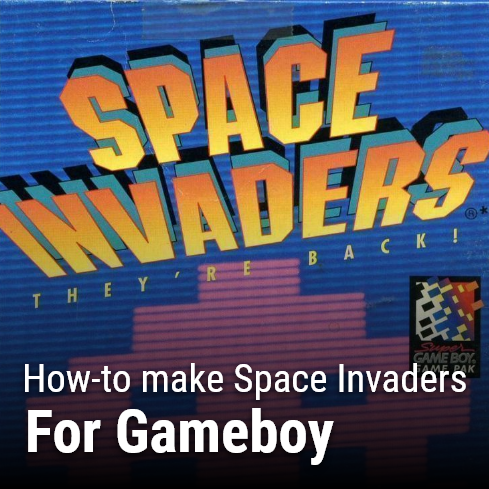
In this tutorial, you will learn how to make flappy bird for gameboy. If you are not yet familiar with gameboy game development via GBDK 2020, please refer to my tutorial series on How to make a Gameboy Game. You can watch a live demo of the final product on my YouTube Channel here.
Table of contents
Pre-requisites
There are only 2 requirements for this tutorial. You need to know how to program in C/C++, and you need a computer. If you want to learn how to program in C, there are many free YouTube tutorials (maybe the Junkyard will create one someday). In addition, there are tons of books on it like this one.
The GBKD 2020 Docs has a section for Basic C programming tutorials here: https://gbdk-2020.github.io/gbdk-2020/docs/api/docs_coding_guidelines.html#docs_c_tutorials
What is included? What is NOT included?
The final product of the tutorial will not be a 1-for-1 mirror of the original flappy bird. However, many of the original game’s features will be present. With the exception of In-game advertisements
What IS included:
- Score Counter
- Parallax Scrolling Backgrounds
- Rotating Bird based on velocity
- End Game Scoreboard w/ High Score and Medals
- One-button control scheme
- Pre-gameplay “tap to start” game state w/ title
- Graphics – Bird, Pipes, and Background
- Basic Sounds – Fly, Score Increase, and Death
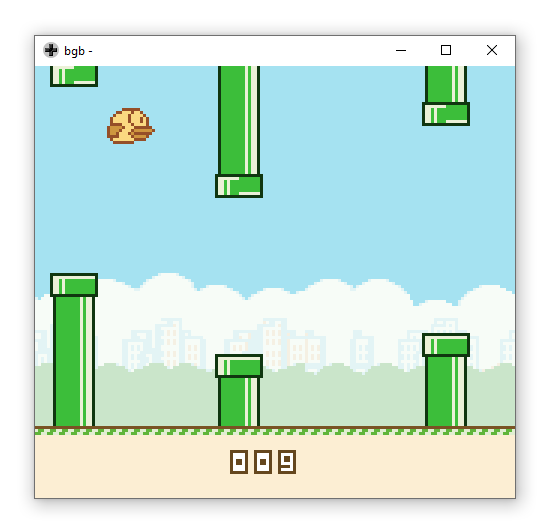
Our final output should look like this:
How to make Flappy Bird
To simplify things for readers, i have created a starter repository. This repository contains everything you need to get started with the tutorial, including:
- .c and .h files for all graphics
- .c and .h files pre-created for our game’s logic
- A make.bat to compile your .gb file.
- #include’s set for included files
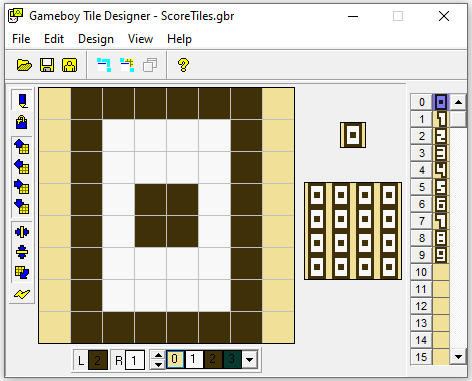
- GBTD .gbr Files for the ground, score, and bird
- Aseprite files used also
This tutorial requires GDK 2020 is installed on the computer. Check our our tutorial on that here. Once installed, you may need to update the make.bat to point to where it’s at.
Here is the starter repository. I hope you enjoy the tutorial. If you want to just see the final product, check out this repository!

Our Entry Point
A game’s entry point is where everything begins. In our case, what the gameboy hardware is going to run when the cartridge is inserted. Our game’s entry point (the “main” function) lies in our main.c file. In this file we are going to handle our game loop and game state management.
void main(void){
}
Before we get into game state management there is somethings we need to do. Specifically, turn on the display, enable the background & sprites, enable sound, and populate VRAM with some tiles. All of this will be done in a function called “GameFirstLoad”. This function will be called at the beginning of our main function. We’ll create this function in the next section, once we are finished with our main.c file.
void main(void){
    GameFirstLoad();
}
Our Game will have 3 game states. Gameplay Start, The Core Game Loop, and The Gameplay End. We need to create two variables to represent our current and next game state. We will default them to GAMEFIRSTLOAD and GAMEPLAYSTART respectively. These are macros that we will define in Common.c later.
void main(void){

    ... Code from previous step(s)

    uint8_t currentGameState=GAMEFIRSTLOAD;
    uint8_t nextGameState=GAMEPLAYSTART;
}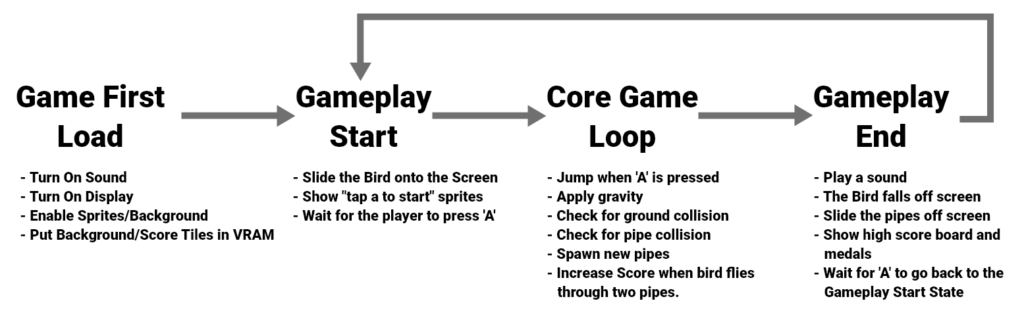
Each of our game states will define a “setup” and “update” function. Whenever we start a new game state, we will first call it’s setup function. Our update function will run indefinitely and return which state to go to next, or the same state. If the same state is returned, the update function will continue to run indefinitely.
With the variables now created to represent the current & next game state, we will start our game’s main while loop. This loop will infinitely run. An iteration in this loop looks like this:
- Keep Track of Joypad Input
- Scroll the background and Apply Gravity (to the bird)
- Call the setup function of the new game state, if we are switching.
- Update our current game state (and get the next game state)
- Wait for the gameboy’s vertical blank phase to complete
For more info on Joypad input, check out How to handle Gameboy Joypad input
Some things to NOTE: We still need to create many of the functions & variables used below. The bird’s position is not yet being changed.
void main(void){

    ... Code from previous step(s)

    while(1){

        // Save the last joypad state
        joypadPrevious=joypadCurrent;
        joypadCurrent=joypad();

        ScrollTheBackgroundAndApplyGravity();

        // If we are changing game state
        if(nextGameState!=currentGameState){

            // Update our current game state
            currentGameState=nextGameState;

            // Call our game state's setup function
            if(currentGameState==GAMEPLAYSTART)GameplayStartSetup();
            else if(currentGameState==COREGAMELOOP)CoreGameLoopSetup();
            else if(currentGameState==GAMEPLAYEND)GameplayEndSetup();

        }

        // Call our game state's update function
        if(currentGameState==GAMEPLAYSTART)nextGameState=GameplayStartUpdate();
        else if(currentGameState==COREGAMELOOP)nextGameState=CoreGameLoopUpdate();
        else if(currentGameState==GAMEPLAYEND)nextGameState=GameplayEndUpdate();

        // Wait until the vertical blank phase has completed
        wait_vbl_done();
    }
}
Were almost done with the main.c file. We just need to define the “ScrollTheBackgroundAndApplyGravity” function. This function will help us scroll different parts of the background at different rates. Here’s the rate at which our background sections should scroll:
- Clouds – 1px every 10 frames
- City Buildings – 1px every 5 frames
- Bushes – 1px every 2 frames
- Ground – 1px every frame
The function will also apply basic gravity to the bird’s y velocity. But it will not actually update our bird’s position.
void ScrollTheBackgroundAndApplyGravity(){

    backgroundScrollCounter++;

    // We only scroll the background clouds (by one) every 10frames, so it scrolls slower than pipes move
    if(backgroundScrollCounter>=10){
        topBackgroundScroll++;

        backgroundScrollCounter=0;
    }

    // We only scroll the city buildings every 5 frames
    if(backgroundScrollCounter%5==0){
        midBackgroundScroll++;
    }

    // We only scroll the background bushes every 2 frames
    if(backgroundScrollCounter%2==0){
        lowBackgroundScroll++;
    }

    // The scroll of the ground floor
    // We scroll this every frame
    floorBackgroundScroll++;

    // Increase velocity, but limit to avoid high falling speeds
    if(birdVelocityY<21){
        birdVelocityY++;

    }
}
Common Variables
Before we go on, we need to declare some variables. These variables will be used throughout the game, so we are placing them in a common file. This file’s header file equivalent will be used in a lot of our classes. What each variable does is in the comments (if not self-explanatory).
// A counter for scrolling the background
// We'll move different parts of the background at different rates
// Top background = clouds - scroll 1px every 10 frames
// mid background = city - scroll 1px every 5 frames
// low background = bushes - scroll 1px every 2 frames
// floor background = ground - scroll 1px every frame
uint8_t backgroundScrollCounter=0,topBackgroundScroll=0,midBackgroundScroll=0,lowBackgroundScroll=0,floorBackgroundScroll=0;

// Used for keeping track  of the current and previous states of the gameboy joypad
uint8_t joypadCurrent;
uint8_t joypadPrevious;

int16_t birdY=80;
uint8_t birdX=24;
uint8_t score=0,highScore=0;

// Are we currently between two pipes (one above, and one below)
// Later: Whenever this value changes from 1 to 0, we will increase score
uint8_t betweenTwoPipes=0;

// How fast is the bird moving up or down
// This needs to be a signed integer so we can have negative (rising) values
int8_t birdVelocityY=0;

// Used to help spawn pipes
uint8_t distance=0;

// Is the bird alive (1) or dead (0)
uint8_t alive=0;
Other files will not directly include the common.c file. They will instead include the common.h header file. So we need to declare that those variables exist in that common.h file. In addition, we will setup macros for the game states.
#define GAMEFIRSTLOAD 0
#define GAMEPLAYSTART 1
#define GAMEPLAYEND 2
#define COREGAMELOOP 3

extern uint16_t birdY;
extern int8_t birdVelocityY;
extern uint8_t backgroundScrollCounter,highScore,floorBackgroundScroll,joypadCurrent,joypadPrevious,birdX,score,betweenTwoPipes,distance,alive,topBackgroundScroll,midBackgroundScroll,lowBackgroundScroll;
Getting the game compiling
As of now, your game probably won’t compile. This is because we’ve tried to use a bunch of things that didn’t yet exist. The simple solution to get things going: Let’s create those things ahead of time now. If you are using the starter repo, then all of these .c and.h files should be created already.
void GameFirstLoad(){}void GameFirstLoad();void GameplayStartSetup(){}
uint8_t GameplayStartUpdate(){}void GameplayStartSetup();
uint8_t GameplayStartUpdate();void CoreGameLoopSetup(){}
uint8_t CoreGameLoopUpdate(){}void CoreGameLoopSetup();
uint8_t CoreGameLoopUpdate();void GamelayEndSetup(){}
uint8_t GamelayEndUpdate(){}void GamelayEndSetup();
uint8_t GamelayEndUpdate();Your game should now compile, but a blank screen is all you will see. Next we will actually start getting some things drawn.
Game First Load
This function was called at the start of our game’s entry point. It exists to complete a few goals:
- Enable Sound
- Turn on our display, enable sprites, the background
- Setup an LCD interrupt for parallax background scrolling
- Popular VRAM with some of our game’s graphics (Specifically the background and score)
We only have to do all of this once. We’ll enable sound, sprites, and the background similar to how we did so in the following tutorials:
- How to play a sounds on Gameboy Hardware
- Drawing and Moving Sprites in Gameboy Games
- Drawing on the Background and Window Layers
void GameFirstLoad(){
// This enables Sound
// these registers must be in this specific order!
NR52_REG = 0x80; // is 1000 0000 in binary and turns on sound
NR50_REG = 0x77; // sets the volume for both left and right channel just set to max 0x77
NR51_REG = 0xFF; // is 1111 1111 in binary, select which chanels we want to use in this case all of them. One bit for the L one bit for the R of all four channels
DISPLAY_ON;
SHOW_BKG;
SHOW_SPRITES;
SPRITES_8x16;
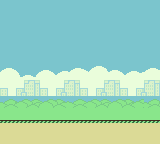
}We will use a LCD interrupt to achieve parallax scrolling. Parallax scrolling is a basic technique you see in games, and is observable in real life. Things further from you move slower than things closer to you. So we will scroll different parts of the background at different speeds.
Our LCD interrupt will be triggered before a scan line is drawn by the gameboy. The function called during each interrupt, “HandlingBackgroundScrolling”, will be defined once we’ve completed the “GameFirstLoad” function.
void GameFirstLoad(){

    ... Code from previous steps

    // We're gonna use interrupts to achieve parallax scrolling
    // Set the LYC register at 0, where we will start the scrolling logic
    // From there we will move diferent chunks of the background different amounts
    STAT_REG|=0x40; //enable LYC=LY interrupt
    LYC_REG=0;
    disable_interrupts();
    add_LCD(HandleBackgroundScrolling);
    set_interrupts(LCD_IFLAG|VBL_IFLAG);
    enable_interrupts();

}
Next we need to setup VRAM with the tiles & palettes for our background and score tiles.
void GameFirstLoad(){
... Code from previous steps
/////////////////////
// Setting up VRAM //
/////////////////////
const UWORD ScoreTilesPalette[] ={ ScoreTilesCGBPal1c0,ScoreTilesCGBPal1c1,ScoreTilesCGBPal1c2,ScoreTilesCGBPal1c3} ;
set_bkg_data(0,FlappyBirdBackground_TILE_COUNT,FlappyBirdBackground_tiles);
set_bkg_data(FlappyBirdBackground_TILE_COUNT,ScoreTilesLen,ScoreTiles);
set_bkg_palette(0,3,FlappyBirdBackground_palettes);
set_bkg_palette(3,1,ScoreTilesPalette);
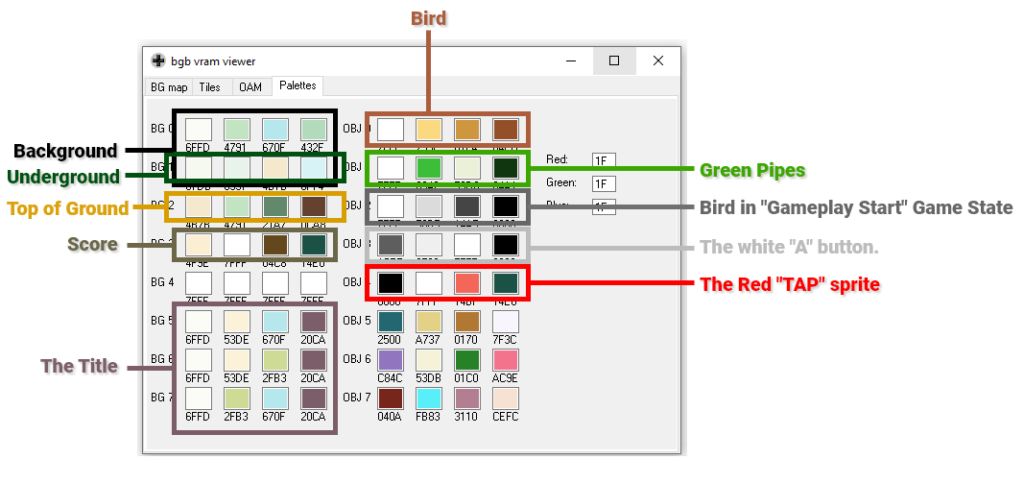
}Here’s a breakdown of our color palettes in VRAM:
NOTE: The green pipes, title, and bird palettes have not yet been set.
With VRAM setup for our background and score, we’ll display our background image.
void GameFirstLoad(){

    ... Code from previous steps

    /////////////////////////
    // Draw our background //
    /////////////////////////

    VBK_REG = 1;
    set_bkg_tiles(0,0,32,18,FlappyBirdBackground_map_attributes);
    VBK_REG = 0;
    set_bkg_tiles(0,0,32,18,FlappyBirdBackground_map);
}
That’s it for our “GameFirstLoad” function. Above we added an LCD interrupt that will achieve parallax scrolling. That interrupt would invoke a function named “HandleBackgroundScrolling”. Here is what that function should be. This should be placed above the “GameFirstLoad” function.
void HandleBackgroundScrolling(){

    // If the gameboy is drawing line 0 (the top of the screen)
    if(LYC_REG==0){

        // The interrupt should next trigger at line 63
        LYC_REG=63;

        // Move everything below on the background (until our next interrupt at 63) back to the starting position
        move_bkg(0,0);

        // Re-show sprites
        SHOW_SPRITES;

    // if the gameboy is drawing line 63
    }else if(LYC_REG==63){

        // The interrupt should next trigger at line 79
        LYC_REG=79;

        // Move everything below on the background (until our next interrupt at 79) according to this variable
        move_bkg(topBackgroundScroll,0);

    // if the gameboy is drawing line 79
    }else if(LYC_REG==79){

        // The interrupt should next trigger at line 95
        LYC_REG=95;

        // Move everything below on the background (until our next interrupt at 95) according to this variable
        move_bkg(midBackgroundScroll,0);

    // if the gameboy is drawing line 95
    }else if(LYC_REG==95){

        // The interrupt should next trigger at line 119
        LYC_REG=119;

        // Move everything below on the background (until our next interrupt at 119) according to this variable
        move_bkg(lowBackgroundScroll,0);

    // if the gameboy is drawing line 119
    }else if(LYC_REG==119){

        // The interrupt should next trigger at line 125
        LYC_REG=125;

        // Move everything below on the background (until our next interrupt at 125) according to this variable
        move_bkg(floorBackgroundScroll,0);

    // if the gameboy is drawing line 125
    }else if(LYC_REG==125){

        // The interrupt should next trigger at line 0
        LYC_REG=0;

        // Move everything below on the background (until our next interrupt at 0) back to the starting position
        move_bkg(0,0);

        // Prevent pipes from overlapping
        HIDE_SPRITES;
    }

}
If properly done, when you compile and run your gameboy .gb file, you should see a simple background. If you load up a VRAM viewer, you’ll notice all of the background and score tile data in VRAM.

Gameplay Start – Sliding the Bird into view
In this section we are going finally show the bird. Our Gameplay Start State’s Setup function, “GameplayStartSetup”, will be called after the game first loads, and after each player death. So we need to make sure VRAM and all necessary variables are in a proper state. Firstly, we are going to move all the sprites reserved for the green pipes off screen. We are also going to assign their palette.
void GameplayStartSetup(){

    // Clear up sprites for usage
    // Move all non-player sprites to large number
    // So our logic later tracks them as 'unused' (x > 176)
    // Also set their palette
    for(uint8_t i=2;i<40;i++){
        move_sprite(i,250,0);
        set_sprite_prop(i,1);
    }
}
Next we are going to put into VRAM our sprites for the “tap a to start” guide.
void GameplayStartSetup(){

    .. Code from previous step

    const UWORD TapToStartPalette[] = {TapToStartSpritesCGBPal0c0,TapToStartSpritesCGBPal0c1,TapToStartSpritesCGBPal0c2,TapToStartSpritesCGBPal0c3};
    const UWORD TapSpritePalette[] = {TapToStartSpritesCGBPal2c0,TapToStartSpritesCGBPal2c1,TapToStartSpritesCGBPal2c2,TapToStartSpritesCGBPal2c3};
    const UWORD BirdPalette[] = {BirdAndPipesCGBPal0c0,BirdAndPipesCGBPal0c1,BirdAndPipesCGBPal0c2,BirdAndPipesCGBPal0c3};
    const UWORD BlackAndWhitePalette[] ={32767,22197,5285,0};
    const UWORD PipesPalette[] = {BirdAndPipesCGBPal1c0,BirdAndPipesCGBPal1c1,BirdAndPipesCGBPal1c2,BirdAndPipesCGBPal1c3};

    // Put our bird, the pipes, and the menu sprites (a button, and 'tap' sign) into VRAM
    set_sprite_data(0,BirdAndPipesLen,BirdAndPipes);
    set_sprite_data(BirdAndPipesLen,TapToStartSpritesLen,TapToStartSprites);

    // Set the palettes for our birds, pipes, and the menu sprites
    set_sprite_palette(0,2,BirdPalette);
    set_sprite_palette(1,1,PipesPalette);
    set_sprite_palette(2,1,BlackAndWhitePalette);
    set_sprite_palette(3,1,TapToStartPalette);
    set_sprite_palette(4,1,TapSpritePalette);
}
The next part involves calling a function called “ClearTopSky”. This is necessary because the gameplay end game state leads to the gameplay start state. During the gameplay end game state the high score board will be drawn on the background, overriding the blue sky tiles. To avoid those tiles persisting our “ClearTopSky” function will re-draw the top half of the sky. We will also use this again later after drawing the
title/logo on the background.
void GameplayStartSetup(){

    .. Code from previous step

    // Clear the top sky so when we come from GameplayEnd the Board is painted over.
    ClearTopSky();
}
Here is the code for the ClearTopSky function. This should go above the “GameplayStartSetup” function.
// Draw the top 8 rows back onto the background
// Anything that was previously there will be oerriden
// This is important when coming from the gameplay end GameplayStartSetup
// Otherwise the scoreboard would partially show behind the title.
void ClearTopSky(){

    VBK_REG = 1;
    set_bkg_tiles(0,0,20,8,FlappyBirdBackground_map_attributes);

    VBK_REG = 0;
    set_bkg_tiles(0,0,20,8,FlappyBirdBackground_map);
}
Next in our “GameplayStartSetup” function we need to call another function (that we haven’t yet created). This time we are going to call a function called “ShowFlappyBirdLogo”. What this function does should be self-explanatory.
void GameplayStartSetup(){

    .. Code from previous step

    // Show logo
    ShowFlappyBirdLogo();
}
Here is the definition of that function. It should go above our GameplayStartSetup function.
// Show the flappy bird title/logo at 4,1
// The assets assume their corresponding tiles are at the start of VRAM
// They are not, because of this, we need to use a helper array to offset their values
// Once we have offset their values we can display their tiles on the background layer
void ShowFlappyBirdLogo(){

    uint8_t i;

    // Put our title into VRAM after our score and the background tiles
    set_bkg_data(FlappyBirdBackground_TILE_COUNT+ScoreTilesLen,FlappyBirdTitle_TILE_COUNT,FlappyBirdTitle_tiles);

    // Add an additional background palette for the title
    set_bkg_palette(5,3,FlappyBirdTitle_palettes);

    // A helper array or passing offset plane 0 and 1 into vram
    unsigned char FlappyBirdTitle_map_offset[48];

    for(i=0;i<48;i++){

        // Offset by 5
        // Our FlappyBirdTitle thinks it's color palettes start at 0, when they really start at 5
        FlappyBirdTitle_map_offset[i]=FlappyBirdTitle_map_attributes[i]+5;
    }

    // Plane 1 for setting attributes
    VBK_REG = 1;

    // Our title is 12 x 4 tiles in size
    set_bkg_tiles(4,1,12,4,FlappyBirdTitle_map_offset);

    for(i=0;i<48;i++){

        // Offset by our background and score tiles
        // Our FlappyBirdTitle thinks it's tiles are at the start of VRAM, when really they are ater the background and score itles
        FlappyBirdTitle_map_offset[i]=FlappyBirdTitle_map[i]+FlappyBirdBackground_TILE_COUNT+ScoreTilesLen;
    }

    // Plane 0 for setting tile mappings
    VBK_REG = 0;

    // Our title is 12 x 4 tiles in size
    set_bkg_tiles(4,1,12,4,FlappyBirdTitle_map_offset);
}
Were almost done with our GameplayStartSetup function, there are two more things to do. Next we are going to position the bird far off screen to the right, we will set his default tiles to use, and we are also going to set his palette to use the black and white color palette. When we go to the “CoreGameLoop” game state we will update his color palette.
void GameplayStartSetup(){

    ... Code from previous steps

    // put the bird off screen
    birdX=240;
    birdY=80;

    // Set our player's tiles
    set_sprite_tile(0,2);
    set_sprite_tile(1,4);

    // Set our player's tile palette to be the black and white palette
    set_sprite_prop(0,2);
    set_sprite_prop(1,2);
}
The last part of our “GmeplayStartSetup” function is to setup sprites for our “tap to start” guides. We’ll set them to use sprites 2& 4 and sprites 4 & 5.
void GameplayStartSetup(){

    ... Code from previous steps

    // Set our "tap hand" sprites tiles
    set_sprite_tile(2,BirdAndPipesLen);
    set_sprite_tile(3,BirdAndPipesLen+2);
    set_sprite_prop(2,3);
    set_sprite_prop(3,3);

    // Set our "tap" text sprites tiles
    set_sprite_tile(4,BirdAndPipesLen+4);
    set_sprite_tile(5,BirdAndPipesLen+6);
    set_sprite_prop(4,4);
    set_sprite_prop(5,4);
}
That’s it for our “GameplayStartSetup” function. Next we will work on it’s associated update function: GameplayStartUpdate.
In our gameplay start game state’s update function we are going to increase the bird’s x coordinate until it is more than 24 and less than 160. Our bird starts at 240. Because the birdX variable is a uint8_t when the variable reaches 256 it will loop background to 0. Afterwards, we’ll need to update the bird’s two sprites to match it’s current position.
uint8_t GameplayStartUpdate(){

    // Move tothe right, while our birdX is less than 24
    // Our bird starts at 240 (off screen tothe right)
    // We also check to make sure it's larger than 160 (the width of the screen in pixels)
    if(birdX<24||birdX>160)birdX++;

    move_sprite(0,birdX+8,birdY+16);
    move_sprite(1,birdX+16,birdY+16);
}
In this next if-else statement we are going to conditionally show the “tap a” sprite. If the bird is in it’s ready state, at birdX >= 24px, we will show the “tap a” sprite below the bird. Otherwise, we will not show it.
uint8_t GameplayStartUpdate(){

    ... Code from previous step

    // If the bird isn't in it's ready spot
    if(birdX<24||birdX>=160){

        // Drawing the Tap hand sprite at 0,0
        // sprites at 0,0 are not visible
        move_sprite(2,0,0);
        move_sprite(3,0,0);
    }else {

        // Drawing the Tap hand sprite Below the bird
        move_sprite(2,birdX+8,birdY+32);
        move_sprite(3,birdX+16,birdY+32);
    }
}
Somewhat similarly, we want to only show the “tap” sign sprite when the bird is in it’s ready state. But we also want this sprite to flash on and off. So the logic will be the same as with the “tap a” sprite. Excet we have one additional condition for showing the sprite. We’ll use our “floorBackgroundScroll” variable, division, and the modulo operator to make sure we only show it every other 3 frames.
uint8_t GameplayStartUpdate(){

    ... Code from previous steps

    // Sprites 4 and 5 are the "tap" sign
    // We want to show it on and off every 3 frames or so.
    // We'll use the floorBackgroundScroll since it's always moving
    if((floorBackgroundScroll/3)%2==0&&birdX>=24&&birdX<160){

        //Drawing the tap sign sprite to the right of the bird

        move_sprite(4,birdX+32,birdY+24);
        move_sprite(5,birdX+40,birdY+24);

    }else {

        // Drawing the tap sign sprite at 0,0
        // sprites at 0,0 are not visible

        move_sprite(4,0,0);
        move_sprite(5,0,0);

    }
}
We’re just about ready to end the “gameplayStartUpdate” function. The last part of this function will check if the A button is down. If the A button is down, and the bird is in it’s ready state. We will:
- Clear all non-bird sprites
- Clear the top sky again (our title was previously drawn on the background)
- Proceed onto the core game loop game state. Before we proceed on
uint8_t GameplayStartUpdate(){

    .. Code from previous steps

    // If the player presses A and the bird is larger than or equal to 24
    // The bird starts off screen to the right, we make sureit's X is less than 160. So were sure it's on screen
    if(birdX>=24&&birdX<160&&(joypad() & J_A)){

        // Clear up sprites for usage
        // Move all non-player sprites to large number
        // So our logic later tracks them as 'unused' (x > 176)
        // Also set their palette
        for(uint8_t i=2;i<40;i++){
            move_sprite(i,250,0);
            set_sprite_prop(i,1);
        }

        ClearTopSky();

        return COREGAMELOOP;
    }

    return GAMEPLAYSTART;
}
Core Game Loop
Now Start’s our core game loop’. Our setup for this game state is pretty minimal.
- assign the bird it’s rightful color palette.
- give some variables proper default values
- draw the score initially (We’ll cover drawing the score in the next section.)
void CoreGameLoopSetup(){

    // Update the bird's palette to be it's normal one.
    set_sprite_prop(0,0);
    set_sprite_prop(1,0);

    alive=1;
    score=0;
    distance=0;
    betweenTwoPipes=0;
    birdVelocityY=-14;

    UpdateScoreTextAt(8,16,score);
}
That’s it for the “CoreGameLoopSetup” function. Onto the “CoreGameLoopUpdate” function. We are going to start our CoreGameLoop game state’s update function by checking for player input. Specifically, checking if the A button was just pressed. If so, we will give the birdVelocityY a negative value (so it is rising), and play a sound.
uint8_t CoreGameLoopUpdate(){

    // If we jsut pressed the A button
    if((joypadCurrent & J_A) && !(joypadPrevious & J_A)){

        // Set our y velocity to negative, to rise up
        birdVelocityY=-14;

        // PLay a sound
        NR10_REG=0x1C;
        NR11_REG=0x44;
        NR12_REG=0x42;
        NR13_REG=0x43;
        NR14_REG=0x86;

    }
}
Next we are going to move and update our bird. To do this we will use a function called “MoveAndUpdateFlappyBird”. This function will be used in the Gameplay End Game State also, so we will put it in our common.c and common.h files.
uint8_t CoreGameLoopUpdate(){

    ... Code from previous step(s)

    MoveAndUpdateFlappyBird();
}
Next we are going to handle pipes. Specifically scoring (by flying in between pipes), and dying by colliding into pipes.
We need to save if we are between two pipes or not. After we save such, we will reset us to NOT being between pipes. This may seem weird, but the next function we call,”ScrollSpritesForPipes”, is going to do 4 things.
- Scroll the sprites used by the pipes
- Check for bird collision against those pipes
- Re-evaluate if the bird is in between two pipes
- Return how many sprites are in use.
In order to spawn pipes, we have two conditions that need to be met:
- We want a random distance to have passed
- We need at least 10 sprites NOT in use
The first thing of those 2 things, the passing of a random distance, is tracked via our “distance” variable. We decrement this variable every update if it is larger than 0. The second thing on those 2 things, how many sprites are not in use, is given to us from the previously called “ScrollSpritesForPipes”. If both conditions are met, we will spawn new pipes at the right side of the screen.
Ater spawning pipes possibly, If we WERE between pipes, and now we are not. We will play a sound, increase score (and possibly high score), and update the score on the background.
uint8_t CoreGameLoopUpdate(){

    ... Code from previous step(s)

    // Save whether or not we WERE previously between pipes
    uint8_t wasBetweenPipes=betweenTwoPipes;

    // Set us as NOT inbetween pipes by default
    betweenTwoPipes=0;

    uint8_t numberOfInUseSprites = ScrollSpritesForPipes(1);

    // Wait until a random amount of distance as passed
    if(distance!=0)distance--;

    // make sure we have enough sprites NOT in use
    // The  top/bottom pipe combinations take around 10 sprites maximum
    // So make sure we don't have more than 30 in use (there are 40 sprites max for gameboy games)
    else if(numberOfInUseSprites<30){

        SpawnPipes();

        // Wait a random amount of distance until we spawn another pipe
        distance=RandomNumber(36,76);
    }

    // If we were between pipes, but now we are not
    // We want to increase our score and play a sound
    if(wasBetweenPipes==1&&betweenTwoPipes==0){

        NR21_REG=0x81;
        NR22_REG=0x44;
        NR23_REG=0xD7;
        NR24_REG=0x86;

        score++;
        if(score>highScore)highScore=score;

        UpdateScoreTextAt(8,16,score);
    }
}
Our “CoreGameLoopUpdate” function, like our other update functions, must return which game state to go to next. If the bird is still alive, we return the same state. If the bird is no longer alive, we return the gameplay end state. The previously mentioned “ScrollSpritesForPipes” function helps us with this. It will set the bird as no longer alive if a collision is detected.
uint8_t CoreGameLoopUpdate(){

    ... Code from previous steps


    if(alive==0)return GAMEPLAYEND;
    else return COREGAMELOOP;

}
In these next sub-sections, we’ll declare some functions we previously used:
- SpawnPipes
- ScrollSpritesForPipes
- MoveAndUpdateFlappyBird
- UpdateScoreTextAt
Core Game Loop – Spawning New Pipes
For spawning pipes we first need to decide how tall the top pipe will be. In terms of 8×16 sprites, the top pipe can be 1-4 sprites tall. Which equates to 16 – 64 pixels tall. After we determine that, we determine how much space will be between the top pipe and the bottom pipe. We’ll keep this between 3 and 4. The size of the bottom sprite will be the remainder of space until we reach the “ground” (window).
The window is drawn 120 pixels from the top of the screen. The gameboy screen is 144 pixels tall. if we divide 120 by 16 (the height of our sprites),we get 7.5. Which we will round up to 8. Meaning, that we can fit 8 sprites vertically from the top ofthe screen to where the window/ground starts (line 120). The size of our bottom pipe will be 8 minus the size of the gap and the size of the top pipe.
In addition, we want to randomly move the top pipe up some, and the bottom pipe down some.
void SpawnPipes(){

    // The size of the top pipe, how much space in-between, and the size of the bottom pipe
    uint8_t top = RandomNumber(1,4);
    uint8_t space = RandomNumber(3,4);

    // Randomly move the top upwards and the bottom downwards some.
    uint8_t rdrop1 = RandomNumber(0,16);
    uint8_t rdrop2 = RandomNumber(0,16);

}
With our pipe sizes calculated, we will first spawn the top pipe. Each pipe is two sprites wide. We will use a for loop and in each iteration, setup two sprites to represent that chunk of the pipe. Pipes use sprite palette 1. We will use a different sprite tile if we are at the “lip” of the pipe. The tiles used are referenced from VRAM.
void SpawnPipes(){

    ... Code from previous step

    // The top pipe
    // Each iteration of the for loop represents one 16x16 portion of a sprite ( 2 sprites)
    for(uint8_t  j=0;j<top;j++){

        uint8_t spr = GetAvailableSprite();


        // We checked that we had enough sprites
        // However, if for any reason this returns 0: stop everything
        if(spr==0)return;

        // Set the sprite's tile, it's color palette, and it's position
        set_sprite_tile(spr,j==(top-1)?28:22);
        set_sprite_prop(spr,1);
        move_sprite(spr, 168,j*16+16-rdrop1);


        spr = GetAvailableSprite();


        // We checked that we had enough sprites
        // However, if for any reason this returns 0: stop everything
        if(spr==0)return;

        // Set the sprite's tile, it's color palette, and it's position
        set_sprite_tile(spr,j==(top-1)?32:24);
        set_sprite_prop(spr,1);
        move_sprite(spr, 176,j*16+16-rdrop1);

    }

}
Next we do the same thing for the bottom pipe.
void SpawnPipes(){

    ... Code from previous step

    // The bottom pipe
    // Each iteration of the for loop represents one 16x16 portion of a sprite ( 2 sprites)
    for(uint8_t j=top+space;j<8;j++){

        uint8_t spr = GetAvailableSprite();


        // We checked that we had enough sprites
        // However, if for any reason this returns 0: stop everything
        if(spr==0)return;

        // Set the sprite's tile, it's color palette, and it's position
        set_sprite_tile(spr,j==(top+space)?30:22);
        set_sprite_prop(spr,1);
        move_sprite(spr, 168,j*16+16+rdrop2);


        spr = GetAvailableSprite();

        // We checked that we had enough sprites
        // However, if for any reason this returns 0: stop everything
        if(spr==0)return;

        // Set the sprite's tile, it's color palette, and it's position
        set_sprite_tile(spr,j==(top+space)?26:24);
        set_sprite_prop(spr,1);
        move_sprite(spr, 176,j*16+16+rdrop2);

    }

}
Core Game Loop – Scroll Sprites for Pipes
We still need to define the “ScrollSpritesForPipes” function. We will define this function in our common.c because we will use this function outside of our Core Game Loop game state.
This function is going to do 4 things.
- Scroll the sprites used by the pipes
- Check for bird collision against those pipes (set the bird as dead in such case)
- Re-evaluate if the bird is in between two pipes
- Return how many sprites are in use.
We don’t have any custom data objects created to represent the pipes, so we’ll compare with the Shadow OAM items. Without getting technical. The shadow_OAM array items associate with each sprite. We can observe and manipulate each sprite by accessing it’s shadow_OAM object.
When a sprite’s x position is less than 177, we’ll consider that sprite “in use”. If that sprite is “in use” we’ll:
- increase our count of in use sprites
- move that sprite over to the left some
- Check if the bird is between pipes (if the bird is alive)
- Check if the bird has collided (if the bird is alive)
uint8_t ScrollSpritesForPipes(uint8_t speed){

    uint8_t numberOfInUseSprites=2;

    for(uint8_t i=2;i<40;i++){

        OAM_item_t * itm = &shadow_OAM[i];

        if(itm->x<=176){

            numberOfInUseSprites++;

            scroll_sprite(i,-speed,0);

            if(alive){

                // Check if we horizontally align with the player
                if(itm->x<birdX+2)continue;
                if(itm->x>birdX+21)continue;

                // If our x coordinates align with the player,
                // They are 'betweenTwoPipes'
                betweenTwoPipes=1;

                // Check if we vertically align with the player
                if(itm->y<birdY)continue;
                if(itm->y>birdY+32)continue;

                alive=0;
            }
        }
    }

    return numberOfInUseSprites;
}
Let’s not forget to declare this function in the common.h header file.
uint8_t ScrollSpritesForPipes(uint8_t speed);Common – Move and Update Flappy Bird
Now we are going to define our “MoveAndUpdateFlappyBird” function. We are finally going to apply the bird’s y velocity to the bird. Because this value can be relatively high, we’ll divide by 5 for a weaker gravity. AFter applying the y velocity, we’ll check the birrd’s y position. If we are too low, we’ll set the bird as dead.
Before we update the location of our sprites, we want to update the tiles for those sprites. We will use the bird’s y velocity for this. Our bird has a total of 5 different angles we can draw it at. Each angle takes 4 sprites. The tiles that make up each of these different angles are stored sequentially in VRAM starting at tile 2. (there are 2 blank tiles at 0 and 1)

// Move the bird vertically based on birdVelocityY
// Set the bird as not alive if too low
// Choose the proper sprite for our bird
// Gameboy doesn't support rotation of sprites
// Thus we have extra sprites for different rotation states
void MoveAndUpdateFlappyBird(){

    // our bird's default state is tile 2
    uint8_t tile=2;

    // Apply velocity
    birdY+=birdVelocityY/5;

    // Avoid going TOO low
    if(birdY>106){
        alive=0;
    }

    // use a different tile based on our y velocity
    if(birdVelocityY>10)tile=14;
    if(birdVelocityY>18)tile=18;
    if(birdVelocityY<-5)tile=6;

    // Set the proper tile for our bird
    set_sprite_tile(0,tile);
    set_sprite_tile(1,tile+2);

    move_sprite(0,birdX+8,birdY+16);
    move_sprite(1,birdX+8+8,birdY+16);
}
Common – Update Score Text At
Our “UpdateScoreTextAt” function will be used to update the score on the background. This function is going to use division and the modulo operator (%) to set the proper tiles for score display. The modulo operator is the remainder after division. For a more in-depth explanation, check out this stack overflow post.
We previously put the tiles for score immediately after the background in VRAM. We set the color palette the score tiles use in slot 3. The “UpdateScoreTextAt” function wil set 3 tiles at a time (horizontally)
void UpdateScoreTextAt(uint8_t x, uint8_t y,uint16_t scoreToDisplay){

    unsigned char scorePlane1[] = {0x03,0x03,0x03};
    unsigned char scoreText[] = {0,0,0};

    // The score tiles start immediately after the background tiles
    scoreText[0]=(scoreToDisplay/100)%10+FlappyBirdBackground_TILE_COUNT;
    scoreText[1]=(scoreToDisplay/10)%10+FlappyBirdBackground_TILE_COUNT;
    scoreText[2]=scoreToDisplay%10+FlappyBirdBackground_TILE_COUNT;

    VBK_REG = 1;
    set_bkg_tiles(x,y,3,1,scorePlane1);

    VBK_REG = 0;
    set_bkg_tiles(x,y,3,1,scoreText);
}
Like in previous scenarios, we can’t forget to declare this function in our header file.
void UpdateScoreTextAt(uint8_t x, uint8_t y,uint16_t scoreToDisplay);Utiltity Functions
In our spawn pipes function we used a “RandomNumber” function, and a “GetAvailableSprite” function. These are not builtin, we’ll define them now in our Utilities.c file.
The “RandomNumber” function returns a pseduo random value. The code is going to get the value at 0xFF04 in memory, and clamp that value between the minimum and maximum values specified. The register at 0xFF04 changes freqeuntly, so it will suffice for a random number generator.
The “GetAvailableSprite” function simply returns the first sprite with an x value less than 200. When we spawn pipes, their x positions are less than 200. If a spawned pipe’s x position is greater than 200, then it has went of the left side of the screen and looped back around (due to it’s x coordinate being a uint8_t)
uint8_t RandomNumber(uint8_t min, uint8_t max){
    unsigned char *ptr_div_reg = 0xFF04;
    return min+(*(ptr_div_reg) % (max-min));    // get value at memory address
}

uint8_t GetAvailableSprite(){
    for(uint8_t i=2;i<40;i++){
        OAM_item_t * itm = &shadow_OAM[i];
        if(itm->x>=200)return i;
    }
    return 0;
}
Our CoreGameLoop game state will be finished once we decalre these two functions in their respective header file.
uint8_t RandomNumber(uint8_t min, uint8_t max);
uint8_t GetAvailableSprite();
At this point in time, you should have a working game. Next we are going to wrap things up, and handle when the bird dies.
Gameplay End
At this point in time, our bird has hit a pipe. We want the bird to fall off screen, and then we want the pipes to scroll offscreen. After the screen has been cleared of the bird and pipes, we’ll show the scoreboard. After the player presses A again, can go back to the Gameplay Start game state. Our Scoreboard will show the current score, the high score, and the medal earned.
- Bronze – 10+ points
- Silver – 20+ points
- Gold – 30+ Points
- Platinum – 40+ points
Our setup function for this game state will also be very minimal. In our Setup function, now that bird has died, we are going to play a sound to tell the player. We’ll also default the value of a helper variable, “areShowingGameplayEndBoard” to 0.
uint8_t areShowingGameplayEndBoard=0;

void GameplayEndSetup(){

    // Play a noise
    NR10_REG=0x7C;
    NR11_REG=0x41;
    NR12_REG=0x73;
    NR13_REG=0x73;
    NR14_REG=0x86;

    areShowingGameplayEndBoard=0;
}
In our update function, if we are not showing the high score board, we check if the bird’s y is low enough on screen. We will scroll pipes at normal speed until the bird is offscreen, then we will scroll pipes off screen faster.
Our “ScrollSpritesForPipes” doesn’t affect the bird, so we’ll manually move it to the left one pixel each update.
uint8_t GameplayEndUpdate(){


    uint8_t numberOfInUseSprites=2;

    if(areShowingGameplayEndBoard==0){

        // Scroll the pipes faster when the bird is fully offscreen
        if(birdY>=176)numberOfInUseSprites=ScrollSpritesForPipes(4);
        else numberOfInUseSprites=ScrollSpritesForPipes(1);
    }

    // Move our bird to the left along with our scrolling pipes
    birdX-=1;
}
This is the second-to-last code snippet of this tutorial. To wrap up the gameplay end game state’s update function we need to:
- Move and update the flappy bird until it’s offscreen.
- Show the game end board when the bird is offscreen and no pipes remain
- Wait for the A button to be pressed, so we can go back to the gameplay start state.
uint8_t GameplayEndUpdate(){

    ... Code from previous step

    // While the player's y isn't really large
    // We're going to make the player fall off screen
    // Eventually the player will physically reach below (greater than) 176 and the loop will stop
    if(birdY<176){

        MoveAndUpdateFlappyBird();

    // If the bird is far off screen, let's scroll in use sprites until none are on screen.
    }else if(areShowingGameplayEndBoard==0 && numberOfInUseSprites==2){

        areShowingGameplayEndBoard=1;

        ShowGameplayEndBoard();

    }else{

        if((joypadCurrent & J_A) && !(joypadPrevious & J_A)){
            return GAMEPLAYSTART;
        }
    }

    return GAMEPLAYEND;
}
Here is our “ShowGameplayEndBoard” function. This should be defined above our “GameplayEndUpdate” function. This function draws the high score board on the background. This is one of thereasons in our “GamelayStartSetup” function we need the “ClearTopSky” function.
// This function will cover showing our high score board.
// Here's everything it will do:
// - Cover the score on the bottom of the background
// - Show the high score board on the background
// - Score the score and high score
// - Conditionally show the medal earned.
void ShowGameplayEndBoard(){

    ////////////////////////////////////////////////////////
    // Cover up the score at the bottom of the background //
    ////////////////////////////////////////////////////////

    unsigned char coverScoreTiles[3]={0,0,0};

    VBK_REG = 1;
    get_bkg_tiles(0,17,3,1,coverScoreTiles);
    set_bkg_tiles(8,16,3,1,coverScoreTiles);
    VBK_REG = 0;
    get_bkg_tiles(0,17,3,1,coverScoreTiles);
    set_bkg_tiles(8,16,3,1,coverScoreTiles);

    ///////////////////////////////
    // Show our high score board //
    ///////////////////////////////

    unsigned char FlappyBirdEnd_map_offset2[98];
    unsigned char FlappyBirdEnd_map_offset[98];

    // Our gameplay end board expects to have it's tiles & palettes at the start of VRAM
    // Because this is not the case, we need to use 2 helper arrays to offset these values
    // The color palettes should start at 5
    // The tiles should be after the background & scores tiles.
    for(uint8_t i=0;i<98;i++){
        FlappyBirdEnd_map_offset2[i]=FlappyBirdEnd_map_attributes[i]+5;
        FlappyBirdEnd_map_offset[i]=FlappyBirdEnd_map[i]+FlappyBirdBackground_TILE_COUNT+ScoreTilesLen;
    }

    set_bkg_data(FlappyBirdBackground_TILE_COUNT+ScoreTilesLen,FlappyBirdEnd_TILE_COUNT,FlappyBirdEnd_tiles);
    set_bkg_palette(5,2,FlappyBirdEnd_palettes);

    VBK_REG = 1;
    set_bkg_tiles(3,1,14,7,FlappyBirdEnd_map_offset2);
    VBK_REG = 0;
    set_bkg_tiles(3,1,14,7,FlappyBirdEnd_map_offset);

    /////////////////////////////////////////////
    // Draw our scores on the high score board //
    /////////////////////////////////////////////

    UpdateScoreTextAt(13,3,score);
    UpdateScoreTextAt(13,6,highScore);

    ///////////////////////////////////////////////////
    // Show our medal if we have more than 10 points //
    ///////////////////////////////////////////////////

    if(score>10){

        set_sprite_data(24,64,FlappyBirdMedals_tiles);
        set_sprite_palette(0,3,FlappyBirdMedals_palettes);

        uint8_t medal = 0;

        if(score>20)medal=1;
        if(score>30)medal=2;
        if(score>40)medal=3;

        // inline uint8_t move_metasprite(const metasprite_t * metasprite, uint8_t base_tile, uint8_t base_sprite, uint8_t x, uint8_t y) {
        move_metasprite(FlappyBirdMedals_metasprites[medal],24,2,60,61);

    }
}
Conclusion
That’s it! Our games done. Feel free to compile the .gb file and run it in an emulator. You can double check your code against my finished version in this github repository.
I hope everything was explained clearly. If you have any questions, do not hesitate to reach out, your questions and criticism help The Junkyard improve. If you found his helpful and/or interesting, please do The Junkyard a favor and share on social media.
If you want to run this on some actual gameboy, try looking into getting a EZ Flash Jr.