Drawing on the Background and Window Layers
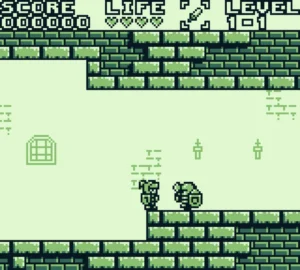
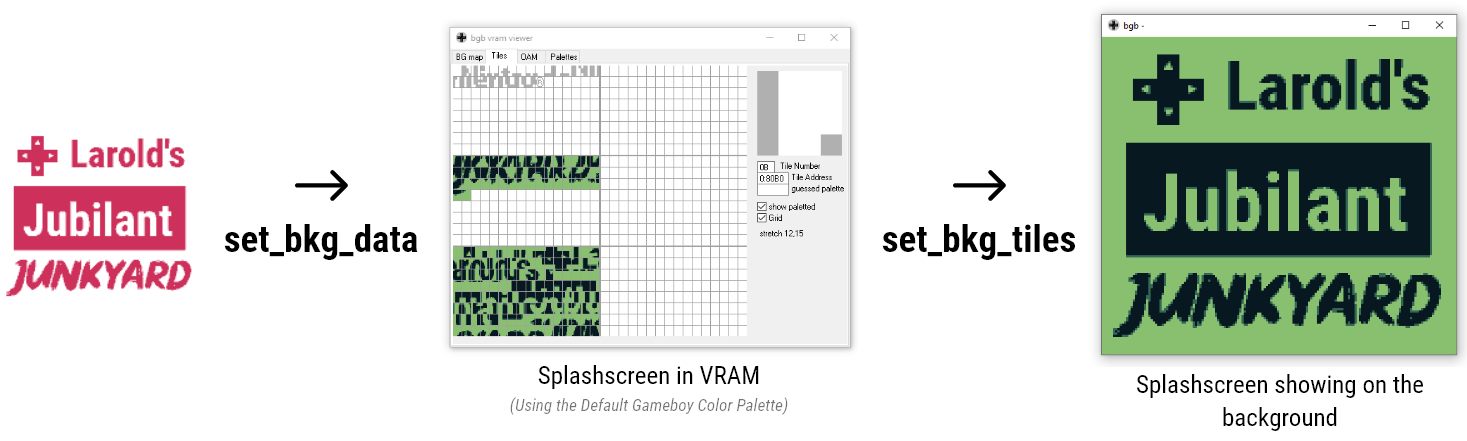
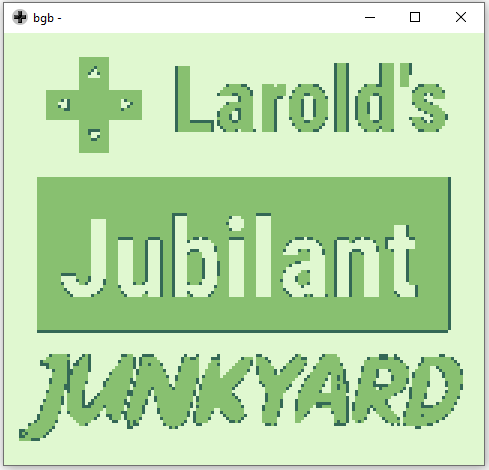
This is part 2 of my “How to make a Gameboy Game” tutorial series. If you haven’t read part 1 yet, you can find it here. In part 1, a minimal GBDK template was used get a minimal/blank .gb ROM file created. In this part 2 we will get a basic background showing. Here is a visual:
If you want to know more about the inner workings of backgrounds, checkout our our guide on Gameboy Graphics. From here, part 2 can be broken down into 4 major steps.
- Convert the Background Image to GBDK .c and .h files.
- Add our .c and .h files to existing code
- Place the background tiles into VRAM (set_bkg_data)
- Showing the background (set_bkg_tiles)
The background and window layers are tile maps, made of 8×8 sized tiles. Each layer is 32 tiles wide, and 32 tiles high. This makes their overall max size in pixels 256x256px. The background and window layers do not support transparency, and they share the same Tile data in VRAM. (This means that the window and background will use the same tiles). The background and window can be moved freely separately.
The Gameboy screen is 160px by 144px. The tiles in the background & window tilemaps will wrap around when they exceed the 256px mark vertically and/or horizontally. Here is an awesome video that explains more about the background and window on the Gameboy.
If you want to learn how to draw maps larger than 256x256px in size, check out this tutorial: Drawing Large Maps in GBDK
Check us out on Youtube
If you are a visual learner, check out the Larold’s Jubilant Junkyard YouTube Page. I’ve started uploading videos there too. The video editing process takes a lot longer than writing tutorials, and am juggling multiple projects at once, but it is on my TODO list to do a full video series and more.
Initial Files
For this step, i’m going to be using a basic background i created from my logo. I’ve already converted the background to GBDK format here:
- https://drive.google.com/file/d/1hvtuaokEGMBFIYKSkV4chfx82LzBYyVI/view?usp=sharing
- https://drive.google.com/file/d/1aM2LR5KyKs81TMLmR_oa8qXf91ljw5Yk/view?usp=sharing
Those two files need to be downloaded and placed alongside your main.c file. Once these two files have been downloaded, we need to make sure the .c file is actually compiled and included in our .gb file.
Make.bat:
					:: delete previous files
DEL *.gb

:: compile .c files into .o files
C:\gbdk\bin\lcc -c -o main.o main.c
C:\gbdk\bin\lcc -c -o LaroldsJubilantJunkyard.o LaroldsJubilantJunkyard.c

:: Compile a .gb file from the compiled .o files
C:\GBDK\bin\lcc -o DrawingOnTheBackgoundAndWindow.gb main.o LaroldsJubilantJunkyard.o

:: delete intermediate files created for the conmpilation process
DEL *.asm
DEL *.lst
DEL *.ihx
DEL *.sym
DEL *.o
In our main.c file we need to include the header file also.
Main.c:
					#include <gb/gb.h>
#include "LaroldsJubilantJunkyard.h"

void main(void)
{
    DISPLAY_ON;
}
Showing the background
					#include <gb/gb.h>
#include "LaroldsJubilantJunkyard.h"

void main(void)
{
    DISPLAY_ON;

    SHOW_BKG;
    // Use HIDE_BKG; to turn the background OFF
}
Placing background tiles into VRAM
VRAM stands for “Video RAM”. Before we get into how to display backgrounds and sprites, the topic of VRAM must be shortly explained.
For Gameboy games, it is a essentially a variable collection of 8x8px tiles. There is a dedicated space in VRAM for sprites, and another dedicated space in VRAM for the background/window (they share this space). Both spaces can have a maximum of 256 tiles. The contents of these spaces can be changed at any time.
For ANYTHING to be displayed on screen, it must be stored in VRAM first. Everything you see on screen maps to a VRAM tile.
The GBDK “set_bkg_data” function will place a given number of tiles in the VRAM space dedicated to the window/background. This function takes in 3 parameters.
- The first parameter is where in VRAM to start placing the tile.
- The second parameter is how many tiles to place in VRAM
- The Third parameter is a pointer to the actual tiledata. I have a tutorial on understanding the GBDK/Gameboy Tileformat
Usage of the “set_bkg_data” function looks like this:
					#include <gb/gb.h>
#include "LaroldsJubilantJunkyard.h"

void main(void)
{
    DISPLAY_ON;

    SHOW_BKG;
    // Use HIDE_BKG; to turn the background OFF

    // Load & set our background data
    set_bkg_data(0,178,LaroldsJubilantJunkyard_data);
}
Drawing tiles on the Background Layer
					#include <gb/gb.h>
#include "LaroldsJubilantJunkyard.h"

void main(void)
{
    DISPLAY_ON;

    SHOW_BKG;
    // Use HIDE_BKG; to turn the background OFF

    // Load & set our background data
    set_bkg_data(0,178,LaroldsJubilantJunkyard_data);

    // The gameboy screen is 160px wide by 144px tall
    // We deal with tiles that are 8px wide and 8px tall
    // 160/8 = 20, and 144/8 = 18
    set_bkg_tiles(0,0,20,18,LaroldsJubilantJunkyard_map_plane0);
}
If you now run the make.bat file, you should see a background with the default gameboy colors. It’s not very pretty, but it’s something. We can add colors later in this tutorial.
Drawing tiles on The Window Layer
Adding color to the background/window (Gameboy Color Only)
This section only applies for gameboy color games. If we want to enable color backgrounds, then we need to do a little more. Firstly, we need to add the “-Wm-yC” flag when compiling our .gb file.
					:: Compile a .gb file from the compiled .o files
C:\GBDK\bin\lcc -Wm-yC  -o DrawingOnTheBackgoundAndWindow.gb main.o LaroldsJubilantJunkyard.o
Secondly, we need to update our headers to include <gb/cgb.h>.
					#include <gb/gb.h>
#include <gb/cgb.h>
#include "LaroldsJubilantJunkyard.h"

void main(void)
{
    ... Code from previous steps

    // The "LaroldsJubilantJunkyard_pallette" color palette is defined in LaroldsJubilantJunkyard.c
    set_bkg_palette(0,1,LaroldsJubilantJunkyard_pallette);
}
Thirdly, we need to put our desired color palettes in VRAM. The following code places 1 palette in the first color palette slot.
					#include <gb/gb.h>
#include <gb/cgb.h>
#include "LaroldsJubilantJunkyard.h"

void main(void)
{
    ... Code from previous steps

    // The "LaroldsJubilantJunkyard_pallette" color palette is defined in LaroldsJubilantJunkyard.c
    set_bkg_palette(0,1,LaroldsJubilantJunkyard_pallette);
}
- bit 7 – priority: When set to 1, the associated tile appears ABOVE sprites.
- bit 6 – vertical flip: When set to 1, the associated tile is flipped vertically.
- bit 5 – horizontal flip: When set to 1, the associated tile is flipped horizontally.
- bit 4 – not used
- bit 3 – Which bank (0 or 1) the tile is taken from
- bits 2-0 – Which color palette to use.
If you are just setting which color palette to use, like in this tutorial, you just need to use a value between0 and 7 inclusive.
The second map is stored in VRAM bank 1. To switch to bank 1, we need to use a GBDK provided “VBK_REG” macro. Oncewe are in VRAM bank 1, we can setthetiles for our second map/plane.
					#include <gb/gb.h>
#include <gb/cgb.h>
#include "LaroldsJubilantJunkyard.h"

void main(void)
{
    ... Code from previous steps

    // Switch to bank 1 for writing background tile attributes.
    VBK_REG=1;
    set_bkg_tiles(0,0,20,18,LaroldsJubilantJunkyard_map_plane1);
}
					#include <gb/gb.h>
#include <gb/cgb.h>
#include "LaroldsJubilantJunkyard.h"

void main(void)
{
    ... Code from previous steps

    // Switch back to bank 0 to prevent accidentally writing to bank 1
    VBK_REG=0;
}
The final product can also be seen on github: https://github.com/LaroldsJubilantJunkyard/drawing-on-the-background-and-window
If you want to draw very large maps, The Junkyard has a tutorial on that too: Drawing Large Maps in GBDK