How to play a sounds on Gameboy Hardware
Games would not be complete without proper sound. Good sound & music bring games to life. In this final part of How to make a Gameboy Game, we are going to go over how to play basic sounds in GBDK.
Unfortunately, i’m still learning all the details behind sounds on the gameboy. I cannot give in-depth explanations behind how things work, but i can show you how to do it. If you want a more in-depth look, check out this page on Gameboy Sound Hardware over at https://gbdev.gg8.se/
This tutorial is going to continue from Part 4: How to handle Gameboy Joypad input. We wont need to add any new files, here is our starting main.c file:
					#include <gb/gb.h>
#include "SimpleSprite.h"

UINT8 joypadPrevious;
UINT8 spriteX,spriteY;
INT8 velocityX,velocityY;

void main(void)
{
    DISPLAY_ON;
    SHOW_SPRITES;

    set_sprite_data(0,1,SimpleSprite);
    set_sprite_tile(0,0);
    move_sprite(0,84,88);

    // Set our default position
    spriteX=80;
    spriteY=72;

    // Set our default velocity to be moving down and to the right
    velocityX=0;
    velocityY=0;

    // Loop forever
    while(1) {

        // If the right button on the d-pad is held down
        if(joypad() & J_RIGHT){

            // Positive x velocity to move the sprite to the right
            velocityX=1;

        // If the right button on the d-pad is held down
        }else if(joypad() & J_LEFT){

            // negative x velocity to move the sprite to the left
            velocityX=-1;
        }else{

            // Zero x velocity means no horizontal movement
            velocityX=0;
        }

        // If the "A" button was just pressed
        if((joypad() & J_A) && !(joypadPrevious & J_A)){

            // Move the sprite downward
            spriteY+=8;

        // If the "B" button was just presssed
        } else if((joypad() & J_B) && !(joypadPrevious & J_B)){

            // Move the sprite up
            spriteY-=8;
        }

        // Apply our velocity
        spriteX+=velocityX;
        spriteY+=velocityY;

        // Position the first sprite at our spriteX and spriteY
        // All sprites are render 8 pixels to the left of their x position and 16 pixels ABOVE their actual y position
        // This means an object rendered at 0,0 will not be visible
        // x+5 and y+12 will center the 8x8 tile at our x and y position
        move_sprite(0,spriteX+4,spriteY+12);

        joypadPrevious=joypad();

		// Done processing, yield CPU and wait for start of next frame
        wait_vbl_done();
    }
}
Master Control Registers
We have 3 registers for master sound control. These overall enable sound on each of the 4 channels, and can adjust volume for those channels on the left and right side speaker.
- NR52_REG – sets the volume for both left and right channel just set to max 0x77
- NR50_REG – sets the volume for both left and right channel just set to max 0x77
- NR51_REG – is 1111 1111 in binary, select which chanels we want to use in this case all of them. One bit for the L one bit for the R of all four channels
I don’t fiddle with these 3 registers, as i’m not knowledgeable enough with them. I usually set their values to 0x80, 0x77, and 0xFF respectively for my games. Let’s add that to the top of our main function from Part 4 How to handle Gameboy Joypad input:
// This enables Sound
// these registers must be in this specific order!
NR52_REG = 0x80; // is 1000 0000 in binary and turns on sound
NR50_REG = 0x77; // sets the volume for both left and right channel just set to max 0x77
NR51_REG = 0xFF; // is 1111 1111 in binary, select which chanels we want to use in this case all of them. One bit for the L one bit for the R of all four channels
Sound Registers
Sound is played in GBDK by changing the value of 4-5 specific registers. The sound output depends on which values you set to which registers. The gameboy has 4 different sound channels. Each channel has it’s own set of registers, and make’s its own type of sound. GBDK has preprocessor MACROs for each channels registers:
Channel 1
- NR10_REG
- NR11_REG
- NR12_REG
- NR13_REG
- NR14_REG
Channel 2
- NR21_REG
- NR22_REG
- NR23_REG
- NR24_REG
Channel 3
- NR30_REG
- NR31_REG
- NR32_REG
- NR33_REG
- NR34_REG
Channel 4
- NR41_REG
- NR42_REG
- NR43_REG
- NR44_REG
What values/channel should i use?
I’ll repeat that i am currently not knowledgeable enough to give an in-depth answer to this question. What i do is use a special set of code that comes with GBDK. This code can be compiled into a .gb file that allows you to make your own sounds. It also shows you which values to set for which registers. Here is a screenshot of the .gb file.
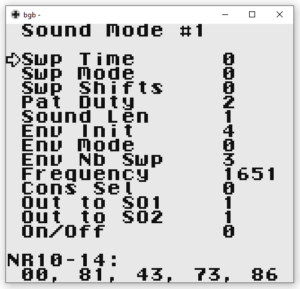 In this screenshot you can see at the bottom “NR10-14 and “00,81,43,73,86”. That means we neeed the following code to recreate that sound in GBDK:
					NR10_REG=0X00;
NR11_REG=0X81;
NR12_REG=0X43;
NR13_REG=0X73;
NR14_REG=0X86;
We could change the channel and parameters for the channel as we wish. For now, we are going to keep things as is. Let’s put the above code snippet in our existing code (twice) when the A or B buttons are pressed.
// If the "A" button was just pressed
if((joypad() & J_A) && !(joypadPrevious & J_A)){

    // Play a sound on channel 1
    NR10_REG=0X00;
    NR11_REG=0X81;
    NR12_REG=0X43;
    NR13_REG=0X73;
    NR14_REG=0X86;

    // Move the sprite downward
    spriteY+=8;

// If the "B" button was just presssed
} else if((joypad() & J_B) && !(joypadPrevious & J_B)){

    // Play a sound on channel 1
    NR10_REG=0X00;
    NR11_REG=0X81;
    NR12_REG=0X43;
    NR13_REG=0X73;
    NR14_REG=0X86;

    // Move the sprite up
    spriteY-=8;
}
That’s all you need for basic sound. From there, if you want to get more familiar with making sounds, you can fiddle around with the Sound.gb file in the repo. The source code for this part, can be found here: https://github.com/LaroldsJubilantJunkyard/playing-sounds-in-gbdk
I hope that was sufficient. In the future, when i become more knowledgeable on sound, i hope to return to this part of the tutorial with more expertise. If you have any questions, feel free to reach out on Social Media or by Email. Your criticism and questions help The Junkyard improve. If you found this helpful, please do share with your friends on social media. Thanks!
What about music?
This part of the tutorial is currently on my TODO list. For now, check out these two links:
When i become familiar enough, i will expand upon this section.