If you look out into the distance, and move around, you’ll notice that objects closer to you move slower than objects further from you. This effect is called “Parallax”
Parallax is the observed displacement of an object caused by the change of the observer’s point of view. In astronomy, it is an irreplaceable tool for calculating distances of far away stars.
From “What Is Parallax?” on Space.com
In games, parallax is used to give the user a sense of depth. In this tutorial, i’m going to show you how to create parallax backgrounds in your gameboy games using the GBDK 2020.
The key to implementing parallax backgrounds with GBDK 2020 is using STAT interrupts. An interrupt is a chunk of code called during specific points in time during the gameboy’s execution. The gameboy pan docs are the most detailed online source outlining the Gameboy hardware. Here is an excerpt from the pan docs regarding STAT interrupts:
One very popular use is to indicate to the user when the video hardware is about to redraw a given LCD line. This can be useful for dynamically controlling the SCX/SCY registers ($FF43/$FF42) to perform special video effects.
Example application: set LYC to WY, enable LY=LYC interrupt, and have the handler disable sprites. This can be used if you use the window for a text box (at the bottom of the screen), and you want sprites to be hidden by the text box.
https://gbdev.io/pandocs/Interrupt_Sources.html
In this tutorial, we’re going to take a simple flat background, and give this flat background an appearance of depth by moving parts backgrounds around at different speeds. For smooth motion, we are going to used Scaled Integers. I also have a tutorial on scaled integers if you are unfamiliar.
The background we are going to use, is from my Flappy Bird Tutorial. This image is 256 pixels wide (32 tiles wide) and 144 pixels high (18 tiles high).
NOTE: This tutorial does NOT take into consideration backgrounds larger than 256 pixels wide. The background tilemap is 256 x 256. If your background image is less than 256px wide, you will see a gap. If it’s larger than 256px wide, everything after the first 256 pixels will be omitted. For background images larger than 256px wide, parallax scrolling logic may need to be combined with the logic for large maps.
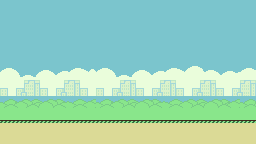
This is the final result. You can find the source code for this tutorial on github.
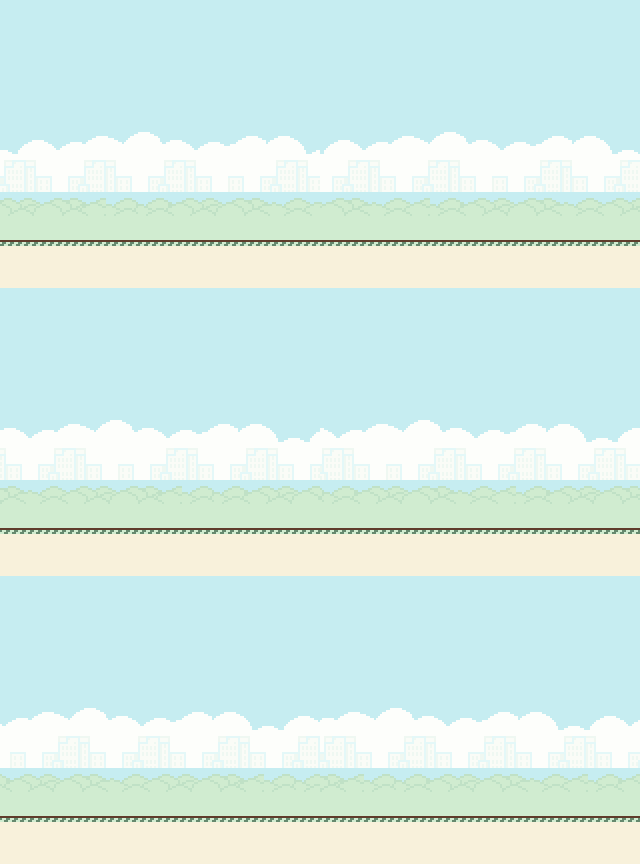
The start of this tutorial is relatively simple and common. We’re going to do everything discussed in my tutorials about drawing backgrounds. You can find a video format of that tutorial on my YouTube channel:
This is what we’ll start with:
#include <gb/gb.h>
#include <gb/cgb.h>
#include <stdint.h>
#include "FlappyBirdBackground.h"

void main(void)
{
    // Set the tiles for our background in vram
    set_bkg_data(0,FlappyBirdBackground_TILE_COUNT,FlappyBirdBackground_tiles);

    // Set the colors used by our background also into vram
    set_bkg_palette(0,FlappyBirdBackground_PALETTE_COUNT,FlappyBirdBackground_palettes);

    SHOW_BKG;
    DISPLAY_ON;

    // Set the attributes for each background tile
    VBK_REG =1;
    set_bkg_tiles(0,0,FlappyBirdBackground_WIDTH>>3,FlappyBirdBackground_HEIGHT>>3,FlappyBirdBackground_map_attributes);

    // Set the actual background tiles
    VBK_REG =0;
    set_bkg_tiles(0,0,FlappyBirdBackground_WIDTH>>3,FlappyBirdBackground_HEIGHT>>3,FlappyBirdBackground_map);


    // Loop forever
    while(1) {
		// Game main loop processing goes here


		// Done processing, yield CPU and wait for start of next frame
        wait_vbl_done();
    }
}
Once we’ve done that, we’ll increase our 16 bit variable used for scrolling. This variable, called ‘scrollValue‘ will be increased by 10 each frame. It will also be used to derive how much each section of the background moves by.
For implementing this variable, we’ll simply define it above the main function and increase it’s value by 10 in our game loop:
...

uint16_t scrollValue=0;

void main(void)
{
    ...

    // Loop forever
    while(1) {

        scrollValue+=10;

		     // Done processing, yield CPU and wait for start of next frame
        wait_vbl_done();
    }
}
Enabling STAT interrupts for our Parallax Backgrounds
The next addition to our main function will enable STAT interrupts. Our goal is that during a STAT interrupt, we’ll have a special function called when when the gameboy is about to redraw a specific scanline.
The LY register stores what scanline the gameboy is currently rendering. The gameboy, despite being 30+ years old, operates at 60fps. This means the LY register’s value will be always changing EXTREMELY FAST. We want our STAT interrupt to be called when the LY register equals the LYC register. For that, we do the following:
STAT_REG|=STATF_LYC; // prepare LYC=LY interrupt when LCD/STAT interrupts are enabledThat won’t immediately change things, but it will tell the gameboy how to operate with respect to the associated registers. Next we’ll provide a default value. Our STAT interrupt will be first called when the gameboy is redrawing the first scanline:
LYC_REG=0u;Next, we’ll add a LCD interrupt. We haven’t created the function yet, but we’ll get to that soon. We surround our function call in a CRITICAL section. This disables and enables interrupts while executing the inner contents. We do this because It’s not good to add the LCD interrupt while interrupts are currently running.
CRITICAL{
    add_LCD(HandleBackgroundScrolling);
}
The next line, will tell the gameboy which interrupts should be enabled. For our code to work, we need LCD interrupts enabled. By default, only Vertical Blank interrupts are enabled. We’ll use a bitwise “or” operation with the GBDK macro for Vertical Blank interrupts and ther GBDK macro for LCD interrupts. This ensures they are both enabled.
NOTE: It’s important to make sure we enable Vertical Blank Interrupts. Disabling Vertical Blank interrupts would cause the “wait_vbl_done” method to forever stall.
set_interrupts(LCD_IFLAG|VBL_IFLAG);This is our final main function:
void main(void)
{
    // Set the tiles for our background in vram
    set_bkg_data(0,FlappyBirdBackground_TILE_COUNT,FlappyBirdBackground_tiles);

    // Set the colors used by our background also into vram
    set_bkg_palette(0,FlappyBirdBackground_PALETTE_COUNT,FlappyBirdBackground_palettes);

    SHOW_BKG;
    DISPLAY_ON;

    // Set the attributes for each background tile
    VBK_REG =1;
    set_bkg_tiles(0,0,FlappyBirdBackground_WIDTH>>3,FlappyBirdBackground_HEIGHT>>3,FlappyBirdBackground_map_attributes);

    // Set the actual background tile
    VBK_REG =0;
    set_bkg_tiles(0,0,FlappyBirdBackground_WIDTH>>3,FlappyBirdBackground_HEIGHT>>3,FlappyBirdBackground_map);

    // We're gonna use interrupts to achieve parallax scrolling
    // Set the LYC register at 0, where we will start the scrolling logic
    // From there we will move diferent chunks of the background different amounts
    STAT_REG|=STATF_LYC; // prepare LYC=LY interrupt when LCD/STAT interrupts are enabled
    LYC_REG=0u; // set the scanline where interrupt first fires
    CRITICAL{
        add_LCD(HandleBackgroundScrolling);
    }
    set_interrupts(LCD_IFLAG|VBL_IFLAG); // additionally enable LCD interrupt

    // Loop forever
    while(1) {
        scrollValue+=10;

		    // Done processing, yield CPU and wait for start of next frame
        wait_vbl_done();
    }
}
Defining our LCD Interrupt function
We previously used a “HandleBackgroundScrolling” function when setting up our STAT interrupts. In this section we’ll define that function. This function is ultimately just a large Switch-case statement.
void HandleBackgroundScrolling(){

    switch(LYC_REG){

        ... will explain next
    }

}
This switch statement just checks the value of the LYC register. The logic for each case is pretty straight-forward. We’ll move the background’s position, and we’ll update the LYC register. Here’s an example:
case 65:

    // The interrupt should next trigger here
    LYC_REG=79;

    // Move everything below on the background (until our next interrupt)
    SCX_REG = scrollValue >> 7;

    break;
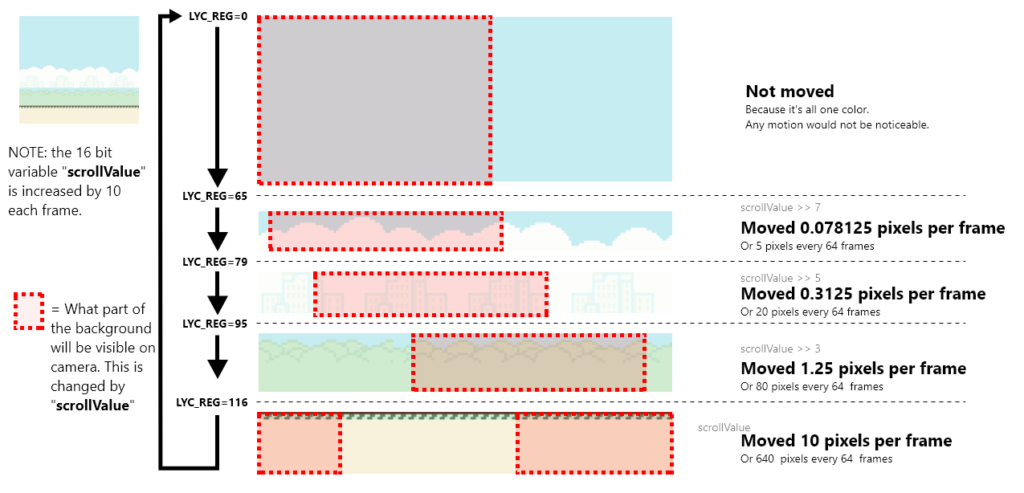
The above example is executed when our LYC & LY registers are equal to 65, we’ll then update the LYC register, so that our “HandleBackgroundScrolling” function is next called when our LYC & LY registers both equal 79. We also move the background (using the SCX register) over horizontally using the scrollValue. We bit-shift the scrollValue’s bits to the right to reduce it’s value some.
We’ll perform this logic multiple times. Each time, shifting less and less. Because we are bit-shifting to the right, the more we shift, the slower that chunk of the background will move. When we reach the scanline for our final section, we’ll update the LYC register to be 0. This will tell the gameboy that the next time to call the “HandleBackgroundScrolling” function is when it starts drawing at the top of the screen. Here’s a visual explaining how each section is moved.
Here is the final state of our function when we add in all the other cases.
void HandleBackgroundScrolling(){

    // What scanline are we currently at?
    switch(LYC_REG){

        case 0:

            // The interrupt should next trigger here
            LYC_REG=65;

            // No need to move the background here
            // This will all be one color
            // Any motion wont be noticable
            SCX_REG = 0;

            break;

        case 65:

            // The interrupt should next trigger here
            LYC_REG=79;

            // Move everything below on the background (until our next interrupt)
            SCX_REG = scrollValue>>7;

            break;

        case 79:

            // The interrupt should next trigger here
            LYC_REG=95;

            // Move everything below on the background (until our next interrupt)
            SCX_REG = scrollValue>>5;

            break;

        case 95:

            // The interrupt should next trigger here
            LYC_REG=116;

            // Move everything below on the background (until our next interrupt)
            SCX_REG = scrollValue>>3;

            break;

        case 116:

            // The interrupt should next trigger here
            LYC_REG=0;

            // Move everything below on the background (until our next interrupt)
            SCX_REG = scrollValue;

            break;
    }

}
That’s it! If you compile and run in a emulator (like Emulicious), you’ll see your Flappy Bird Background moving with a cool parallax effect.
I hope you found this tutorial helpful. If so, please share it with your friends and/or show some appreciation to Larolds Jubilant Junkyard on Facebook, or Twitter. Like & Subscribe to my YouTube channel for a video version later. If you have any problems or need any help, feel free to send me an email, leave a comment, or find me on the GBDev or GBDK/ZGB discord servers.
If you want to see the final result, you can find the source code for this tutorial on github.


