

Space Invaders is a classic video game. It’s simple, but fun mechanics have entertained many generations on virtually every gaming platform. In this tutorial, we’ll remake the black and white Gameboy version of space invaders.
This tutorial utilizes The C programming language and GBDK 2020. If you are not familiar with GBDK-2020, check out my other tutorial: How to make a Gameboy Game and check out the Actual GBDK 2020 Documentation. The GBDK-2020 Documentation is very extensive, and also has a guide regarding C Programming if you are rusty . Finally, here is a discord channel for GBDK if you want real-time help & tips


The contents of this tutorial will be ordered similar to how the game flows. If you skip to the Gameplay section, things may not work correctly.
Space Invaders is a simple game. On modern platforms, and with modern engines (like Unity or Unreal), it is not difficult to make. However, for gameboy things change. The biggest difficulty lies in the number of the invaders. Specifically, there can be 40 invaders on screen at a given time. However the gameboy’s hardware only allows 40 different OAM sprites on screen maximum. While this may seem like the perfect fit, it doesn’t leave room for the alien, the player, or any bullets.
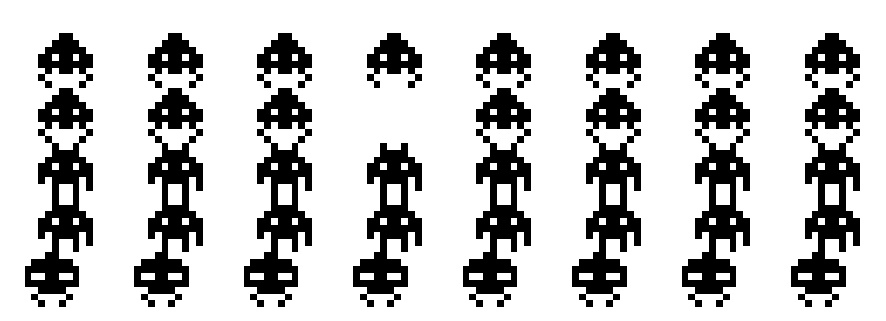
Because of this hardware limitation, creativity was needed. As explained later, the invaders are drawn using the background layer. Around 16 different tiles had to be created for each invader. Each tile features the same invader, but shifted to the left/right 0-7 pixels.
The final source code can be found here: https://github.com/LaroldsJubilantJunkyard/space-invaders-gameboy
Table of contents
Starter Content
This space invaders tutorial will be based off a starter repository. This repository will be hosted for free on GitHub. Usage of starter repository has two goals:
- Making it easier for readers to dive into the content.
- Simplifying the tutorial-writing process
The starter repository will contain all the assets you need to get started including:
- Pre-created .c and .h files
- “#include”s already setup in both .c and .h files
- All variables already declared and commented
- Empty functions in the .c and .h files
- Aseprite Development Graphics
- Generated PNG Graphics
- A make.bat for building the ROM file
- Common.c/h and HUD.c/h already filled out (so you can jump straight into the fun!)
You can find the starter repository here: https://github.com/LaroldsJubilantJunkyard/space-invaders-gameboy-starter
If you have any suggestions or questions, feel free to reach out. The Junkyard will use these suggestions/questions to improve the clarity of it’s content. For reference, I watched this longplay on YouTube a lot.
Build & Graphical Workflow
To compile the ROM file, use the Make.bat script. This script compiles all of the .c files into a SpaceInvaders.gb ROM file. This ROM file can be run on gameboy hardware or emulators. The script also converts the game’s palleted PNG graphics to .c and .h files before hand.
Unlike modern images, normal modern image formats (like PNGs, JPGs, etc.) cannot be used for graphics in GBDK/Gameboy games. Images have to be converted into a numerical format usable by GBDK 2020. For this Space Invaders Tutorial, i utilized a GBDK 2020 provided tool called “png2asset“. Graphics are drawn in aseprite (files included), and exported to palleted PNG files. png2asset takes these files and converts them into .c and .h files. I use the macros generated in those .h files to build some of my own macros. These are used throughout the tutorial and come from the common.h header file. Here are SOME of them:
NOTE: You don’t have to create/add this code. It will already be done for you in the starter repository.
#define PLAYER_SPRITE_START 1

// Sprites
#define BULLETA_SPRITE_START PLAYER_SPRITE_START+Player_TILE_COUNT
#define BULLETB_SPRITE_START BULLETA_SPRITE_START+BulletA_TILE_COUNT
#define BULLETC_SPRITE_START BULLETB_SPRITE_START+BulletB_TILE_COUNT
#define ALIEN_SPRITE_START BULLETC_SPRITE_START+BulletC_TILE_COUNT
#define EXPLOSION_SPRITE_START ALIEN_SPRITE_START+Alien_TILE_COUNT

// Backgrounds
#define SPACEINVADERSFONT_TILES_START 1

#define PLAYER_TILES_START SPACEINVADERSFONT_TILES_START+SpaceInvadersFont_TILE_COUNT
#define ALIEN_TILES_START PLAYER_TILES_START+Player_TILE_COUNT
#define INVADER1_TILES_START ALIEN_TILES_START+Alien_TILE_COUNT
#define INVADER2_TILES_START INVADER1_TILES_START+Invader1_TILE_COUNT
#define INVADER3_TILES_START INVADER2_TILES_START+Invader2_TILE_COUNT
#define BARRICADE_TILES_START INVADER3_TILES_START+Invader3_TILE_COUNT
#define BARRICADE_LAST_TILE BARRICADE_TILES_START+Barricade_TILE_COUNT-1

// Start after the title
#define SPACEINVADERSTITLE_TILES_START SPACEINVADERSFONT_TILES_START+SpaceInvadersFont_TILE_COUNT-5
I defined these macros so it’s easy for me to place & reference the VRAM tiles for various objects. Also, within reason, i can edit the graphics and things will still work if i add/remove tiles.
Depending on where your GBDK is installed, you may need to update these lines in make.bat and generate-graphics.bat:
(mine is located at C:/gbdk so that’s what value i set)
SET GBDK_HOME=C:/gbdkThe Main Loop / Entry Point
Our game’s entry point is very generic. It draws many similarities to the entry point in our How to make Flappy Bird for the Nintendo Gameboy tutorial. First we enable sound, turn on our display, and show the background & sprites.
We’ll split our game into different game states. Each of which will have their own setup and update functions. Each game state’s update function will return what game state to go to next.
In addition, we’ll fade our screen out and in when changing game stats.
void main(void){

    // This enables Sound
    // these registers must be in this specific order!
    NR52_REG = 0x80; // is 1000 0000 in binary and turns on sound
    NR50_REG = 0x77; // sets the volume for both left and right channel just set to max 0x77
    NR51_REG = 0xFF; // is 1111 1111 in binary, select which chanels we want to use in this case all of them. One bit for the L one bit for the R of all four channels

    DISPLAY_ON;
    SHOW_SPRITES;
    SHOW_BKG;
    SPRITES_8x8;

    uint8_t currentGameState = GAMEFIRSTLOAD;
    uint8_t nextGameState = STARTSCREEN;

    while(1){

        joypadPrevious=joypadCurrent;
        joypadCurrent=joypad();

        if(nextGameState!=currentGameState){
            currentGameState=nextGameState;

            FadeScreen(0,255);

            fill_bkg_rect(0,0,20,18,0);
            ClearAllSprites();

            if(currentGameState==STARTSCREEN)SetupStartScreen();
            else if(currentGameState==MENUSCREEN)SetupMenuScreen();
            else if(currentGameState==GAMEPLAYSCREEN)SetupGameplayScreen();
            else if(currentGameState==GAMEOVERSCREEN)SetupGameOverScreen();
            else if(currentGameState==NEXTLEVELSCREEN)SetupNextLevelScreen();

            FadeScreen(255,0);
        }


        if(currentGameState==STARTSCREEN)nextGameState=UpdateStartScreen();
        else if(currentGameState==MENUSCREEN)nextGameState=UpdateMenuScreen();
        else if(currentGameState==GAMEPLAYSCREEN)nextGameState=UpdateGameplayScreen();
        else if(currentGameState==GAMEOVERSCREEN)nextGameState=UpdateGameOverScreen();
        else if(currentGameState==NEXTLEVELSCREEN)nextGameState=UpdateNextLevelScreen();


        wait_vbl_done();
    }


}
Fading is very simple in this case, since our game only really uses black and white. We’ll use a for loop to change the only sprite and background palettes. When fading out, we’ll set all colors in the palette to white gradually. When fading in, we’ll set all colors (except the first) to black gradually. A “wait_vbl_done()” is used in the for loop to make sure the changes aren’t instantaneous.
void FadeScreen(uint8_t start, uint8_t end){

    int8_t dir = 15;
    if(end<start)dir=-15;

    // Since we are only using black and white, fading is easy
    for(uint16_t fade=start;fade!=end;fade+=dir){

        const palette_color_t blackAndWhite[4] = { RGB8(255, 255, 255), RGB8(fade, fade, fade),RGB8(fade, fade, fade),RGB8(fade, fade, fade)    };

        // Update color palettes
        set_sprite_palette(0,1,blackAndWhite);
        set_bkg_palette(0,1,blackAndWhite);

        wait_vbl_done();
    }

}
Next we’ll go into the logic for each game state. The explanations in this Space Invaders Tutorial are done in the order they appear in the game.
The Start Screen
For our start screen game state, we want to show the title, the high score, our brand name, and some basic “push to start” text. In the setup function, we’ll place the necessary tiles into VRAM for this. I cover this in my Drawing on the Background and Window Layers tutorial. These are our tiles for the space invaders font, and the tiles for the space invaders title.
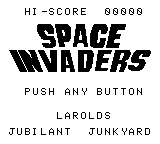
Once our tiles are set in VRAM, we’ll draw the title on the background and move the background downwards 144 pixels. Our update function will scroll the title onto the screen and then draw the rest.
void SetupStartScreen(){

    blinkCounter=0;

    set_bkg_data(SPACEINVADERSFONT_TILES_START,SpaceInvadersFont_TILE_COUNT,SpaceInvadersFont_tiles);
    set_bkg_data(SPACEINVADERSTITLE_TILES_START,SpaceInvadersTitle_TILE_COUNT,SpaceInvadersTitle_tiles);

    // Draw the Space Invaders Title
    set_bkg_based_tiles(1,3,18,6,SpaceInvadersTitle_map,SPACEINVADERSTITLE_TILES_START);

    // Move the background down 144px
    // The gameboy screen is 144px tall
    move_bkg(0,144);
}
Our start screen’s update function will scroll the title into view. The title is drawn on the background, which was offset 144px downwards in the setup function. When the background finally reaches it’s original location, we’ll draw our high score, and our “Larold’s Jubilant Junkyard” text.
Now that they title is in it’s proper location, we’ll use a “blinkCounter” variable to hide and show the “press any button” text. We’ll hide/show the text ever 30 frames or so. Finally, now that are title is in position, if any (non d-pad) button is pressed, we’ll go to the menu screen game state next.
uint8_t UpdateStartScreen(){

    blinkCounter++;

    // If the background's y position is larger than zero
    if(SCY_REG>0){

        // Move the background back to 0
        scroll_bkg(0,1);

        // If the background has just reached 0
        if(SCY_REG==0){

            // Reset our counter
            blinkCounter=30;

            // Draw our high score and name
            DrawText(3,1,"HI-SCORE");
            DrawNumber(13,1,highScore,5);
            DrawText(7,14,"LAROLDS");
            DrawText(1,16,"JUBILANT  JUNKYARD");
        }
    }

    // If the background's y position is at 0
    if(SCY_REG==0){

        // When our linkCounter reaches 30
        if(blinkCounter==30){

            blinkCounter=0;

            // If there is anything at this tile
            if(get_bkg_tile_xy(3,11)!=0){

                // Fill the background with tiles on that row
                // This will effectively replace the drawn tiles o the"push any button "text with blank tiles
                fill_bkg_rect(3,11,16,1,0);
            }else {

                // Draw the "push any button" text
                DrawText(3,11,"PUSH ANY BUTTON");
            }
        }

        // If any (non d-pad) button is pressed, return that we should go to the menu screen first.
        if((joypadCurrent & J_A)||(joypadCurrent & J_B)||(joypadCurrent & J_START)||(joypadCurrent & J_SELECT))return MENUSCREEN;
    }

    return STARTSCREEN;

}
The Menu Screen
Our “Menu Screen” isn’t really a menu, but just a simple guide on the game’s elements. The setup function for our menu screen may look complex. But it really is not. This function is going to prepare VRAM for gameplay. All sprite and background data will be placed in their proper spots. These spots are defined using “_SPRITE_START” and “_TILES_START” macros in the common.h header file.
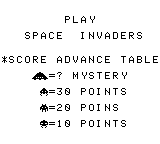
After setting VRAM up, we’ll draw text and some tiles onto the background. The “DrawText” function comes from HUD.c and is explained later on.
void SetupMenuScreen(){

    // Setup our sprites for gameplay
    set_sprite_data(PLAYER_SPRITE_START,Player_TILE_COUNT,Player_tiles);
    set_sprite_data(BULLETA_SPRITE_START,BulletA_TILE_COUNT,BulletA_tiles);
    set_sprite_data(BULLETB_SPRITE_START,BulletB_TILE_COUNT,BulletB_tiles);
    set_sprite_data(BULLETC_SPRITE_START,BulletC_TILE_COUNT,BulletC_tiles);
    set_sprite_data(ALIEN_SPRITE_START,Alien_TILE_COUNT,Alien_tiles);
    set_sprite_data(EXPLOSION_SPRITE_START,Explosion_TILE_COUNT,Explosion_tiles);

    // Place everything in background VRAM so we can draw it on the menu screen and in gameplay
    set_bkg_data(SPACEINVADERSFONT_TILES_START,SpaceInvadersFont_TILE_COUNT,SpaceInvadersFont_tiles);
    set_bkg_data(PLAYER_TILES_START,Player_TILE_COUNT,Player_tiles);
    set_bkg_data(ALIEN_TILES_START,Alien_TILE_COUNT,Alien_tiles);
    set_bkg_data(INVADER1_TILES_START,Invader1_TILE_COUNT,Invader1_tiles);
    set_bkg_data(INVADER2_TILES_START,Invader2_TILE_COUNT,Invader2_tiles);
    set_bkg_data(INVADER3_TILES_START,Invader3_TILE_COUNT,Invader3_tiles);
    set_bkg_data(BARRICADE_TILES_START,Barricade_TILE_COUNT,Barricade_tiles);

    // Draw some text
    DrawText(8,2,"PLAY");
    DrawText(3,4,"SPACE  INVADERS");
    DrawText(0,7,"*SCORE ADVANCE TABLE");

    // Draw the alien mystery score (100)
    set_bkg_tile_xy(4,9,ALIEN_TILES_START);
    set_bkg_tile_xy(5,9,ALIEN_TILES_START+1);
    DrawText(6,9,"=? MYSTERY");

    // Draw how much each invader earns you in points
    set_bkg_tile_xy(5,11,INVADER1_TILES_START);
    DrawText(6,11,"=30 POINTS");
    set_bkg_tile_xy(5,13,INVADER2_TILES_START);
    DrawText(6,13,"=20 POINS");
    set_bkg_tile_xy(5,15,INVADER3_TILES_START);
    DrawText(6,15,"=10 POINTS");

}
The update function for our menu screen is very simple. Just wait until A is pressed, then reset our gameplay variables. We’ll set the score to zero, the player’s lives to 3, and the level to 1. Afterwards, we’ll return that the game should show the “next level” game state next.
If you aren’t familiar with input, check out this tutorial: How to handle Gameboy Joypad input
If A is not pressed, stay on the menu screen.
uint8_t UpdateMenuScreen(){

    // If the a button was just pressed
    if((joypadCurrent & J_A) && !(joypadPrevious & J_A)){

        // Start us on level 1, 3 lives, with no score
        player.lives=3;
        level=1;
        score=0;

        // Go to the next level screen
        return NEXTLEVELSCREEN;
    }

    // Continue on the menu screen
    return MENUSCREEN;

}
The Next Level Screen
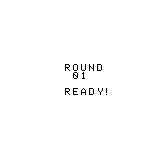
Our next level game state will be very simple. The setup function for our next level game state will just draw some text on the screen. This text will let the user know which levels are beginning.
void SetupNextLevelScreen(){

    // Draw which round it is
    DrawText(8,8,"ROUND");
    DrawNumber(9,9,level,2);
    DrawText(8,11,"READY!");
}
The update function for our Next Level game state is really simple. Wait 2 seconds, aka 2000 milliseconds. Then return to go to gameplay.
uint8_t UpdateNextLevelScreen(){

    // Wait for 2 seconds
    delay(2000);

    // Always return gameplay
    return GAMEPLAYSCREEN;
}
Gameplay Screen
Now, we’ll jump into the primary content of our Space Invaders tutorial. Our gameplay screen game state contains the super-majority of our game’s logic. Because of this, i have split this into multiple sub-sections.
- The main logic (including setting up the level)
- Bullets
- Invaders
- The Player
- Alien’s
The tiles for gameplay are set in VRAM during the menuscreen, so none of the following sections will need to do that.

Our Gameplay Screen’s Main Logic
There is no direct logic in our Setup function for the gameplay game state. All of that logic, for organizational reasons, has been separated into different files and functions. The only thing to note, when gameplay starts, update the HUD initially. The logic for setting up the level else is covered below, after the (also simple) update function is explained.
void SetupGameplayScreen(){

    SetupLevel();
    SetupBullets();
    SetupInvaders();
    SetupPlayer();
    SetupAlien();

    // Update the HUD initially
    UpdateHUD();
}
The gameplay game state’s update function is very simplified. All of the logic has been split into into different class files and functions. When updating the gameplay game state, we’ll update the invaders, bullets, player, and alien. Afterwards, if the player is dead, we go to game over screen. If the player is not dead, and there are no more invaders remaining, we will go to the next level screen. Otherwise, we continue on with gameplay.
uint8_t UpdateGameplayScreen(){
UpdateInvaders();
UpdateBullets();
UpdatePlayer();
UpdateAlien();
// Ifthe player is dead
if (player.dead==1){
// Go to the game over screen
return GAMEOVERSCREEN;
// If we have no more invaders remaining
}else if(invadersRemaining==0){
// Go to the next level screen
return NEXTLEVELSCREEN;
}
// Continue with gameplay
return GAMEPLAYSCREEN;
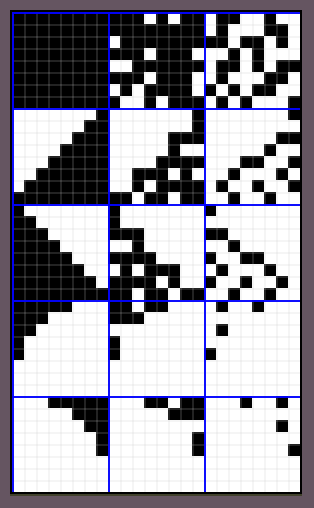
}In this game, i switched to a different Asset flow. This new asset flow uses PNG2asset, a utility in gbdk 2020. This utility converts PNG images to gbdk-2020 format. When setting up the levels, I manually draw the barricade tiles. This is because i drew the tiles without form, and png2asset did not have the ability to utilize and external source tileset.
Each barricade tile has 4 states. Full, Destroyed a little, Drestroyed a lot, and completely gone. These tiles are sequentially stored in VRAM. When a barricade tile is damaged by a bullet, we simply increase it’s tile by one.
void DrawBarricade(uint8_t topLeftX, uint8_t topLeftY){

    uint8_t tileRowSize=3;

    set_bkg_tile_xy(topLeftX,topLeftY,BARRICADE_TILES_START+tileRowSize);
    set_bkg_tile_xy(topLeftX+1,topLeftY,BARRICADE_TILES_START);
    set_bkg_tile_xy(topLeftX+2,topLeftY,BARRICADE_TILES_START);
    set_bkg_tile_xy(topLeftX+3,topLeftY,BARRICADE_TILES_START+tileRowSize*2);

    set_bkg_tile_xy(topLeftX+0,topLeftY+1,BARRICADE_TILES_START);
    set_bkg_tile_xy(topLeftX+1,topLeftY+1,BARRICADE_TILES_START);
    set_bkg_tile_xy(topLeftX+2,topLeftY+1,BARRICADE_TILES_START);
    set_bkg_tile_xy(topLeftX+3,topLeftY+1,BARRICADE_TILES_START);

    set_bkg_tile_xy(topLeftX+0,topLeftY+2,BARRICADE_TILES_START);
    set_bkg_tile_xy(topLeftX+1,topLeftY+2,BARRICADE_TILES_START+tileRowSize*3);
    set_bkg_tile_xy(topLeftX+2,topLeftY+2,BARRICADE_TILES_START+tileRowSize*4);
    set_bkg_tile_xy(topLeftX+3,topLeftY+2,BARRICADE_TILES_START);
}

void SetupLevel(){

    DrawBarricade(2,13);
    DrawBarricade(8,13);
    DrawBarricade(14,13);
}
Whenever the score increases, we conditionally update the high score. After that, we update the HUD.
void IncreaseScore(uint8_t amount){
score+=amount;
if(score>highScore)highScore=score;
UpdateHUD();
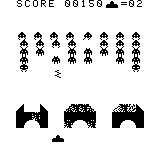
}Our HUD has 2 main elements: Our score, and the number of lives.

In our “UpdateHUD” function we’ll update the display of these two elements using the “DrawText” and “DrawNumber” functions defined in HUD.c. For clarity about the lives display, we’ll draw the player sprite next to the display of lives.
void UpdateHUD(){

    // Draw our "score" text and the actual score number
    DrawText(2,0,"SCORE");
    DrawNumber(8,0,score,5);

    // Drawthe player sprite at the bottom next to our lives display
    set_bkg_tile_xy(13,0,PLAYER_TILES_START);
    set_bkg_tile_xy(14,0,PLAYER_TILES_START+1);
    DrawText(15,0,"=");

    // Draw how many lives we have
    DrawNumber(16,0,player.lives,2);

}
The Player

Our player’s sprite uses 2 Gameboy OAM sprites. Sprites 0 and 1. We’ll set the tiles for theses sprites according to where we have placed our player sprite tiles in VRAM. This value is defined in common.h via the ‘PLAYER_SPRITE_START’ variable. When setting up the player, we’ll position them at the bottom-middle of the screen, and make sure the player is alive with no recent damage.
void SetupPlayer(){

    set_sprite_tile(0,PLAYER_SPRITE_START);
    set_sprite_tile(1,PLAYER_SPRITE_START+1);

    // Put thep layer at the bottom middle ofthescreen
    player.x=80;
    player.y=138;

    // The player is alive, with no recent damage
    player.dead=0;
    player.damageTimer=0;
}
The player’s update logic is very simple. Move and and right with the d-pad. If the A button is pressed we check if the player bullet sprite is in use. if that sprite is NOT in use, we activate the single player bullet by giving it’s tile variable a non-zero value. In addition, we’ll play a sound and position the bullet above the player. From their, our bullet’s update function will take care of things regarding that bullet.
If our player’s damage timer variable is greater than zero, then our player has been previously damaged. Every other 3 frames we’ll hide the player by positioning it’s sprites at 0,0. Because sprites are drawn with an offset (-8 on the x-axis, and-16 on the y-axis), the player sprites will not show for these frames.
void UpdatePlayer(){

    // Move left and right with the d-pad
    if(joypad() & J_LEFT)player.x-=2;
    else if(joypad() & J_RIGHT)player.x+=2;

    // Clamp our x position at the screen ends
    if(player.x<8)player.x=8;
    if(player.x>152)player.x=152;

    // if the A button was just pressed
    if((joypadCurrent & J_A) && !(joypadPrevious & J_A)){

        // If our player's bullet sprite isn't in use
        if(PlayerBulletSprite.tile==0){

            // Align with the player
            PlayerBulletSprite.x=player.x+4;
            PlayerBulletSprite.y=player.y+12;

            // Set to use the player's bullet
            PlayerBulletSprite.tile=BULLETC_SPRITE_START;

            // Play a sound
            NR10_REG=0x1D;
            NR11_REG=0x4F;
            NR12_REG=0x56;
            NR13_REG=0xF6;
            NR14_REG=0x86;
        }
    }

    // If our damage timer hasn't expired
    if(player.damageTimer>0){

        // Decrease our timer by one
        player.damageTimer--;

        // Every other 3 frames we will hide/show the player
        if(player.damageTimer/3%2==0){

            // Draw in normal position
            move_sprite(0,player.x,player.y+12);
            move_sprite(1,player.x+8,player.y+12);
        }else{

            // Hide the player by drawing at 0,0, which would make both sprites offscreen
            move_sprite(0,0,0);
            move_sprite(1,0,0);
        }

    }else{

        // Draw in normal position
        move_sprite(0,player.x,player.y+12);
        move_sprite(1,player.x+8,player.y+12);
    }
}
When the player is damaged we need to check it’s damage timer. If it’s damage timer is above zero, we have been recently damaged by something else. If the player has been damaged by something else, the player will have 15 frames of invulnerability.
When damaged, we decrement the number of lives, update whether or not we are dead, play a sound, and update the HUD.
void DamagePlayer(uint8_t amount){

    // Make sure our damage timer has expired
    if(player.damageTimer>0)return;

    // Avoid going below zero
    // Because (lives is  unsignedinteger)
    if(amount>player.lives)player.lives=0;
    else player.lives-=amount;

    //Set our damage timer to 15
    player.damageTimer=15;

    // If we are dead
    player.dead=player.lives==0;

    // Play a sound
    NR41_REG=0x2A;
    NR42_REG=0xA7;
    NR43_REG=0x57;
    NR44_REG=0xC0;

    // Update our lives
    UpdateHUD();
}
The Invaders
On screen there will be a maximum of 40 space invaders. These invaders will be two columns apart. The space invaders have to be drawn using the background layer. This is because there aren’t enough OAM sprites to draw them AND the player, the bullets, and the alien.
void SetupInvaders(){

    uint8_t alienTypes[3]={INVADER1_TILES_START,INVADER2_TILES_START,INVADER3_TILES_START};
    uint8_t alienScores[3]={30,20,10};

     for(uint8_t i=0;i<40;i++){
        invaders[i].column=(i%8)*2+2;
        invaders[i].row=(i/8)+2;
        invaders[i].slide=0;
        invaders[i].active=1;
        invaders[i].originalTile=alienTypes[i/16];
        invaders[i].score=alienScores[i/16];

        // Put their initial tiles on the background
        set_bkg_tile_xy(invaders[i].column,invaders[i].row,invaders[i].originalTile);

    }

    topRow=2;
    shotTimer=SHOT_TIMER_MAX;
    slideDir=-1;
    moveRow=0;
    rowsAtEnd=0;
    invaderCounter=0;
    invaderSpeed=3;
    invadersRemaining=40;
    anyInvaderHasReachedEndOfScreen=0;
}
For updating the invaders, we will use a counter. When this counter reaches a specific number, we will slide each invader (in the current row) over. Next, we will reset our counter and repeat for the next row. When enough invaders get to the edge of the screen, we will change the direction we slide invaders and repeat the process.
While invaders are active, we’ll randomly shoot bullets and check for collision against the player (when they get low enough).
void UpdateInvaders(){

    invaderCounter++;
    if(shotTimer!=0)shotTimer--;

    for(uint8_t i=moveRow*8;i<moveRow*8+8;i++){

        // If this invader is active
        if(invaders[i].active==1){

            if(shotTimer==0&&RandomNumber(0,100)<10){
                InvaderTryFireBullet(i);
            }

            InvaderCheckPlayerCollision(i);

            // If the invaders should move
            if(InvadersShouldMove()){

                // Check if any have reached the end of the screen after sliding
                if(SlideInvader(i)){

                    // Only set positive if we are active
                    anyInvaderHasReachedEndOfScreen=1;
                }

                // Update the tiles for this invader
                UpdateInvaderTiles(i);
            }
        }
    }

    // If the invaders should move
    if(InvadersShouldMove()){

        if(moveRow==4||moveRow==2){
            NR21_REG=0x43;
            NR22_REG=0x81;
            NR23_REG=0xED;
            NR24_REG=0xC1;
        }else if(moveRow==0){
            NR21_REG=0x83;
            NR22_REG=0x81;
            NR23_REG=0xED;
            NR24_REG=0xC1;
        }

        // Loop around after 5
        moveRow=(moveRow+1)%5;

        // If any invader has reached the end of the screen
        // Shift all invaders down one row.
        // Only do this when we are now on row 0, so everything stays aligned
        if(anyInvaderHasReachedEndOfScreen&&moveRow==0){

            ShiftAllInvadersDown();
        }

        // Reset our counter
        invaderCounter=0;
    }
}
We created a “invaderCounter” variable to help control invader motion. Initially, A row of the invader’s will slide every 9 frames. That amount deceases each row by one frame. Our topRow variable starts at 2. When the invaders have dropped 10 rows, they will slide each frame.
uint8_t InvadersShouldMove(){
    if(topRow>12)return 1;
    return invaderCounter>9-(topRow-2);
}
Each invader is 8×8 in size. Because the invader is a background tile, we cannot individually slide it. Instead, we will change it’s background tile to a slightly shifted (left or right depending on slideDir and it’s ‘slide’ variable). When an invader slides more than 7 pixels it should shift columns in the background map. How much it has shifted is represented in it’s ‘slide’ variable.
If an invader’s column is 0 or 19, it is at the left or right edges repsectively. When it is at the left or right edges of the screen the ‘SlideInvader’ function will return 1 (or true). But only the first time it has reached the edge. If a invader has previously reached an edge, it will not slide and will return 0 (or false).
uint8_t SlideInvader(uint8_t i){

    if(invaders[i].column==0&&slideDir!=1)return 0;
    if(invaders[i].column==19&&slideDir==1)return 0;

    // Slide in the given direction
    invaders[i].slide+=slideDir*2;

    // When we reach -8 or 8
    // We need to shift over a column
    if(invaders[i].slide>7||invaders[i].slide<-7){

        // Reset our slide
        // Move over one column
        invaders[i].slide=0;
        invaders[i].column+=slideDir;

        if(i>0){
            if(invaders[i-1].column>invaders[i].column)set_bkg_tile_xy(invaders[i].column-1,invaders[i].row,0);
        }
        if(i<39){
            if(invaders[i+1].column<invaders[i].column)set_bkg_tile_xy(invaders[i].column+1,invaders[i].row,0);
        }

        // Return if we are on the edge
        return(invaders[i].column==0)||(invaders[i].column==19);
    }

    return 0;
}
Above we mentioned that invaders are not drawn as gameboy OAM sprites, but instead as tiles on the background. To “slide/shift” the invader we have to draw a slightly shifted graphic of an invader on the background. This requires editing the column the invader is on, and the column it will be on next. Which we next column we select, left or right, is based on the slide direction and what direction it has slide (indicated by it’s ‘slide’ variable)
void UpdateInvaderTiles(uint8_t i){

    // If the invader is already dead
     if(invaders[i].active==0)return;

     if(invaders[i].slide==0){

        set_bkg_tile_xy(invaders[i].column,invaders[i].row,invaders[i].originalTile);
        set_bkg_tile_xy(invaders[i].column-slideDir,invaders[i].row,0);

    // If the invader is sliding to the right
    } else if(invaders[i].slide>0){

        set_bkg_tile_xy(invaders[i].column,invaders[i].row,invaders[i].originalTile+16-invaders[i].slide);
        set_bkg_tile_xy(invaders[i].column+1,invaders[i].row,invaders[i].originalTile+8-invaders[i].slide);


    // If the invader is sliding to the left.
    }else if(invaders[i].slide<0){

        set_bkg_tile_xy(invaders[i].column,invaders[i].row,invaders[i].originalTile-invaders[i].slide);
        set_bkg_tile_xy(invaders[i].column-1,invaders[i].row,invaders[i].originalTile+8-invaders[i].slide);
    }
}
When an invader has been killed, we need to clear it’s tiles. This ‘ClearInvaderTiles’ function is only for killed/inactive invaders. It is similar to the above, except it set’s the background tilles to a blank tile (aka 0).
void ClearInvaderTiles(uint8_t i){

        // If the invader is already dead
     if(invaders[i].active==0){

        // Just draw blank
        set_bkg_tile_xy(invaders[i].column,invaders[i].row,0);
        set_bkg_tile_xy(invaders[i].column+slideDir,invaders[i].row,0);

    }
}
The invaders can eventually collide with the player. In this function we’ll just check which column and row the player is over. If they match the column and row of the invader, the player is dead with no more lives.
void InvaderCheckPlayerCollision(uint8_t i){

    uint8_t playerColumn=player.x/8;
    uint8_t playerRow=player.y/8;

    if((playerColumn==invaders[i].column&&playerRow==invaders[i].row)){
        player.dead=1;
        player.lives=0;
    }
}
When the time comes for invaders to drop to the next level, we loop through each invader. If it is inactive, we ignore it. If the invader is active, we increase it’s row and update it’s corresponding tiles.
In addition we need to reverse the direction all invaders are sliding, increase the top row (which tracks how far down we are), and fill up the previous top row with blank tiles. We fill the top row with blank tiles, to avoid old invader locations from still showing invaders.
void ShiftAllInvadersDown(){

    anyInvaderHasReachedEndOfScreen=0;

    // Increase the row for all invaders
    for(uint8_t i=0;i<40;i++){
        invaders[i].row++;

        // Update the tiles for this invader
        if(invaders[i].active==1)UpdateInvaderTiles(i);
    }

    // Reverse the direction to slide invaders
    slideDir=-slideDir;

    fill_bkg_rect(0,topRow,20,1,0);

    // Increase this, so we know how far down are invaders are
    topRow++;
}
There are only 5 OAM sprites allocated for invader bullets. When an invader might fire a bullet, we need to make sure there are available sprites. I there are, we “activate” one to them by setting it’s tile to a non-zero value. We’ll also position that bullet under the invader and let the bullet update logic take things from there.
void InvaderTryFireBullet(uint8_t i){

    // Try to get a bullet sprite
    // We can only have approx. 5 enemy bullets on screen at a time
    // This function returns 0 when no enemy bullets are available.
    uint8_t availableBulletSprite=GetAvailableBulletSprite();

    // If we have an enemy bullet availble
    if(availableBulletSprite!=0){

        /// Set the availabble bullet sprite to use our bullet tile
        set_sprite_tile(availableBulletSprite,BULLETA_SPRITE_START);

        // Position below the enemy
        move_sprite(availableBulletSprite,invaders[i].column*8+12+invaders[i].slide,invaders[i].row*8+24);

        // Increase our timer or the next bullet
        shotTimer=SHOT_TIMER_MAX;
    }
}
The Bullets
Both the player and the invaders can shoot bullets. For this game, the invaders can only have 5 bullets onscreen at a given time. The player can only have one bullet onscreen at a time. Bullet’s are considered “inactive” when their associated OAM sprite’s tiles are set to 0. Our SetupBullets function will just deactivate all of our bullets.
void SetupBullets(){

    // Set all of our bullet sprites to tile 0
    // Tile 0 in our code will mean they are not in use
    // NOTE: tile 0 is intentionally a blank tile
    for(int8_t i=2;i<8;i++)shadow_OAM[i].tile=0;
}
To update our bullets, we first need to check if they are active. A bullet is considered active when their tile is non-zero. If that tile is non-zero we will proceed to update the bullet.
Each bullet has an animation, we’ll increase it’s tile by one each frame. When the tile reaches the next VRAM object’s tile, we’ll reset back to the first tile in that animation.
The player only has one bullet. The Player bullet is moved down, enemy bullet’s are moved up. When a bullet is offscreen we will deactivate the bullet by setting it’s tile to 0.
When a bullet is active and onscreen we’ll check what background tile it is above. If that tile is a barricade tile, we will progress the destruction of that barricade tile. In addition we will play a sound, and deactivate the bullet. Alternatively, If that tile is an invader tile, we will check each invader for collision.
For enemy bullets, we will check for collision against the player. If there is any collision, and the player’s damage timer has not run out, we will damage the player.
void UpdateBullets(){
    // For each of our bullet sprites
    // Bullet i=2 is the player's bullet
    // Bullet i=3 => i=7 are enemy bullets
    for(uint8_t i=2;i<8;i++){
        // If the tile isn't zero
        // If the tile IS zero, this sprite is not in use
        if(shadow_OAM[i].tile!=0){
            shadow_OAM[i].tile++;
            // The order is bullet a, bullet b, bullet c, and then alien
            // If we reach the start of something else, reset back properly
            if(shadow_OAM[i].tile==ALIEN_SPRITE_START)shadow_OAM[i].tile=BULLETC_SPRITE_START;
            if(shadow_OAM[i].tile==BULLETC_SPRITE_START)shadow_OAM[i].tile=BULLETB_SPRITE_START;
            else if(shadow_OAM[i].tile==BULLETB_SPRITE_START)shadow_OAM[i].tile=BULLETA_SPRITE_START;
            // Move the player bullet up
            // Move enemy bullets down
            if(i==2)shadow_OAM[i].y-=2;
            else shadow_OAM[i].y+=2;
            // If the bullet is off screen,reset it
            if(shadow_OAM[i].y>176||shadow_OAM[i].y>250)shadow_OAM[i].tile=0;
            // If the bullet is onscreen
            else {
                uint8_t currentColumn = (shadow_OAM[i].x-4)/8;
                uint8_t currentRow = (shadow_OAM[i].y-12)/8;
                uint8_t currentTile=get_bkg_tile_xy(currentColumn,currentRow);
                // If this is a barricade tile
                if(currentTile>=BARRICADE_TILES_START&¤tTile<=BARRICADE_LAST_TILE){
                    // Go to the next tile
                    uint8_t newTile=currentTile+1;
                    uint8_t barricadeRelativeTile = newTile-BARRICADE_TILES_START;
                    // The barricade graphic has 5 rows of 3
                    // When the barricade relative tile is a multiple of 3, that tile has been fully disolved
                    // We then set the tile to 0, otherwise it would loop on to become the next barriacde tile.
                    if(newTile%3==0)newTile=0;
                    set_bkg_tile_xy(currentColumn,currentRow,newTile);
                    // Reset the bullet sprite
                    shadow_OAM[i].tile=0;
                    NR41_REG = 0x30;
                    NR42_REG = 0x61;
                    NR43_REG = 0x80;
                    NR44_REG = 0xC0;
                }else if(currentTile>=INVADER1_TILES_START&¤tTile<=INVADER3_TILES_START+Invader3_TILE_COUNT){
                    for(uint8_t j=0;j<40;j++){
                        if(InvaderCheckBulletCollision(j)){
                            break;
                        }
                    }
                }
                // If it is an enemy bullet, we'll check against the player
                if(i>2){
                    if(shadow_OAM[i].x-4<player.x-8)continue;
                    if(shadow_OAM[i].x-4>player.x+8)continue;
                    if(shadow_OAM[i].y-12<player.y-4)continue;
                    if(shadow_OAM[i].y-12>player.y+4)continue;
                    if(player.damageTimer>0)continue;
                    shadow_OAM[i].tile=0;
                    DamagePlayer(1);
                }
            }
        }
    }
}
Our Alien’s can have up to 5 bullets on screen. Each bullet will use one OAM sprite between 3 and 7 (inclusive). To get an available bullet sprite, return which sprite between 3 and 7 is using tile 0.
If 0 is returned, there are no available bullet sprites.
uint8_t GetAvailableBulletSprite(){

    // Check the sprites we have assigned for enemy bullets
    for(int8_t i=3;i<8;i++){

        // Return this sprite if it is set to tile 0
        if(shadow_OAM[i].tile==0)return i;
    }

    // This is an invalid result (note the above list goes from 3->7)
    // Needs to be checked or calling functions.
    return 0;
}
Bullet collision against our invaders utilizes basic rectangle collision detection. Our invader’s don’t have a “x”or “y” value. But we can calculate that using their row, column , and slide amount. Each invader is 8×8 pixels in size.
When collision happens with the single player bullet,we’ll do the following:
- increase score
- Decrease the number of enemies
- Set this invader as inactive
- Set the bullet as inactive
- Clear this invader’s tiles
- Play a sound for feedback
- return 1 from the function
if no collision occurs, we will return 0 from the function.
uint8_t InvaderCheckBulletCollision(uint8_t i){

    if(PlayerBulletSprite.tile!=0&&invaders[i].active){

        int8_t xd = (PlayerBulletSprite.x-4)-(invaders[i].column*8+4+invaders[i].slide);
        int8_t yd = (PlayerBulletSprite.y-12)-invaders[i].row*8+4;

        // Get the absolute value
        if(xd<0)xd=-xd;
        if(yd<0)yd=-yd;

        if(xd<5&&yd<8){

            IncreaseScore(invaders[i].score);

            invadersRemaining--;

            // Set this enemy as inactive
            invaders[i].active=0;

            // Set the bullet as in active
            PlayerBulletSprite.tile=0;

            // Update the tiles for this invader
            ClearInvaderTiles(i);

            NR10_REG=0x7D;
            NR11_REG=0xC2;
            NR12_REG=0x37;
            NR13_REG=0x2E;
            NR14_REG=0x87;

            return 1;

        }
    }

    return 0;
}
The Aliens
Alien’s will occasionally appear at the top of the screen. When shot with the player bullet, the player should get 100 points. The setup function for our alien doesn’t do much. Our alien should already be in VRAM from our Menu Screen Game State.
void SetupAlien(){

    alienCounter=0;

    // When these are 0, it means the alien is not active
    set_sprite_tile(ALIEN_OAM_SPRITE,0);
    set_sprite_tile(ALIEN_OAM_SPRITE+1,0);

    // Default to not visible
    move_sprite(ALIEN_OAM_SPRITE,0,0);
    move_sprite(ALIEN_OAM_SPRITE+1,0,0);
}
Our alien is not in use, when sprite 8 is using tile 0. To make things easier, a macro (ALIEN_OAM_SPRITE) was created in common.h for that sprite index. When the alien is notin use, we’ll increment a counter. When this counter is larger than 400, we’ll use the random number function and possibly spawn the alien.

We spawn the alien by setting the ALIEN_OAM_SPRITE” to have a non-zero tile. The tile we will use is defined in common.h.
Once the alien is in use, we will scroll it’s sprites to the right. If the player’s bullet is in use, we’ll check for collision against it. In case of collision, we want to hide/reset the bullet and increase the score.
If our alien is offscreen, we’ll move it offscreen, reset the counter and set it’s tile t0 0. Effectively making it not in use.
void UpdateAlien(){

    if(shadow_OAM[ALIEN_OAM_SPRITE].tile==0){
        alienCounter++;;
    }

    // small chance if the alien is unused
    if(alienCounter>=400&&shadow_OAM[ALIEN_OAM_SPRITE].tile==0){

        if(RandomNumber(0,100)<10){

            // Set the sprite tiles
            set_sprite_tile(ALIEN_OAM_SPRITE,ALIEN_SPRITE_START);
            set_sprite_tile(ALIEN_OAM_SPRITE+1,ALIEN_SPRITE_START+1);

            // Set fully offscreen, as it will scrolll on and then off
            move_sprite(ALIEN_OAM_SPRITE,231,24);
            move_sprite(ALIEN_OAM_SPRITE+1,239,24);

        }else{
            alienCounter=0;
        }

    }else if(shadow_OAM[ALIEN_OAM_SPRITE].tile!=0){

        // Move the sprites to the right
        scroll_sprite(ALIEN_OAM_SPRITE,1,0);
        scroll_sprite(ALIEN_OAM_SPRITE+1,1,0);

        // If the player bullet sprite is active
        if(PlayerBulletSprite.tile!=0){


            // Get differences
            int8_t xd = PlayerBulletSprite.x-(shadow_OAM[ALIEN_OAM_SPRITE+1].x-8);
            int8_t yd = PlayerBulletSprite.y-shadow_OAM[ALIEN_OAM_SPRITE+1].y;

            if(xd<0)xd=-xd;
            if(yd<0)yd=-yd;

            // If we are close enough
            if(xd<=8&&yd<=8){

                // Move over beyond 168 (and less han 200)
                // So the next if staemen ends the alien
                shadow_OAM[ALIEN_OAM_SPRITE].x=178;

                // End the bullet sprite
                PlayerBulletSprite.tile=0;
                PlayerBulletSprite.x=0;
                PlayerBulletSprite.y=0;

                // Increase score by 100
                IncreaseScore(100);
            }
        }

        // The alien spawns a x=230ish, and only moves to the right
        // If i's x coordinae is less than 200 it's looped around
        // If it's x coordinate is more than 168 it is offscreen
        if(shadow_OAM[ALIEN_OAM_SPRITE].x>168 &&shadow_OAM[ALIEN_OAM_SPRITE].x<200){

            alienCounter=0;

            // Unset it's tiles
            set_sprite_tile(ALIEN_OAM_SPRITE,0);
            set_sprite_tile(ALIEN_OAM_SPRITE+1,0);

            // Move it's sprites back to origin
            move_sprite(ALIEN_OAM_SPRITE,0,0);
            move_sprite(ALIEN_OAM_SPRITE+1,0,0);
        }
    }

}
That’s it or our gameplay screen. Next we’ll cover the game over screen, which is really simple.
The Game Over Screen
Our game over game state is really simple. It’s setup function will just draw on the screen the words “Game over”. Our update function will go to the start screen when the a button is pressed.
void SetupGameOverScreen(){

    // Draw game over on the screen
    DrawText(5,9,"GAME  OVER");
}
For our update function. Return the same state, until the a button is pressed.
uint8_t UpdateGameOverScreen(){

    // Go to the start screen when a is pressed
    if(joypadCurrent & J_A)return STARTSCREEN;

    return GAMEOVERSCREEN;
}
Common & HUD Functions
The game-specific logic for our Space Invaders Tutorial is mostly done. The following code snippets will outline some common functions and functions used for the HUD. These functions will be provided for you in the starter repo. I will explain them here for clarity on how they work.
HUD Functions
Our function for drawing numbers on the screen “DrawNumber” will only draw the specified amount of digits. The number’s left most digit will start at x,y. Our number tiles come after our alphabet in our SpaceInvadersFont. So each digit’s tile is that digit, plus 26 (the size of the alphabet), plus the start of the space invaders font.
void DrawNumber(uint8_t x,uint8_t y, uint16_t number,uint8_t digits){
unsigned char buffer[8]="00000000";
// Convert the number to a decimal string (stored in the buffer char array)
uitoa(number, buffer, 10);
// The background address of the first digit
uint8_t *vramAddr= get_bkg_xy_addr(x,y);
// Get the length of the number so we can add leading zeroes
uint8_t len =strlen(buffer);
// Add some leading zeroes
// uitoa will not do this for us
// Increase the VRAM address each iteration to move to the next tile
for(uint8_t i=0;i<digits-len;i++)
set_vram_byte(vramAddr++,SPACEINVADERSFONT_TILES_START+26);
// Draw our number
// Increase the VRAM address each iteration to move to the next tile
for(uint8_t i=0;i<len;i++)
set_vram_byte(vramAddr++,(buffer[i]-'0')+SPACEINVADERSFONT_TILES_START+26);
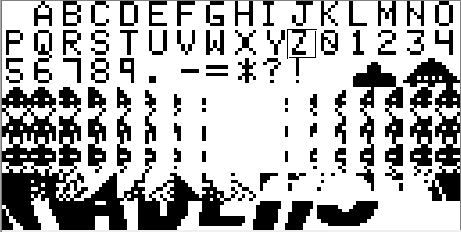
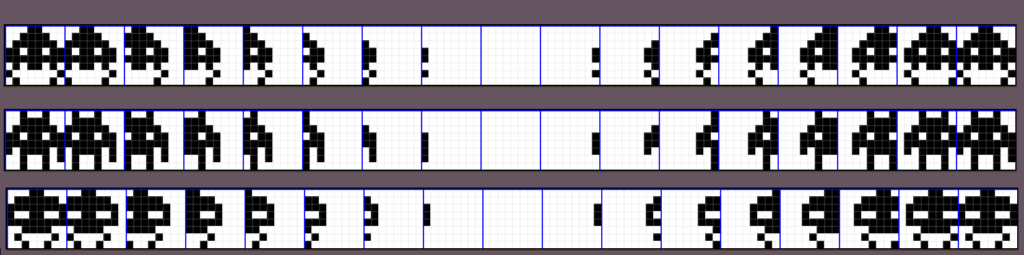
}The following “DrawText” function will draw the text passed (in the third parameter) at x, y. It uses a while loop to loop through that string. For a given character, we figure out which tile we want to use and set that tile on the background. This while loop will continue until it reaches the “string termination” character (\0). (This character is internally added to the end of strings.)
Here is the a (zoomed in) screenshot of our SpaceInvadersFont.

NOTE: For a typewriter effect, we could add a “wait_vbl_done()” call at the end of each iteration. However, that functionality is not desired with this game.
void DrawText(uint8_t x, uint8_t y, unsigned char *text){

    uint8_t i=0;

    // The VRAM address of the first character
    // After setting a tile, we'll increase the VRAM address each iteration to move to the next tile
    uint8_t *vramAddr= get_bkg_xy_addr(x,y);

    while(text[i]!='\0'){

        // Map our alphabet characters to only use uppercase letters
        // From the SpaceInvadersFont.png/aseprite
        if(text[i]>='A'&&text[i]<='Z')set_vram_byte(vramAddr++,SPACEINVADERSFONT_TILES_START+(text[i]-'A'));
        else if(text[i]>='a'&&text[i]<='z')set_vram_byte(vramAddr++,SPACEINVADERSFONT_TILES_START+(text[i]-'a'));
        else if(text[i]>='0'&&text[i]<='9')set_vram_byte(vramAddr++,SPACEINVADERSFONT_TILES_START+26+(text[i]-'0'));

        else {

            // Map our special characters manually
            // From the SpaceInvadersFont.png/aseprite
            switch(text[i]){
                case '.': set_vram_byte(vramAddr++,SPACEINVADERSFONT_TILES_START+36); break;
                case '-': set_vram_byte(vramAddr++,SPACEINVADERSFONT_TILES_START+37); break;
                case '=': set_vram_byte(vramAddr++,SPACEINVADERSFONT_TILES_START+38);break;
                case '*': set_vram_byte(vramAddr++,SPACEINVADERSFONT_TILES_START+39);break;
                case '?': set_vram_byte(vramAddr++,SPACEINVADERSFONT_TILES_START+40);break;
                case '!': set_vram_byte(vramAddr++,SPACEINVADERSFONT_TILES_START+41);break;
                case ' ': set_vram_byte(vramAddr++,0); break;
            }
        }

        i++;
    }
}
Common Functions
The “RandomNumber” function will give us a pseudo random number. DIV_REG is the register used for division. The DIV_REG is very volatile, and constantly changing. Here’s an explanation from the GBDEV.io Gameboy Pan Docs. Extensive and up-to-date technical documentation about the Game Boy and related hardware.
This register is incremented at a rate of 16384Hz (~16779Hz on SGB). Writing any value to this register resets it to $00. Additionally, this register is reset when executing the
stopinstruction, and only begins ticking again oncestopmode ends. This also occurs during a speed switch. (TODO: how is it affected by the wait after a speed switch?)Note: The divider is affected by CGB double speed mode, and will increment at 32768Hz in double speed.
Source: https://gbdev.io/pandocs/Timer_and_Divider_Registers.html?highlight=DIV#ff04—div—divider-register-rw
When combined with sprite 0 (the player’s first sprite), sprite 2 (the player bullet), and sprite 3 (the enemy bullet); we get a very unpredictable value. We’ll use the modulo operator and basic math to keep that within the minimum and maximum values.
uint8_t RandomNumber(uint8_t min, uint8_t max){

    // Use some sprites in getting a random value
    uint8_t v = DIV_REG+shadow_OAM[0].x+shadow_OAM[2].x+shadow_OAM[3].x;

    return min+(v % (max-min));    // get value at memory address
}
This function is used to reset the state of all of the OAM sprites. When placed at “0,0”, OAM sprites will not be visible on screen. This is because they are drawn with a -8,-16 pixel offset. In addition, set their tiles to 0.
void ClearAllSprites(){

    // There are 40 OAM sprite objects
    for(uint8_t i=0;i<40;i++){

        // Set their tiles to 40
        // Move them offscreen
        set_sprite_tile(i,0);
        move_sprite(i,0,0);
    }
}
Space Invaders Tutorial Conclusion
That’s the end of our Space Invaders Tutorial, with all of that, you should have a completed and working Space Invaders gameboy game. You can view the final code here on Github. The game can be tested on a gameboy emulator like BGB or Emulicious. Additionally, if you want to test on real gameboy hardware you have two options:
- You can order something like a EZ Flash Jr, which lets you store multiple gameboy games on a single cartridge.
- InsideGadgets has a Reader/writer that can be used to write gameboy ROMs to physical reproduction cartridges.
I hope you found this space invaders tutorial informative and helpful. If so, please share on social media to help The Junkyard grow. If you have any questions, feel free to reach out via email or social media. Any and all criticism/questions help The Junkyard produce more helpful content.
6 replies on “Space Invaders Tutorial for Gameboy”
Hello I am a french newbie C programmer. Your tutorials are very clean. Hope to read another one, how to make a mario land 🙂 . Thank you very much.
Thanks Eric,
I’ve got some more coming on the way. In the meantime, let me know if there is anything I can further explain.
One comment: I think line 34 of bullets.c UpdateBullets() function should be ” if(barricadeRelativeTile%3==0)newTile=0;” instead of “if(newTile%3==0)newTile=0;” I think it happens to work as the tiles happen to be aligned correctly but I assume barricadeRelativeTile should be used somewhere. Thanks for the tutorial!
Thanks for the heads up. I’ll look into that and updating things.
Hah, I knew it! Messing around with a space invaders clone myself at the minute.
New to GBDK – ran into the 40 sprite limit on the player layer so remade on the background, but thought it would be too much of a pain to sort out the only being able to move a tile at a time by making more sprites. I just remade it with 4 rows of 8 enemies on the player layer in the end, but I think I’ll spend another evening reworking it after reading your post.
One question for you on the background layer – how much can you get away with on original hardware? I originally wanted to make a schmup and I’m wondering if you can get away with a mild amount of bullet hell using the background layer – what do you reckon?
Thanks!
SHMUPs can be a lot of fun.
The best example of how much the hardware can take you can learn from searching for gameboy shmups on YouTube. That’s what i did.
I have a 1942 tutorial coming in a bit, but i would say this: Keep in mind that “sprites” are used by the player, bullets, and enemies alike. So too much one one, will affect the others. Too many bullets on screen might interfere with drawing enemies, and vice versa. Larger enemies can take up more sprites. (tangent: which is why old school HUGE shmup bosses were drawn as one background). One thing i did was put a delay on bullets to limit how often they are fired. This means that, if sprites are recycled, and based on the speed of the bullets, i know the bullets won’t use too many sprites. Thus i can expect a given amount of sprites for enemies for sure. I divide that numbber by how many sprites it takes to draw an enemy. So for example, if i know the player and bullets will use up (max) 10 sprites, that leaves 30 sprites left. If enemies are 2 sprites each (2 8×16 sprites together). That means i can fit 15 enemies on the screen. The same strategy can be provided for enemies, if you make them fly fast enough, you can give the illusion of more enemies. But really, they’re just being reycled.
It’s 30+ year old hardware, your going to have a difficult time getting the traditional amount of “bullet hell” bullets on screen. Which is fine, many classic games found ways to still be fun without many crazy modern features.
I hope that answered your question a little. Hopefully my 1942 tutorial coming soon might help you out more a bit. I’d definitely recommend jumping in the GBDK/ZGB Discord (if you’re not already :D) https://discord.gg/XCbjCvqnUY