Sprites and Background Format in GBDK 2020
Sprites and Backgrounds are a a critical part of every game. The Gameboy, and the GBDK library handle them a certain way. In this post, we’re gonna dive into handling Sprites and Backgrounds in GBDK 2020. All of this i’ve used in my 2021 Gameboy SHMUP project. In addition, this post will help you in learning How to make a Gameboy Game.
Modern game engines let you develop using many different types of image file formats. The engines will handle storage, conversion, and such. However, for Gameboy games, all graphics must be manually converted to arrays of numbers. In addition, each background may contain an additional one or two associated arrays (2 if usage of color palettes is desired).
Prerequisite Knowledge
This tutorial requires knowledge of hex and binary. I have basic tutorials about both hex and binary. If you are not familiar with either, be sure to give them a read. If you don’t know either, read the binary tutorial first.
Gameboy games have 3 major components. Sprites, the Background and The Window. Each are made up of 8×8 tiles, and are assigned a specific color palette. For Gameboy games, all tiles must be stored in numerical format (as an array of unsigned integers). These tiles may only have 4 colors in them. These 4 colors make up that tile’s color palette. There can only be 16 (8 for sprites, and 8 for the background/window) total color palettes (They can be shared). The 4 color limitation is important to remember.
Convert Tiles to Numerical Format
When converting an 8×8 tile to an array (of unsigned integers), things get tricky. For a given pixel, the actual color used is NOT directly used. Instead, an index (between 0 and 3) is used. This index tells the Gameboy which color to use from that tile’s color palette. To make things more difficult, that index isn’t directly included in the final numerical format.

The above image is generated via GBTD. It should seem weird. The “A” tile on the left, has 64 non-unique pixels. However the generated code only has 16 actual values (in hexadecimal). So how does this work?
Each row (8 horizontal pixels) in the tile is converted to 2 sequential elements in the final array. The binary values for these 2 elements are combined to create color palette indices. There are 8 color palette indices created, which correspond to the 8 horizontal pixels.
Let’s examine the second row. Which converts to 0x08 and 0x18.
The below table is a simple representation of the second row of our “A” tile. The two middle tiles are filled with a dark grey and black. Everything else is white. White is the first (index=0) color in the color palette. Dark Grey is the 3rd (index=2) color in the color palette. Black is the fourth (index=3) color in the color palette.
| 0 | 0 | 0 | 2 | 3 | 0 | 0 | 0 |
Now, let’s examine how we store that data for gameboy games. Firstly, look at the two hexadecimal numbers generated for this row: 0x08 and 0x18. These two numbers are what the Gameboy requires. Using this handy webapp, we can convert those numbers from hexadecimal. After doing so we get 0x08 = 8 and 0x18 = 24. That’s not confusing at all. More importantly, 0x08 is 00001000 in binary and 0x18 = 00011000 in binary.
| 0x08=00001000 | 0x18=00011000 |
Next, we take these two binary codes. With them, we match & combine their bits together.
NOTE: The second binary code (0x18 in this case) goes first. This is confusing, yet important!
| 0x18 | 0 | 0 | 0 | 1 | 1 | 0 | 0 | 0 |
| 0x08 | 0 | 0 | 0 | 0 | 1 | 0 | 0 | 0 |
| Combined | 00 | 00 | 00 | 10 | 11 | 00 | 00 | 00 |
Here is where we come full circle. If we take the combined 2-bit binary numbers and convert them to decimal , we have our original indices. These are the indices we originally had for the second row.
| Combined | 00 | 0 | 0 | 10 | 11 | 00 | 00 | 00 |
| Original Indices | 00 | 00 | 00 | 2 | 3 | 00 | 00 | 00 |
Taking all of this into consideration. If we do this for each row, we will have 16 values in the end. As for multiple tiles, the process is simply repeated for each 8×8 tile. The result is stored in a single array.
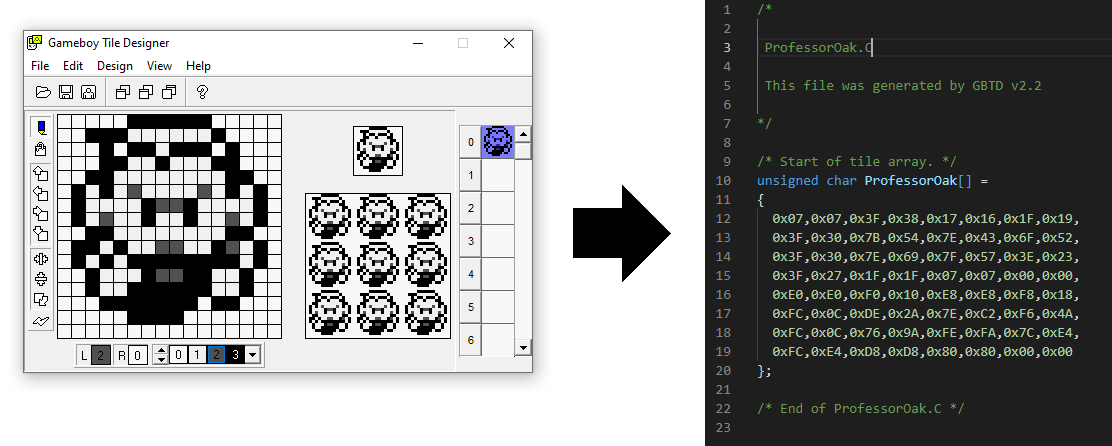
Here is an example using Professor Oak from Pokemon:
(Note: Pokémon Red/Blue Tiles are 16×16. That means each character uses 4 tiles and 2 sprites.)
For help drawing that sprite with GBDK check out the following guide: