Tetris is an iconic puzzle game. Players must position and rotate “tetrominos” to avoid overfilling the playing area. This is going to be a sub-tutorial for the How to make a Gameboy Game in 2021 series. A lot of it’s content will build upon that original series. The topics covered in that series are generic. However, this tutorial will have logic specific to Tetris itself. In addition, screenshots and code snippets will be provided for assistance.
The core Tetris gameplay is rather easy to create. Ultimately it is a bunch of multi-dimensional array operations. My final version is very basic, and utilizes sprites/tiles from the original Tetris DX gameboy game. The original tetris DX sprites can be found at The Spriters Resource. (Specifically Here.)
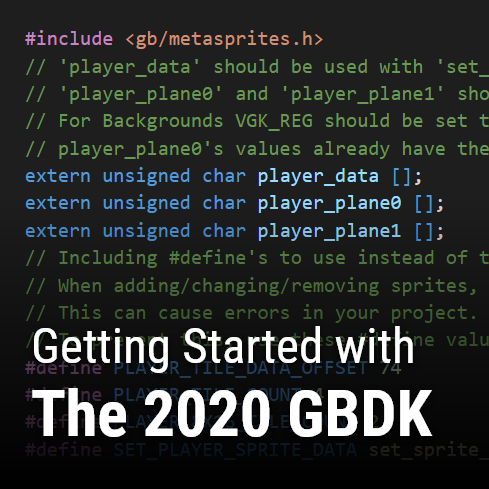
This tutorial will utilize GBDK-2020. A library for the C programming language. If you need more help, I recommend the GBDK-2020 documentation and the GBDK/ZGB discord server. Additionally, check out some of my other tutorials for gameboy game development.
Overview
This tutorial will not include a menu or different game states. The core Tetris gameplay will be the primary focus. This will not be a from-scratch “follow along” tutorial. Instead you should clone the GitHub repo, and use this tutorial as explanation for what’s going and how things work. Being completely transparent: writing full “follow along” tutorials is a very tedious process that is difficult to do with a full-time job and other responsibilities.
The current Tetromino will be drawn using metasprites. Tetrominos that have already placed will be a part of the background.
Our Game Loop will first check if we have an active tetromino. If we do not, then we want to spawn a new one. However, if we cannot spawn a new tetromino, then the game ends.
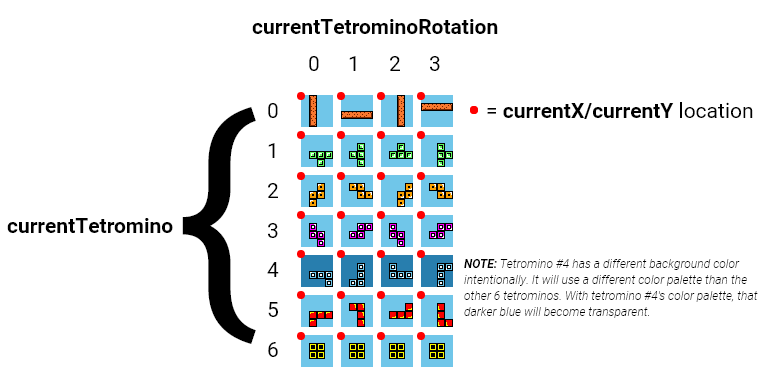
The Tetrominos
Tetris has 7 different tetrominos. Each has it’s own color scheme and design. Each tetromino can be rotated one of four ways when falling. For each tetromino, we will have a corresponding palette-based PNG file. This PNG file will be turned into gameboy format using a GBDK 2020 tool called png2Asset. Four rotation states are in each PNG file. Each state taking up 32×32 pixels.


Png2asset will process our tetromino PNG files. As a result, 7 corresponding .c/.h files will be created. Each having it’s own tile data, and metasprite constants defined.
:: Tetrominos
C:/gbdk/bin/png2asset.exe graphics\Tetromino1.png -c source\gen\graphics\Tetromino1.c -px 0 -py 0 -sx 0 -sy 0 -sw 32 -sh 32 -spr8x8 -keep_palette_order -noflip
C:/gbdk/bin/png2asset.exe graphics\Tetromino2.png -c source\gen\graphics\Tetromino2.c -px 0 -py 0 -sx 0 -sy 0 -sw 32 -sh 32 -spr8x8 -keep_palette_order -noflip
C:/gbdk/bin/png2asset.exe graphics\Tetromino3.png -c source\gen\graphics\Tetromino3.c -px 0 -py 0 -sx 0 -sy 0 -sw 32 -sh 32 -spr8x8 -keep_palette_order -noflip
C:/gbdk/bin/png2asset.exe graphics\Tetromino4.png -c source\gen\graphics\Tetromino4.c -px 0 -py 0 -sx 0 -sy 0 -sw 32 -sh 32 -spr8x8 -keep_palette_order -noflip
C:/gbdk/bin/png2asset.exe graphics\Tetromino5.png -c source\gen\graphics\Tetromino5.c -px 0 -py 0 -sx 0 -sy 0 -sw 32 -sh 32 -spr8x8 -keep_palette_order -noflip
C:/gbdk/bin/png2asset.exe graphics\Tetromino6.png -c source\gen\graphics\Tetromino6.c -px 0 -py 0 -sx 0 -sy 0 -sw 32 -sh 32 -spr8x8 -keep_palette_order -noflip
C:/gbdk/bin/png2asset.exe graphics\Tetromino7.png -c source\gen\graphics\Tetromino7.c -px 0 -py 0 -sx 0 -sy 0 -sw 32 -sh 32 -spr8x8 -keep_palette_order -noflip
The above script is called in “generate-graphics.bat”. For each tetromino png file we pass it and the following parameters to png2asset:
- sw & sh – The width and height of each sprite. Each tetromino will be on a 32×32 metasprite
- spr8x8 – The gameboy’s sprite mode is 8×8. NOTE: If spr8x16 is used, then the sh parameter must also be a multiple of 16.
- keep_palette_order – The PNG will have an embedded palette. This palette should be used when converting to GBDK format. The palette will be determined from the top-left pixel in each tile.
- noflip – Do not flip tiles. Allowing for better DMG support.
After png2Asset generates those files, i first setup an easy way to reference each tetromino and it’s tiles:
const metasprite_t* const Tetrominos_metasprites[28] = {
    Tetromino1_metasprite0,Tetromino1_metasprite1,Tetromino1_metasprite2,Tetromino1_metasprite3,
    Tetromino2_metasprite0,Tetromino2_metasprite1,Tetromino2_metasprite2,Tetromino2_metasprite3,
    Tetromino3_metasprite0,Tetromino3_metasprite1,Tetromino3_metasprite2,Tetromino3_metasprite3,
    Tetromino4_metasprite0,Tetromino4_metasprite1,Tetromino4_metasprite2,Tetromino4_metasprite3,
    Tetromino5_metasprite0,Tetromino5_metasprite1,Tetromino5_metasprite2,Tetromino5_metasprite3,
    Tetromino6_metasprite0,Tetromino6_metasprite1,Tetromino6_metasprite2,Tetromino6_metasprite3,
    Tetromino7_metasprite0,Tetromino7_metasprite1,Tetromino7_metasprite2,Tetromino7_metasprite3
};

const uint8_t tileOffsets[]={
    0,
    Tetromino1_TILE_COUNT,
    Tetromino1_TILE_COUNT+Tetromino2_TILE_COUNT,
    Tetromino1_TILE_COUNT+Tetromino2_TILE_COUNT+Tetromino3_TILE_COUNT,
    Tetromino1_TILE_COUNT+Tetromino2_TILE_COUNT+Tetromino3_TILE_COUNT+Tetromino4_TILE_COUNT,
    Tetromino1_TILE_COUNT+Tetromino2_TILE_COUNT+Tetromino3_TILE_COUNT+Tetromino4_TILE_COUNT+Tetromino5_TILE_COUNT,
    Tetromino1_TILE_COUNT+Tetromino2_TILE_COUNT+Tetromino3_TILE_COUNT+Tetromino4_TILE_COUNT+Tetromino5_TILE_COUNT+Tetromino6_TILE_COUNT,
    Tetromino1_TILE_COUNT+Tetromino2_TILE_COUNT+Tetromino3_TILE_COUNT+Tetromino4_TILE_COUNT+Tetromino5_TILE_COUNT+Tetromino6_TILE_COUNT+Tetromino7_TILE_COUNT
};NOTE: The “TetrominoX_TILE_COUNT“,”TetrominoX_tiles” and “TetrominoX_metaspriteY” constants are created by png2asset and are located in the associated .h files.
With the values from that array, and from the TetrominoX.h files (where X is a value from 1 to 7), we can populate VRAM with our tetromino data. We do this at the start of the game.
void SetupVRAM(){
    set_sprite_data(tileOffsets[0], Tetromino1_TILE_COUNT, Tetromino1_tiles);
    set_sprite_data(tileOffsets[1], Tetromino2_TILE_COUNT, Tetromino2_tiles);
    set_sprite_data(tileOffsets[2], Tetromino3_TILE_COUNT, Tetromino3_tiles);
    set_sprite_data(tileOffsets[3], Tetromino4_TILE_COUNT, Tetromino4_tiles);
    set_sprite_data(tileOffsets[4], Tetromino5_TILE_COUNT, Tetromino5_tiles);
    set_sprite_data(tileOffsets[5], Tetromino6_TILE_COUNT, Tetromino6_tiles);
    set_sprite_data(tileOffsets[6], Tetromino7_TILE_COUNT, Tetromino7_tiles);

    set_bkg_data(tileOffsets[0], Tetromino1_TILE_COUNT, Tetromino1_tiles);
    set_bkg_data(tileOffsets[1], Tetromino2_TILE_COUNT, Tetromino2_tiles);
    set_bkg_data(tileOffsets[2], Tetromino3_TILE_COUNT, Tetromino3_tiles);
    set_bkg_data(tileOffsets[3], Tetromino4_TILE_COUNT, Tetromino4_tiles);
    set_bkg_data(tileOffsets[4], Tetromino5_TILE_COUNT, Tetromino5_tiles);
    set_bkg_data(tileOffsets[5], Tetromino6_TILE_COUNT, Tetromino6_tiles);
    set_bkg_data(tileOffsets[6], Tetromino7_TILE_COUNT, Tetromino7_tiles);

    ...
}
Drawing Tetrominos
For drawing tetrominos, there are 2 paths.
- Drawing the current/active tetromino (that the player is controlling)
- Drawing past tetrominos that are static
For the first path, we’ll use metasprites. For the second path, we’ll use the background.
Drawing the Current/Active Tetromino
GBDK-2020 comes with builtin functions for drawing “metasprites”. Metasprites are simply groups of normal gameboy (OAM) sprites that together represent one single object.
To represent the active tetromino, we have 4 global variables:
- currentX & currentY – What column/row is the top/left corner of the tetromino’s 32×32 frame. (not the actual tetromino itself)
- currentTetromino – Which tetromino is currently active? A value between 0 and 6 (inclusive)
- currentTetrominoRotation – A value between 0 and 3 (inclusive) representing the tetromino’s rotation state.
With those 4 variables, and the previously declared arrays, we can draw our active tetromino like so:
// Show the current tetromino at the proper position
move_metasprite(Tetrominos_metasprites[currentTetromino*4+currentTetrominoRotation],tileOffsets[currentTetromino],0,currentX*8,currentY*8);
As long as our currentTetromino has a valid value (between 0 and 3 inclusive), this happens each frame at the end of our game loop.
Drawing past Tetrominos
Fortunately, drawing past tetrominos is sort of a one time task. The logic required, only needs to be performed when a active tetromino becomes static. For this task, we have a function called “SetCurrentPieceInBackground“. This function, declared in board.c, will iterate through the active piece’s metaspritetiles and copy thosetiles to the background.
void SetCurrentPieceInBackground(){

    metasprite_t *metasprite = Tetrominos_metasprites[currentTetromino*4+currentTetrominoRotation];

    uint8_t finalColumn=currentX;
    uint8_t finalRow=currentY;

    uint8_t i=0;

    while(i<4){

        finalColumn += metasprite->dx/8;
        finalRow += metasprite->dy/8;

        // Set it in the background
        // Offset by 1 colum and 2 rows for the -8 x-16 sprite offset
        VBK_REG=1;set_bkg_tile_xy(finalColumn-1, finalRow-2, metasprite->props);
        VBK_REG=0;set_bkg_tile_xy(finalColumn-1, finalRow-2, metasprite->dtile+tileOffsets[currentTetromino]);

        metasprite++;
        i++;
    }

}
Checking for Placement
Next, I’ll explain a function called “CanPieceBePlacedHere” . This is one of the most important functions in the game. As it’s name implies, it is used to determine if a piece be placed at a given location and with a given rotation.
uint8_t CanPieceBePlacedHere(uint8_t piece, uint8_t rotation, uint8_t column, uint8_t row){

    metasprite_t *metasprite = Tetrominos_metasprites[piece*4+rotation];

    // Offset by 1 colum and 2 rows for the -8 x-16 sprite offset
    int8_t finalColumn=column;
    int8_t finalRow=row;

    uint8_t i=0;

    while(i<4){

        finalColumn += metasprite->dx/8;
        finalRow += metasprite->dy/8;

        // If this square would be below the bottom, a piece cannot be placed here
        /// Or if the background element here isn't empty, a piece cannot be placed here
        if(finalRow-2>=18)return 0;

        // Check our values to make sure the numer doesn't wrap around
        if(finalColumn>=1&&finalRow>=2){
            if(get_bkg_tile_xy(finalColumn-1,finalRow-2)!=blankTile)return 0;
        }

        metasprite++;
        i++;
    }

    return 1;
}
This function is later used when moving pieces, when stopping pieces, and to check for game over.
- piece – What piece? A index between 0 and 6 inclusive.
- rotation – What rotation state? a index between 0 and 3 inclusive.
- column & row – Where is the top/left of the piece’s metasprite.
Spawning a new Tetromino
A modern game engine might use object’s to represent each tetromino during gameplay. However, for this gameboy game the only tetromino that we’ll explicitly track in RAM is the current one. To spawn a new active tetromino is fairly simple. We just change the values of the currentX, currentY, currentTetromino, and currentTetrominoRotation global variables. The position will always be column=0 and row=5. Which will align the tetromino in the center of the board.
Our nextCurrentTetromino and nextCurrentTetrominoRotation variables are used to show the preview on the side. They are changed everytime the active tetromino changes
All that logic is placed in a function called “PickNewTetrominos“. If a tetromino cannot be placed at the spawn location/rotation, this function will return 0. Otherwise, if a new piece can be placed, the function will return 1.
uint8_t PickNewTetromino(){

    // Do we not have a current tetromino?
    // Can the next tetromino be placed at it's default spot?
    if(CanPieceBePlacedHere(nextCurrentTetromino,nextCurrentTetrominoRotation,5,0)){

        currentX = 5;
        currentY = 0;
        currentTetromino=nextCurrentTetromino;
        currentTetrominoRotation=nextCurrentTetrominoRotation;

        // Decide the next tetromino
        nextCurrentTetromino = RandomNumber(0, 7) % 7;
        nextCurrentTetrominoRotation=RandomNumber(0, 4) % 4;

        return 1;
    }

    return 0;
}
User Input
The user input logic or tetris isn’t very complicated.
- Rotate with the A button.
- Move left & right with the d-pad.
- Fall faster with the down direction on the d-pad.
NOTE: Tutorial on handling joypad input here.
For each option, we need to simply check if the piece can be placed in the next position/rotation. If it can, then we perform the operation (rotation or translation). If it cannot, nothing happens.
For falling faster, we’ll increase a “fallTimer” global variable by 5. This global variable increments by 1 each frame. When it reaches 30, the active tetromino will move down one frame. (More info on this later)
All of that is wrapped into one function called HandleInput
void HandleInput(){

    joypadPrevious = joypadCurrent;
    joypadCurrent = joypad();

    // Fall faster when down is held
    if (joypadCurrent & J_DOWN){
        fallTimer += 5;
    }

    // Was the left button A pressed
    if ((joypadCurrent & J_A) && !(joypadPrevious & J_A))
    {
        // check if our next rotation can be placed here
        if(CanPieceBePlacedHere(currentTetromino,(currentTetrominoRotation+1)%4,currentX,currentY)){

            currentTetrominoRotation=(currentTetrominoRotation+1)%4;
        }else if(CanPieceBePlacedHere(currentTetromino,(currentTetrominoRotation+1)%4,currentX+1,currentY)){

            currentTetrominoRotation=(currentTetrominoRotation+1)%4;
            currentX++;
        }else if(CanPieceBePlacedHere(currentTetromino,(currentTetrominoRotation+1)%4,currentX-1,currentY)){

            currentTetrominoRotation=(currentTetrominoRotation+1)%4;
            currentX--;
        }
    }

    // Was the left button JUST pressed
    if ((joypadCurrent & J_LEFT) && !(joypadPrevious & J_LEFT))
    {
        // check if our tetromino can be placed one position to the left
        if(CanPieceBePlacedHere(currentTetromino,currentTetrominoRotation,currentX-1,currentY)){
            currentX--;
        }
    }

    // Was the right button JUST pressed
    if ((joypadCurrent & J_RIGHT) && !(joypadPrevious & J_RIGHT))
    {
        // check if our tetromino can be placed one position to the right
         if(CanPieceBePlacedHere(currentTetromino,currentTetrominoRotation,currentX+1,currentY)){
            currentX++;
        }
    }
}
Gameplay Start
When gameplay starts, first we need to clear our window. It is used to save the state of blinking rows. We’ll fill the window with our blank tile. Secondly, we’ll fill the game board with blank tiles. This is all the area in which tetrominos can be placed and move around. Finally we’ll reset all of our sprites ( so none linger from previous play throughs), determine the next tetromino and it’s rotation, spawn a new tetromino, and update our GUI.
Whenever gameplay ends, this function will be called before the game loop begins. It’s important to make sure there are no remnants of the game’s previous state.
void SetupGameplay(){

    // Fill our full window layers with blank
    VBK_REG=1; fill_win_rect(0,0,31,31,blankTilePalette);
    VBK_REG=0; fill_win_rect(0,0,31,31,blankTile);

    // Fill our board with blank tiles
    VBK_REG=1; fill_bkg_rect(2,0,10,18,blankTilePalette);
    VBK_REG=0; fill_bkg_rect(2,0,10,18,blankTile);

    ResetAllSprites();

    // Decide the next tetromino
    nextCurrentTetromino = RandomNumber(0, 7) % 7;
    nextCurrentTetrominoRotation=RandomNumber(0, 4) % 4;

    PickNewTetromino();

    fallTimer = 0;
    lines=0;
    level=1;
    score=0;

    UpdateGui();
}
The Game Loop
Every game has a game loop. In this how to make tetris tutorial, here is the game loop we’ll use:
- If there is no active tetromino: Try to spawn a new tetromino. If we cannot, then that’s game over. We’ll then reset gameplay by going to label called GameplayStart
- Animate our background (more on this later)
- Increase our fall timer. When our fall timer reaches 30, move the current piece down one. If it cannot be moved down further:
- Increase Score
- Add the active piece to the background
- blink the rows that are full
- Shift all tiles above the full rows down.
- We no longer have an active tetromino
- If we still have an active tetromino:
- Handle player input
- Draw our active tetromino’s metasprite.
void main(void)
{
    ...
    GameplayStart:

    SetupGameplay();

    // Loop
    while (1)
    {
        // If we don't have a current tetromino
        if(currentTetromino==255){

            uint8_t canSpawnNewShape = PickNewTetromino();

            // Try to pick a new shape
            // If we can't go to game start
            if(!canSpawnNewShape){
                goto GameplayStart;
            }else{

                UpdateGui();
            }
        }


       AnimateBackground();

        fallTimer++;

        // If our timer is up
        if (fallTimer >= 30)
        {
            // If the piece cannot move down
            if(!CanPieceBePlacedHere(currentTetromino,currentTetrominoRotation,currentX,currentY+1)){


                // Increase the score
                IncreaseScore(5);

                // Transition the tiles from the tetromino sprite to thebackground
                SetCurrentPieceInBackground();

                // BLink any/all rows that are full
                BlinkFullRows();

                // Shift all tiles down from removed rows
                ShiftAllTilesDown();

                // Hide the current tetromino
                hide_metasprite(Tetrominos_metasprites[currentTetromino*4+currentTetrominoRotation],0);

                currentTetromino=255;

            // Otherwise, if the piece can be moved down
            }else{

                // Move the piece down
                // Reset our timer
                currentY++;
                fallTimer = 0;
            }

        }

        if(currentTetromino!=255){

            // Handle user input
            HandleInput();

            // Show the current tetromino at the proper position
            move_metasprite(Tetrominos_metasprites[currentTetromino*4+currentTetrominoRotation],tileOffsets[currentTetromino],0,currentX*8,currentY*8);

        }

        // Wait for a vertical blank to finish
        wait_vbl_done();

    }


}
Clearing Rows
For clearing full rows, we have two functions. The first is the “BlinkFullRows” function. This is mostly aesthetic, but it’s great for the gameplay feedback loop. The second function is called “ShiftAllTilesDown“. What this function does should be self explanatory.
Blinking full rows
To assist with blinking the full rows, we’ll save the state of a row on the window layer. This layer is not used in the game, but it’s memory is still available for use.
We need to do this because we have no variables representing the current state of all the static tetrominos. Thus once we blink the tiles away, without the assistance of the window layer, we would have no way of determining which tiles were there.
Here’s a GIF of that mechanism. The metasprite’s tiles are copied to the background when placed. When blinking the full row, we pass the row from the background to the (hidden) window layer, and back.
Here is the “BlinkFullRows” function before a quick explanation:
void BlinkFullRows(){

    isBlinking=FALSE;

    // Move all sprites off screen for the blinking
    // So the last placed tile doesn't cover some o it up
    for (uint8_t i = 0; i < 16; i++){
        move_sprite(i,160,160);
    }

    int8_t j=0;

    for ( j = 17; j >=0; j--)
    {
        // The 'IsRowFull' unction checks the background tiles, which may be set to empty for the flashing
        // Check of our index is in the 'clearRows' variable.
        if (IsRowFull(j)){

            isBlinking=TRUE;

            lines++;
            IncreaseScore(100);

            // Copy from the background to the window
            // The window will be our "buffer"
            VBK_REG=1;get_bkg_tiles(2,j,10,1,reusableRow10); set_win_tiles(2,j,10,1,reusableRow10);
            VBK_REG=0; get_bkg_tiles(2,j,10,1,reusableRow10); set_win_tiles(2,j,10,1,reusableRow10);
        }
    }

    if(isBlinking){

        // Flash 8 times
        // This should be an even number to make sure things get set right back how they were
        for(uint8_t k=0;k<8;k++){

            // From the bottom to the top
            for ( j = 17; j >=0; j--)
            {
                // We need to check both the window and background
                // Since the background will be blank every other iteration of the k for-loop
                if (IsRowFullBoth(j,TRUE)){

                    if(k%2==0){

                        // Fill with blank
                        VBK_REG=1;fill_bkg_rect(2,j,10,1,blankTilePalette);
                        VBK_REG=0;fill_bkg_rect(2,j,10,1,blankTile);
                    }else{

                        // Copy from the window to the background
                        VBK_REG=1;get_win_tiles(2,j,10,1,reusableRow10); set_bkg_tiles(2,j,10,1,reusableRow10);
                        VBK_REG=0;get_win_tiles(2,j,10,1,reusableRow10); set_bkg_tiles(2,j,10,1,reusableRow10);
                    }
                }
            }


            for(uint8_t n=0;n<20;n++){
                AnimateBackground();
                wait_vbl_done();
            }
        }


        // Fill our full window layers with blank
        VBK_REG=1; fill_win_rect(0,0,31,31,blankTilePalette);
        VBK_REG=0; fill_win_rect(0,0,31,31,blankTile);
    }
}
First, we need to move all sprites off screen. This prevents the active tetromino from covering up the blinking rows.
Next, we’ll iterate through each row, starting from the bottom. For each row, if it is full, we’ll increase score, and copy that row from the window to the background.
After that, if any rows were full, we’ll flash these rows 8 times. After each flash we’ll wait for about 20 frames before the next flash.
For flashing a row, we check if the background is showing the tiles. If it is, to hide that row, we fill it with blank tiles. If the background is not showing the tiles, those tiles will have been copied to the window layer. To re-show that row, copy the tiles from the window layer to the background. For checking if a row is full, i’ve created a function called “IsRowFull“. This function takes two parameters:
- j – Which row?
- both – Should both the window layer and background layer be checked?
uint8_t IsRowFull(uint8_t j,uint8_t both){

    // Return 0 if any items in the row are zero
    for (uint8_t i = 0; i < 10; i++){

        // Should we check the window AND the background
        if(both){
            if (get_bkg_tile_xy(2+i,j) == blankTile&&get_win_tile_xy(2+i,j) == blankTile)return 0;

        //Normally, just heck the background
        }else if (get_bkg_tile_xy(2+i,j) == blankTile)return 0;
    }

    // None of the items were zero
    return 1;
}
Shift All Tiles Down
This function, simply put, iterates from the bottom row to the top row. For each row, if that row is full, it will shift all rows above it downward.
void ShiftAllTilesDown(){
    for (uint8_t j = 17; j != 255; j--)
    {
        // While this row is full
        while (IsRowFull(j,FALSE)){

            // Shift all above rows down
            ShiftAllTilesAboveThisRowDown(j);
        }
    }
}
The function called “ShiftAllTilesAboveThisRowDown” clears the top row, and iterates from the given row upwards. Copying each row down one spot in the process.
void ShiftAllTilesAboveThisRowDown(uint8_t j)
{
    // set the top row to be mpty
    VBK_REG=1; fill_bkg_rect(2,j,10,1,blankTilePalette);
    VBK_REG=0; fill_bkg_rect(2,j,10,1,blankTile);

    // From the given row up
    for (uint8_t j2 = j-1; j2 !=255; j2--){

        // Move all rows downward
        VBK_REG=1; get_bkg_tiles(2, j2,10,1,&reusableRow10[0]); set_bkg_tiles(2, j2+1, 10, 1, &reusableRow10[0]);
        VBK_REG=0; get_bkg_tiles(2, j2,10,1,&reusableRow10[0]); set_bkg_tiles(2, j2+1, 10, 1, &reusableRow10[0]);
    }
}
All that’s left now is to explain the user interface.
The User Interface
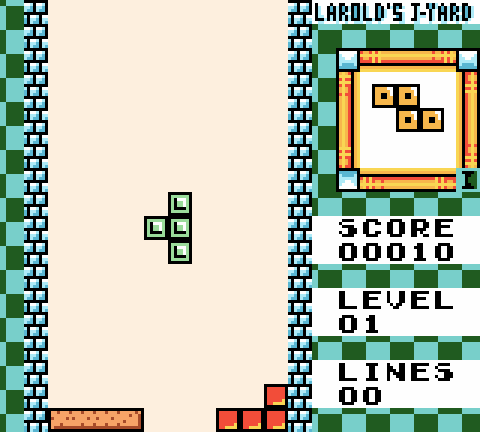
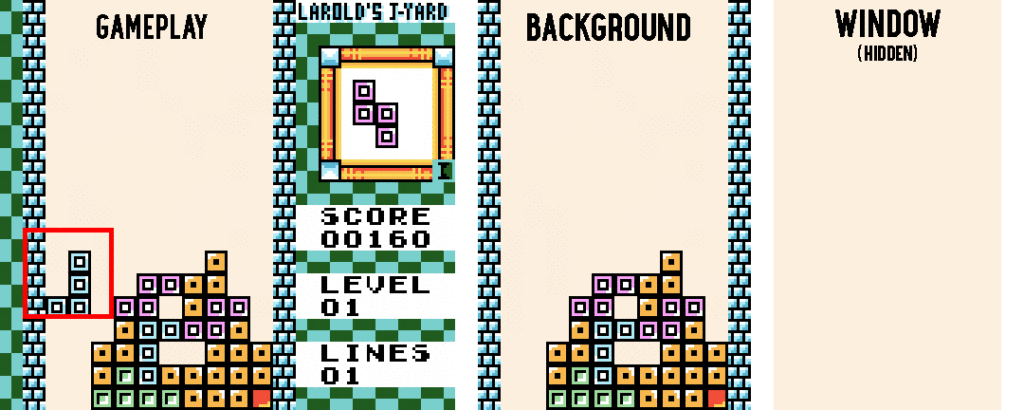
I really like how the user interface turned out in this one. In this section, we’ll cover how it comes together.
Our user interface starts with one palette-based PNG file called UserInterface.png. Like we did with our tetrominos, we’ll convert this to a GBDK-2020 supported format using png2asset.
Once in a GBDK-2020 format, we can add it’s tiles to the Gameboy’s VRAM when the game starts. We’ll position these tiles after the tiles for the tetrominos.
void SetupVRAM(){

    ... Adding tetromino tiles to VRAM

    set_bkg_data(USERINTERFACE_TILE_START, UserInterface_TILE_COUNT, UserInterface_tiles);

    ...
}
The Green/Beige Tiles
It’s important to note the solid green tiles and the solid beige tiles in that User Interface graphic.
Green tiles will be substituted for our animated background tiles. Our logic that does that substitution specifically checks against the first tile at the top/left of the image.
Beige tiles will be considered “blank” tiles during gameplay. The active tetromino can be placed here. When we want to make a row blank, we will set tiles in that row to use that “blank” tile.
If any of the green or beige tiles are changed, notable visual/gameplay bugs will occur.
Drawing our User Interface
For actually drawing our user we’ll use GBDK’s set_bkg_tiles function. That function is covered in more depth here. The key thing to note: We need to save the tiles and palette at column=0, row=0 and at column=3, row=3. The tile at 0,0 will be replaced throughout our background. We’ll replace it with a tile we can animate later. The tile at 3,3 will be used to determine if a row is blank.
void SetupUserInterface(){

     // Reset our whole screen
    // Reset the 4 helper rows we use for blinking
    VBK_REG=1; set_bkg_tiles(0,0,20,18,UserInterface_map_attributes);
    VBK_REG=0; set_bkg_based_tiles(0,0,20,18,UserInterface_map,USERINTERFACE_TILE_START);

    VBK_REG=1; tileAnimationBasePalette = get_bkg_tile_xy(0,0);
    VBK_REG=0; tileAnimationBase = get_bkg_tile_xy(0,0);

    // SAve which tile is considred blank
    // For easy comparison
    VBK_REG=1; blankTilePalette=get_bkg_tile_xy(3,3);
    VBK_REG=0; blankTile=get_bkg_tile_xy(3,3);

    // Fill in everything else outside of the scren with our blank tiles
    VBK_REG=1;fill_bkg_rect(0,18,31,14,tileAnimationBasePalette);fill_bkg_rect(20,0,12,31,tileAnimationBasePalette);
    VBK_REG=0;fill_bkg_rect(0,18,31,14,tileAnimationBase); fill_bkg_rect(20,0,12,31,tileAnimationBase);

    SetupAnimatedBackground();
}
When setting up our animated background, we’re going to create a checker-pattern. This pattern will be generated wherever we find the “green” tile. Which was from column=0, row=0 of our original user interface graphic.
Our checkerboard-pattern is going to alternate between two constants:
- TILEANIMATION_TILE1_VRAM
- TILEANIMATION_TILE2_VRAM
These are actually macros that expand to the following:
#define TILEANIMATION_TILE1_VRAM USERINTERFACE_TILE_START+UserInterface_TILE_COUNT
#define TILEANIMATION_TILE2_VRAM USERINTERFACE_TILE_START+UserInterface_TILE_COUNT+1
Here is how we create our checkerboard pattern in the SetupAnimatedBackground function.
void SetupAnimatedBackground(){

    // For the entire background layer
    for(uint16_t i=0;i<32;i++){
        for(uint16_t j=0;j<32;j++){

            // We are going to manually place our animating tile
            // Our graphic has a basic green tile everywhere that we should have our animating tile
            // If this tile is that basic green tile
            if(get_bkg_tile_xy(i,j)==tileAnimationBase){

                // If our row is even
                if(j%2==0){

                    // Alternate starting with tile 1 if it's even
                    // If it's odd, Alternate starting with tile 2
                    if(i%2==0)set_bkg_tile_xy(i,j,TILEANIMATION_TILE1_VRAM);
                    else set_bkg_tile_xy(i,j,TILEANIMATION_TILE2_VRAM);
                }else{
                    // Alternate starting with tile 2 if it's even
                    // If it's odd, Alternate starting with tile 1
                     if(i%2==0)set_bkg_tile_xy(i,j,TILEANIMATION_TILE2_VRAM);
                    else set_bkg_tile_xy(i,j,TILEANIMATION_TILE1_VRAM);
                }
            }
        }
    }
}
Now the “SetupAnimatedBackground” function is done. Those tiles on the background layer will forever point to one of those two constants in VRAM.
Animating our Background
For our animated background, we have a 16 tiles. This is split into 2 rows of 8 tiles.

The key to animating tiles is to change what’s in VRAM, not the actual background tilemap. By changing the what’s in VRAM, all tiles that reference the changed tiles will also automatically change.
We’ll set the first tile of the first row at TILEANIMATION_TILE1_VRAM, and the first tile at the second row at TILEANIMATION_TILE2_VRAM.
NOTE: Each tile takes 16 bytes. 128 = 16 bytes * 8 tiles.
void SetupVRAM(){

    ... Set tetrominos in VRAM then user interface

    set_bkg_data(TILEANIMATION_TILE1_VRAM, 1, TileAnimation_tiles);
    set_bkg_data(TILEANIMATION_TILE2_VRAM, 1, TileAnimation_tiles+128);

    .. Set numbers and color palettes in VRAM
}
Finally, in our AnimateBackground function, we’ll use a basic counter called tileAnimationCounter to change the tiles at the given constants.
void AnimateBackground(){
    tileAnimationCounter+=6;
    if(tileAnimationCounter>=128)tileAnimationCounter=0;
    set_bkg_data(TILEANIMATION_TILE1_VRAM, 1, TileAnimation_tiles+(tileAnimationCounter>>4)*16);
    set_bkg_data(TILEANIMATION_TILE2_VRAM, 1, TileAnimation_tiles+128+(tileAnimationCounter>>4)*16);
}
Now we have an animating background!
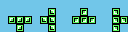
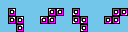
Updating the Preview, Score, Level, and Lives
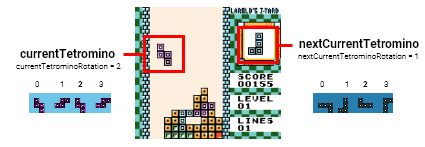
Our GUI elements will be updated in a function named “UpdateGUI“. Also in this function, we’ll update the preview for the next tetromino.
The next tetromino will be drawn at x=124, y=36. This next tetromino will always start using sprite 16.
void UpdateGui(){

    DrawNumber(14,10,score,5);
    DrawNumber(14,13,level,2);
    DrawNumber(14,16,lines,2);

    move_metasprite(Tetrominos_metasprites[nextCurrentTetromino*4+nextCurrentTetrominoRotation],tileOffsets[nextCurrentTetromino],16,124,36);
}
Drawing numbers
For drawing numbers, we’ll use a method similar to the Space Invaders Tutorial. We’ll be drawing numbers drawn in the following graphic.

Like with the UserInterface, The Animated Background Tiles, and the Tetrominos; we’ll utilize png2asset to convert that PNG file to GBDK-compatibile .c and .h files.
void DrawNumber(uint8_t x,uint8_t y, uint16_t number,uint8_t digits){

    unsigned char buffer[]="00000000";

    // Convert the number to a decimal string (stored in the buffer char array)
    uitoa(number, buffer, 10);

    // Get the length of the number so we can add leading zeroes
    uint8_t len =strlen(buffer);

    // Add some leading zeroes
    // uitoa will not do this for us
    // Increase the VRAM address each iteration to move to the next tile
    for(uint8_t i=0;i<digits-len;i++){
        VBK_REG=1; set_bkg_tile_xy(x,y,4);
        VBK_REG=0;set_bkg_tile_xy(x++,y,NUMBERS_TILES_START);
    }

    // Draw our number
    // Increase the VRAM address each iteration to move to the next tile
    for(uint8_t i=0;i<len;i++){

        VBK_REG=1;set_bkg_tile_xy(x,y,4);
        VBK_REG=0;set_bkg_tile_xy(x++,y,(buffer[i]-'0')+NUMBERS_TILES_START);
    }
}
Playing Music
The final part of our how to make Tetris tutorial is audio. For Audio, were going to simply play some background music. The song (“Free OST 1 – Character Select.mod“) is from this public GitHub repo: https://github.com/DeerTears/GB-Studio-Community-Assets.
You can listen to the mod online here: https://med.planet-d.net/demo/web/modplayer/
Converting our sound file to GBDK format
To play this sound in our game we’ll use hUGETracker. hUGETracker is not included with GBDK 2020. The Source & binaries can be found here.
To convert our .mod file to GBDK format, we first need to download the latest binaries and run the hUGETracker.exe file. With this program, we’ll utilize the “Import GBT Player…” File option, to import our .mod file. Next we’ll then use the “Export GBDK .c” option. This will convert our .mod file to a .c file named tetris_music.c
NOTE: The song descriptor needs to also be set as “tetris_music”.
Including hUGEDriver with our project
Now we have our tetris_music.c file. We need to include hUGEDriver when we compile our project. The GitHub repo will already have this setup for you. For instructional purposes here is the process.
NOTE: It may be confusing, but there is a difference between hUGETracker, hUGEBuild, and hUGEDriver. hUGETracker is a program for creating the music. hUGEDriver plays music created in the hUGETracker program. hUGEBuild is UnToxa‘s repository contain the source code for hUGETracker.
Building hUGEDriver
We utilize a program called rgbasm.exe to convert the hUGEDriver assembly source file (found in the binaries here) to a .obj file. Now we’ll use another program called rgb2sdas.exe. That program will to convert our .obj file to a .o file.
:: Assemble the hUGEDriver source into an RGBDS object file
"lib/rgbasm.exe" -obin/hUGEDriver.obj -i.. source/asm/hUGEDriver.asm

:: Convert the RGBDS object file into a GBDK .o file
"lib/rgb2sdas.exe" bin/hUGEDriver.obj
That file, “hUGEDriver.obj.o”, will be included in our make.bat for compilation
NOTE: When compiling our .gb file and the tetris_music file, we need to make sure lcc.exe is passed hUGEDriver’s “include” folder.
Playing our Music
Once we’ve done all of that, we only need a couple of lines to play the music. We’ll do that before our gameplay start.
... Other includes

#include "hUGEDriver.h"

extern const hUGESong_t tetris_music;

... HandleInput, SetupVRAM, and SetupGameplay

void main(void)
{

    ... Setting up VRAM and the user interface

    // Enable sound by setting these registers
    NR52_REG = 0x80;
    NR51_REG = 0xFF;
    NR50_REG = 0x77;

    // Init hUGEDriver and add a interrupt to play the sound
    __critical {
        hUGE_init(&tetris_music);
        add_VBL(hUGE_dosound);
    }

    ... Gameplay Start

}
Conclusion
I hope you found this how to make tetris tutorial informative. If you did, please share on Social Media. If you run into any problem, or have any constructive criticism, please feel free to leave some feedback. Constructive criticism helps The Junkyard grow.
The code for this tutorial can be found here on Github. All resources are included.
Be sure to check out some of our other tutorials: