RPG Style movement in games let the player move in 4 directions. Some Gameboy games like Pokemon Red & Blue confine you to a grid. Alternatively, games like The Legend of Zelda: Links Awakening give you near complete freedom to move . In this tutorial you’re going to learn how to make a character move around and face in 4 different directions.
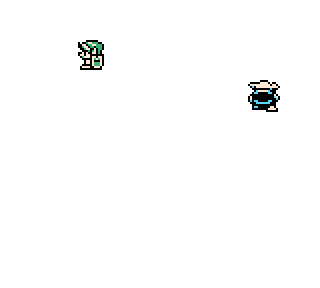
In our final product, you’ll be able to move link around in different directions. Additionally, you’ll have a Moblin randomly moving around also. This tutorial expands on my How to make a gameboy game tutorial series. Additionally, you can find videos on my youtube channel:
You can find the finish source code on github.
Getting started
To get things started, we’re going separate this tutorial on RPG Style Movement into 3 primary files.
- main.c – A basic game loop that updates link and the moblin.
- link.c – Setup & Update logic for link
- moblin.c – Setup & Update logic for the moblin
The Graphical assets used are from the spriters resource, and can be found on the github repo:
- LinkDown
- LinkUp
- LinkRight
- Moblin
- Palette
In a later section, we’ll explain why link’s sprites are split into 3 different files, and why the Moblin’s sprites are not. The palette asset will also be explained. These assets were converted into GBDK .c and .h format using the GBDK tool called png2asset.
Color Palettes Explained
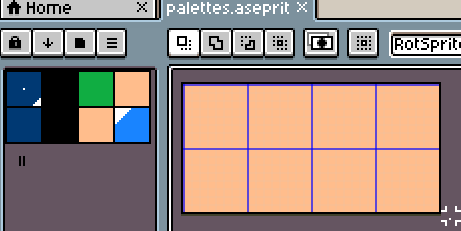
Before we go on, I’ll explain the color palette strategy. A single Gameboy color palette contains 4 colors. In this tutorial, we’ll have two different color palettes. One for link, and one for the Moblin. These palettes are defined and exported from a PNG file called palettes. Here’s a screenshot of the palettes asset in Aseprite.
We’ll export this PNG using a GBDK tool called png2asset. After we do that, we’ll later be able to set those color palettes into VRAM in a single line:
// Set our color palettes into vram
set_sprite_palette(0,palettes_PALETTE_COUNT,palettes_palettes);
Link uses the first palette. His graphic, which is also exported to .c and .h format using png2asset, only needs the first palette.
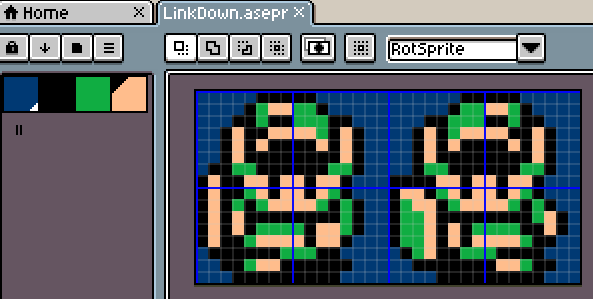
NOTE: Link has 3 different graphics. One for right, one for downward, and one for upward.
Our moblin’s will use the second color palette. Here’s where things get slightly confusing. When png2asset converts our PNG to .c and .h files, it encodes in each metasprite the palette used. We want the moblin to use color palette #2. The 4 red squares are used in the Moblin.png image to avoid png2asset assigning the moblin with color palette #1 instead (links palette).

Creating our entry point & game loop
The game’s entry point lies is a function called “main” that lies in a file also named main. In this function , before our game loop, we need to:
- Enable sprites
- set our color palettes – so everything shows in the correct color
- Setup Link & The Moblin – Their RPG Style movement logic is isolated into 2 different functions, we’ll cover later in their respective sections.
If you need help with sprites, check out my video or written tutorial on sprites.
This what that we’ll start with:
uint8_t joypadCurrent=0;

void main(void)
{
    // Turn on sprites
    // Enable the 8x16 (tall) sprites mode
    SHOW_SPRITES;
    SPRITES_8x16;
    DISPLAY_ON;

   // Set our color palettes into vram
   set_sprite_palette(0,palettes_PALETTE_COUNT,palettes_palettes);

    // Setup link & the moblin
   SetupLink();
   SetupMoblin();

    // Loop forever
    while(1) {

		// Done processing, yield CPU and wait for start of next frame
        wait_vbl_done();
    }
}
Our Game Loop
Like with my other gameboy tutorials, our game loop will be run indefinitely. The more easy to understand part of our game loop is this: We’ll need to capture joypad input so we can move link, we’ll also need to update link and the moblin.
Handling Two Frame Walking Animations
Link and the moblin both have 2 frames per direction. When walking, we’ll alternate between these 2 frames. We’re going to use a single shared variable to handle this. That variable will be explained later, but in our game loop we need to make sure we consistently update that variable. For that, in our game loop, we’ll call a function named “UpdateTwoFrameCounter”.
UpdateTwoFrameCounter();This function will be declared in a common.c class file. It uses scaled integers to smoothly update our “twoFrameCounter” variable. The true (non-scaled) version will be kept in a sibling variable called “twoFrameRealValue”. Link and The moblin will use that variable. Link and the moblin sharing this variable is an optimization and it also makes handling multiple objects much easier.
// This is an easy way to determine a direction for a object with two frames per direction
const Vector8 directionsForTwoFrameObjects[7]={
    {0,1}, // Down
    {0,0},
    {0,-1}, // Up,
    {0,0},
    {1,0},// Right
    {0,0},
    {-1,0},// Left
};

uint8_t joypadCurrent=0;
uint8_t twoFrameCounter= 0;
uint8_t twoFrameRealValue=0;


/**
 * @brief Our moblin and link has two frame walk animation. They'll share a common variable that determines which frame to show
 * when they are walking.
 */
void UpdateTwoFrameCounter(){
    twoFrameCounter+=3;
    twoFrameRealValue = twoFrameCounter>>4;

    // Stop & reset if the vlaue is over 2
    if(twoFrameRealValue>=2){
        twoFrameRealValue=0;
        twoFrameCounter=0;
    }
}
Our common.c class file will also have an array of signed 2d vectors, called “directionsForTwoFrameObjects”. Our moblin will use this later on to easily achieve the RPG Style Movement.
Drawing Metasprites & Updating our characters
For drawing link and the moblin, we won’t directly manage sprites. Instead we’ll use the GBDK move_metasprites* functions. Among other parameters, These functions take in a “base sprite” index and will return how many gameboy OAM sprites were used. We can chain these calls. We’ll establish counter, called lastSprite (starting at 0), and we’ll increase this counter everytime we invoke a “move_metasprites*” function. The following code isn’t in the tutorial, but is an example of the “chaining”:
uint8_t lastSprite=0;

// The third parameter is the "base sprite" index
// The sprites used will start from that index
lastSprite += move_metasprite(myMetasprite1,0,lastSprite,myX1,myY1);
lastSprite += move_metasprite(myMetasprite2,0,lastSprite,myX2,myY2);
lastSprite += move_metasprite(myMetasprite3,0,lastSprite,myX3,myY3);
lastSprite += move_metasprite(myMetasprite4,0,lastSprite,myX4,myY4);
At the of our UpdateLink and UpdateMoblin functions, we’ll return the result of calling a “move_metasprites*” function. Our game loop will chain those results:
uint8_t lastSprite=0;

lastSprite += UpdateLink();
lastSprite += UpdateMoblin(lastSprite);
After we do that, we need to hide any remainder OAM sprites. This is not neccessary in the scope of this tutorial, but it would be necessary in a real game. If the number of total OAM sprites used changes, by default, any extra remainder OAM sprites will remain visible as they last were. Even if they aren’t used. We’ll use the “hide_sprites_range” function to make sure no leftover sprites linger on.
uint8_t lastSprite=0;

lastSprite += UpdateLink();
lastSprite += UpdateMoblin(lastSprite);

// Hide any extra sprites
// This might not be as useful in this demo
// But this will be helpful for actual games
// Without this, extra "leftover" sprites may weidly linger around.
hide_sprites_range(lastSprite,40);
This is the final main.c file.
#include <gb/gb.h>
#include <gb/cgb.h>
#include <gb/metasprites.h>
#include <stdint.h>
#include "graphics/palettes.h"
#include "moblin.h"
#include "link.h"

void main(void)
{
    // Turn on sprites
    // Enable the 8x16 (tall) sprites mode
    SHOW_SPRITES;
    SPRITES_8x16;
    DISPLAY_ON;

   // Set our color palettes into vram
   set_sprite_palette(0,palettes_PALETTE_COUNT,palettes_palettes);

    // Setup link & the moblin
   SetupLink();
   SetupMoblin();

    // Loop forever
    while(1) {

        // Save the current state of the joypad
        // it's important NOT to call the joypad function more than once
        joypadCurrent=joypad();

        UpdateTwoFrameCounter();

        uint8_t lastSprite=0;

        lastSprite += UpdateLink();
        lastSprite += UpdateMoblin(lastSprite);

        // Hide any extra sprites
        // This might not be as useful in this demo
        // But this will be helpful for actual games
        // Without this, extra "leftover" sprites may weidly linger around.
        hide_sprites_range(lastSprite,40);

		    // Done processing, yield CPU and wait for start of next frame
        wait_vbl_done();
    }
}
In later sections we’ll cover the Setup & Update logic for Link and the Moblin.
Multi-state object tile management
There are two primary scenarios that need to be discussed when handling objects with multiple states.
- Scenario 1: When there may be multiple (independent) instances of a given object type.
- Scenario 2: When there will ever only be one of a given object type
Our tutorial will explain both scenarios. Link will use scenario 2, because generally speaking, there will never be multiple “links” on screen. On the contrary, again generally speaking, there may be multiple different Moblins on the screen. Thus our Moblin in this tutorial will showcase scenario 1.
The difference may seem trivial, but it allows us to make an optimization in Scenario 2. This optimization can be extremely important depending on the number of tiles used by an object.
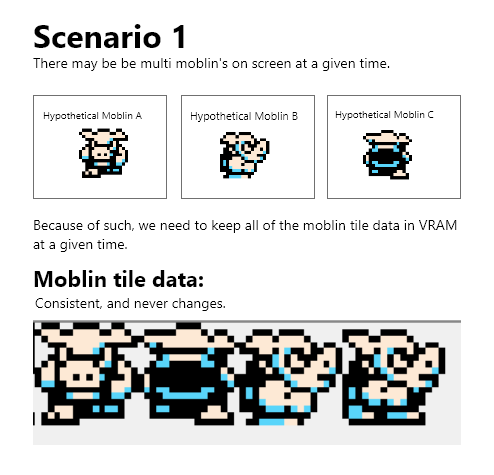
Scenario 1 – (potentially) multiple instances of an object type.
If there are potentially multiple instances of a given object type, then we need to store all of the tile data for that object in VRAM.
The possibility does exist to only store the used tile data across all the active instances. That would be a nightmare to implement, and overly complicate your code.
The Moblin has 16 tiles. We’ll always need all 16 tiles in VRAM. This because, it’s possible that one Moblin may be facing one direction, and that another Moblin may be facing an entirely different direction.
Scenario 2 – Only one instance of an object type.
The next scenario occurs if there is only one instance of a given object type.
Because there is only one instance, you only need to keep in VRAM the relevant tiles. That means, if link is facing downwards, you only need to keep in VRAM the tiles for Link’s downward facing sprites. The tile data for Link’s leftward, rightward, and upward sprites do not need to be kept in VRAM.
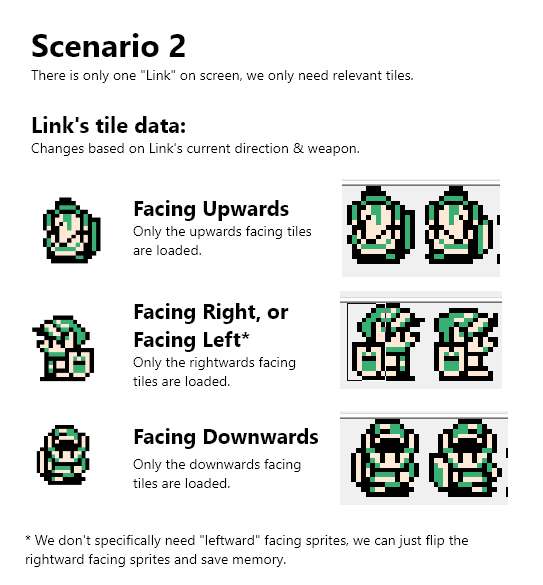
When that singleton object changes, we’ll also change which tiles are loaded in VRAM for it. That means, if link changes directions and is now facing rightwards, we’ll load in the tile data for Link’s rightward facing sprites. This tile data will replace link’s previous tile data. Meaning, now, the tile data for Link’s leftward, downward, and upward facing sprites will not be in VRAM.
If each of link’s directions has from 8-12 different tiles, keeping all of his tiles for RPG style movement in VRAM could take up 24-36 tiles in VRAM. Instead, by only keeping the relevant tile data in VRAM link never takes up more than 12 tiles in VRAM.
One last thing to note: With this method, when placing in VRAM the tile data for other objects AFTER link, you should pad for the different sizes of tile data. As an example, take into consideration all of link’s different (weapons & directions). Some states might have 8 tiles, some might have 12, etc. In this case, we should always assume link’s relevant tile data consumes 12 tiles. This is to avoid both:
- having to re-calculate the tile data for everything after Link, when changing directions
- link’s tile data overriding another object when link changes to a state that uses more tiles
Link
Link is the main character and protagonist of the The Legend of Zelda series.[104][105][106][107][108][109] He has appeared across many incarnations throughout the series, usually depicted as an ordinary boy or young man who becomes a legendary hero by saving the world through feats of courage.
https://zelda.fandom.com/wiki/Link#Link’s_Awakening
Setting up Link for RPG Style Movement
Link’s setup function is pretty simple & straight forward. All we will do is:
- Put his default Tile Data in VRAM.
- Set his default position using Scaled Integers.
- Set his default direction
- Set his default metasprite
All of that turns into the following code snippet:
uint8_t linkDirection = 0;
uint16_t linkX, linkY;

uint8_t flipLink = FALSE;

// Keep track of which metasprite to use for link
metasprite_t const *linkMetasprite;

void SetupLink()
{
    // set the down tiles in
    set_sprite_data(0, LinkDown_TILE_COUNT, LinkDown_tiles);

    // Position near the top middle
    // Scale the position, since we are using scaled integers
    linkX = 80 << 4;
    linkY = 40 << 4;

    // Start by facing down
    linkDirection = J_DOWN;

    // Start with the down metasprite
    linkMetasprite = LinkDown_metasprites[0];
}
Updating Link
For link’s update function, we’ll start by checking the d-pad to see if the user pressed any of the directional buttons. In such case, like in zelda or any game with RPG style movement, we’ll move link and update his direction. We’ll keep track of link’s direction before those tests so we can know if his direction changes.
uint8_t UpdateLink()
{

    // Save our last direction
    // So we can keep track of directional changes
    uint8_t linkLastDirection = linkDirection;
    uint8_t linkMoving = FALSE;
    linkDirection = linkDirection;

    // check if the right joypad button is pressed
    if (joypadCurrent & J_RIGHT)
    {
        linkX += LINK_SPEED;
        linkDirection = J_RIGHT;
        linkMoving = TRUE;
    }

    // check if the left joypad button is pressed
    if (joypadCurrent & J_LEFT)
    {
        linkX -= LINK_SPEED;
        linkDirection = J_LEFT;
        linkMoving = TRUE;
    }

    // check if the down joypad button is pressed
    if (joypadCurrent & J_DOWN)
    {
        linkY += LINK_SPEED;
        linkDirection = J_DOWN;
        linkMoving = TRUE;
    }

    // check if the up joypad button is pressed
    if (joypadCurrent & J_UP)
    {
        linkY -= LINK_SPEED;
        linkDirection = J_UP;
        linkMoving = TRUE;
    }

    ...
}
We also created a variable to detect if link is moving. That variable is set to true when one of the d-pad buttons are held down. If you need help with joypad input, check out my youtube video about it:
Next, if link is moving we need to do two things
- If link has changed directions we need to change which tile data for link is in VRAM
- Set the metasprite to use for link this frame
Both of these things will be dependent on which direction link is facing.
NOTE: We do not have left-facing sprites for link, we’ll simply flip link’s right-facing sprites when link is facing to the left
uint8_t UpdateLink()
{

    ...

    // If link is moving
    if (linkMoving)
    {

        // If we changed direction
        if (linkDirection != linkLastDirection)
        {

            // Set the sprite data for the new side we are facing
            // We do not have 'left' tiles, we'll use the 'right' tiles and flip them
            switch (linkDirection)
            {
            case J_DOWN:
                set_sprite_data(0, LinkDown_TILE_COUNT, LinkDown_tiles);
                break;
            case J_RIGHT:
                set_sprite_data(0, LinkRight_TILE_COUNT, LinkRight_tiles);
                break;
            case J_LEFT:
                set_sprite_data(0, LinkRight_TILE_COUNT, LinkRight_tiles);
                break;
            case J_UP:
                set_sprite_data(0, LinkUp_TILE_COUNT, LinkUp_tiles);
                break;
            }
        }

        // Change the metasprite link uses
        // We don't have 'left' metasprites. So we'll use the right metasprites and flip
        switch (linkDirection)
        {
        case J_DOWN:
            linkMetasprite = LinkDown_metasprites[twoFrameRealValue];
            flipLink = FALSE;
            break;
        case J_RIGHT:
            linkMetasprite = LinkRight_metasprites[twoFrameRealValue];
            flipLink = FALSE;
            break;
        case J_LEFT:
            linkMetasprite = LinkRight_metasprites[twoFrameRealValue];
            flipLink = TRUE;
            break;
        case J_UP:
            linkMetasprite = LinkUp_metasprites[twoFrameRealValue];
            flipLink = FALSE;
            break;
        }
    }

    ...
}
The final part of link’s update logic is to actually draw link using metasprites.
If link is facing left, we’ll use the move_metasprite_vflip function. This might not be intuitive at first, but this function is similar to the “move_metasprite” function. However, it flips the metasprite along the vertical axis.
If link is facing right, up, or down we’ll use the normal move_metasprite function.
Link’s position variables, linkX and linkY, are scaled integers. So we’ll de-scale (shifting 4 bits to the right) them before using them.
Links tile data is always first, and link will always use the first sprites available.
The result from our move_metasprite* function calls (how many gameboy OAM sprites were used) will be returned for the Moblin to use.
uint8_t UpdateLink()
{

    ...

    // flip along the vertical access if neccessary
    // Draw link at the non-scaled position
    // Return how many sprites were used
    if (flipLink)
        return move_metasprite_vflip(linkMetasprite, 0, 0, linkX >> 4, linkY >> 4);
    else
        return move_metasprite(linkMetasprite, 0, 0, linkX >> 4, linkY >> 4);
}
Moblin
Moblins are recurring Enemies in The Legend of Zelda series.[3][4] They are among the most common enemies throughout the series, having appeared in the majority of games, and are prolific in Ganon‘s army.
https://zelda.fandom.com/wiki/Moblin
Setting up the Moblin
The moblin’s setup logic is very similar to link.
- Set the moblin tile data in VRAM
- Position the moblin
- Set the moblin’s default direction.
This is our SetupMoblin function:
#define MOBLIN_SPEED 4
#define LINK_PADDED_TILE_COUNT 12
#define MOBLIN_COUNTER_RESET 255u
#define MOBLIN_COUNTER_WALK_LIMIT 128u

uint8_t moblinDirection = 0;
uint16_t moblinX, moblinY;
uint16_t moblinCounter = MOBLIN_COUNTER_RESET;

metasprite_t const *moblinMetasprite=0;

void SetupMoblin()
{
    // It's not clear in this tutorial, but:
    // We Take into consideration that some of links directions/sprites having different lengths
    // We'll "allocate" (not really in terms of memory, just in terms of organization) a set number of tiles for link
    // This way, we avoid links tiles overriding the moblins tiles
    set_sprite_data(LINK_PADDED_TILE_COUNT, Moblin_TILE_COUNT, Moblin_tiles);

    moblinX = 80 << 4;
    moblinY = 100 << 4;
    moblinDirection = 0;

    moblinMetasprite=Moblin_metasprites[0];
}
Updating the Moblin
Our moblin’s update logic is also very similar to link’s update logic. The major difference is that, instead of joypad input, we are going to be using a very basic random motion and delay.
Random RPG Style Movement
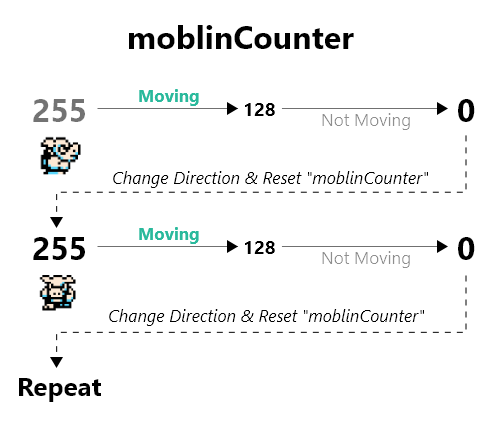
For our moblin’s random motion ,we have a 8-bit integer variable called “moblinCounter”. In our update function we’ll decrease this variable. When it reaches zero, we’ll change direction and reset it’s value to 255. For this tutorial, we’ll just use the DIV register as a very-simple pseudo random number.
uint8_t UpdateMoblin(uint8_t lastSprite)
{

    // If we are about to reach zero
    if (moblinCounter <= 1)
    {

        // Reset our counter
        moblinCounter = MOBLIN_COUNTER_RESET;

        // Pick a new direction
        // use the DIV register to get a pseduo random value
        // We'll use values that correspond with our 'twoFrameDirections' array
        // Those values also are the starting metasprites for each direction: down,up, right, left
        const uint8_t directionsOnly[] = {0, 2, 4 ,6};
        moblinDirection = directionsOnly[DIV_REG % 4];
    }
    else
    {

        // Decrease our counter
        moblinCounter --;
    }

    ...
}
When the moblin’s counter variable is above 128, We’ll move him in the direction he is facing. This is a simple way to add a move & delay without using multiple variables.
We previously (very briefly) mentioned a constant array of signed 2d vectors named “directionsForTwoFrameObjects”. This array is used to easily map our joypad button constants to signed directional vectors. We’ll reference that “directionsForTwoFrameObjects” constant when moving the moblin. There will be 7 total values.
| moblinDirection variable | Direction | X Axis | Y Axis |
| 0 | Down | 0 | 1 |
| Not Used | Not Used | – | – |
| 2 | Up | 0 | -1 |
| Not Used | Not Used | – | – |
| 4 | Right | 1 | 0 |
| Not Used | Not Used | – | – |
| 6 | Left | -1 | – |
We’ll use the moblin’s direction and the values from the table above to move the moblin according to his direction.
uint8_t UpdateMoblin(uint8_t lastSprite)
{

    ...

    // The moblin is moving when the counter is above 256
    if (moblinCounter > MOBLIN_COUNTER_WALK_LIMIT)
    {

        // Change his x and y position based on the direction he's moving in
        moblinX += directionsForTwoFrameObjects[moblinDirection].x * MOBLIN_SPEED;
        moblinY += directionsForTwoFrameObjects[moblinDirection].y * MOBLIN_SPEED;


    }

    ...
}
Drawing our Moblin
The final portion is very similar to Link’s update logic.
If the moblin is moving, we’ll pick a metasprite based on his direction and the value from our twoFrameRealValue variable (which will always be 0 or 1). Here are the metasprites for our moblin:
- If the moblin is facing downwards, we’ll use metasprite 0 or 1
- If the moblin is facing upwards, we’ll use metasprite 2 or 3
- If the moblin is facing to the right, we’ll use metasprite 4 or 5
- If the moblin is facing to the left, we’ll use metasprite 6 o r 7
Our “moblinDirection” is setup to make this easier.
- When the moblin is facing downward, we’ll set it’s value to 0.
- When the moblin is facing upward, “moblinDirection” will equal 2.
- When the moblin is facing to the right, the “moblinDirection” will equal 4.
- When the moblin is facing to the left, “moblinDirection” will equal 6.
This means, to get our desired frame, we just have to add our “twoFrameRealValue” to our “moblinDirection” variable. If the moblin is not moving, the last value used in our ‘moblinMetasprite’ variable will be used instead of picking a new metasprite.
At the end of the update logic, we’ll draw the moblin’s metasprite and return how many OAM sprites were used. You could later chain on other objects.
NOTE: When we call move_metasprite below, we don’t pass 0 in. That’s where Link’s tiles start. Also notice, we don’t specifically pass 8 (the number of unique tiles in links unarmed animations. We pass in a macro that resolves to 12. This isn’t necessary in this tutorial, but as a best practice, this considers the possibility of link using more than 8 tiles.
uint8_t UpdateMoblin(uint8_t lastSprite)
{

    ...

    // The moblin is moving when the coutner is above 256
    if (moblinCounter > MOBLIN_COUNTER_WALK_LIMIT)
    {

       ...

        // use the proper metasprites for the moblin
        // Each direction has two metasprites
        // For the left direction, we'll just flip the right metasprite
        moblinMetasprite = Moblin_metasprites[moblinDirection+twoFrameRealValue];

    }


    ...
}
That’s it for our moblin logic. This tutorial only uses one moblin, but you could adapt the logic for multiple moblins by using an array of structs.
Conclusion
That’s it for this tutorial, if you found this helpful please share on social media. You can find the finish source code on github. If you have any questions, send me an email, leave a comment, or reachout to @laroldsjubilantjunkyard on the GBDev or GBDK/ZGB discord servers. Check out my youtube channel for video tutorials.